Generating reports
Last updated: 2025-09-23
Each module of AASHTOWare Project provides access to many custom reports developed for WisDOT. Reports can be generated from module components or from the Global Actions Menu. Historical reports are generated when a process is complete, saved as PDFs and attached to one of the contract module components.
Tip: Click on the thumbnail images below to expand and view the content.
Below are instructions for generating and accessing reports from different areas of the system. For details about specific Construction or Preconstruction reports, refer to these web pages:
| Module | Web page |
|---|---|
| Construction | Construction reports |
| Construction | Payment estimate reports |
| Preconstuction Project | Generating a Preliminary Project Detail Estimate Report |
| Preconstuction Project | Generating a Preliminary Project Detail Estimate XLS File |
| Preconstuction Proposal | Generating the Preliminary Proposal Detail Estimate Report |
| Preconstuction Proposal | Generating the Proposal Price Schedule Report |
| Preconstuction Proposal | Generating the Estimate of Quantities Report |
- Select Open Global Actions Menu | Generate Report located at the upper right hand corner of the dashboard.

- On Generate Report screen 1 of 5, search for and select the report. Note that there are 3 different types of custom reports.

- Basic report - report output in PDF format
- XLS report - report output in XLS spreadsheet format
- All database records report - this report is generated by checking all records in the database based on the criteria selected on subsequent screens. These report are denoted with an asterisk (*) in the report name.
- Generate Report, screen 2 of 5, varies based on the report type selected. After selecting data, click on the right arrow to go to screen 3.
- Basic or XLS report - The user select specific records for the report output. For example, select multiple DWRs for a date range, multiple diaries for a date range, or multiple change orders.

- All database records report - The user MUST select one record on the list (not ALL records) to create the report.

- Basic or XLS report - The user select specific records for the report output. For example, select multiple DWRs for a date range, multiple diaries for a date range, or multiple change orders.
- Generate Report, screen 3 of 5, appears only when staff are required to select report parameters including which sub reports to print, begin and end date range for the report, or if the report should be run at statewide or region level. Make the appropriate selections and click on the right arrow to go to screen 4.
- On Generate Report, screen 4 of 5, staff are prompted to select the report output type.
- Output Type
- Select “Generate as PDF”. The report will open in a new browser tab.
OR - Select "Download as PDF. The report will be generated and saved in the \downloads folder.
- Select “Generate as PDF”. The report will open in a new browser tab.
- Report Layout Source
- Always leave “Custom” selected so the WisDOT custom report template is used.
- Click <Execute> to generate the report immediately. If the plan is schedule the report to run at a later date or time, go to Scheduling a report for more details.

- Output Type
Info: Note that screens 2-5 change based on the report selected.
A historical report is the final report for a specific approval process. This includes daily work reports (DWRs), contract project design evaluations, contractor / subcontractor evaluations, and payment estimates. When the final approval is granted for one of the noted processes, the historical report is generated as a PDF file that is directly attached to the source record (e.g. change order number 0004, payment estimate number 0005, etc.). In the case of DWRs, they are part of an approved payment estimate and the associated DWR Report is created when the final approval is received on the payment estimate. The historical report is the final copy of the report in PDF format and cannot be edited.
Complete these steps to access the historical reports for daily work reports (DWRs) that are tied to a payment estimate, approved contract project design evaluations, approved contractor / subcontractor evaluations, approved change orders and approved payment estimates.
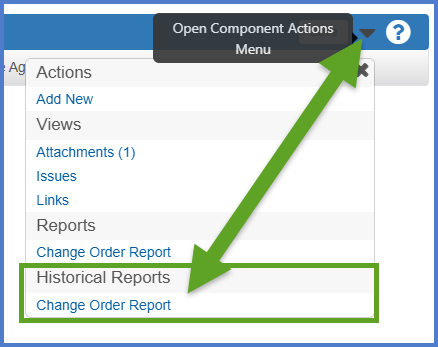
These steps are specifically for change order historical reports, so modify the steps slightly for other areas. Historical reports are found under the Open Components Actions Menu.
- Go to the Contract Progress Summary | Change Orders tab.
- Click on the CO Num hyperlink for an approved change order.
- Select Open Component Actions Menu | Change Order Report under the Historical Reports subsection.

- The historical report will be downloaded to the local computer \downloads folder. The report can be viewed in Adobe Acrobat or similar application.
A report can be generated at any time within the application when working on a design project or proposal or on a construction project or contract.
These steps are specifically for Diary reports, so modify the steps slightly for other areas. Reports are most often found under the Open Component Actions Menu and sometimes the Open Row Actions Menu.
- Go to the Contract Progress Summary | Diaries tab.
- Click on the Diary Date hyperlink.
- Select Open Component Actions Menu | Daily Diary Report under the Reports subsection.
NOTE: There are no historical diary reports.
- On the Generate Report - Output Options - Screen 4 of 5 component, click <Execute>.

- The report will be generated and saved to the local computer \downloads folder. The report can be viewed in Adobe Acrobat or similar application.
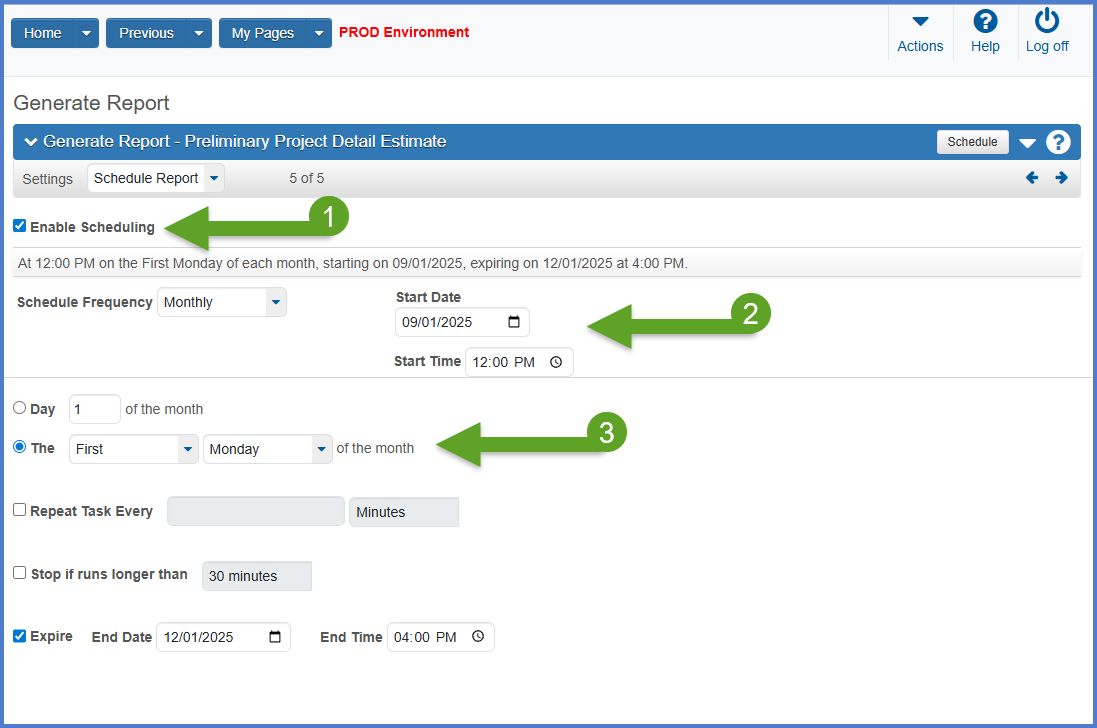
If the option to schedule the report was selected, complete the required fields below on Generate Report, screen 5 of 5.
- Click <Enable Scheduling> to schedule the report.
- Select the appropriate Schedule Frequency (e.g., Once, Daily, Weekly, Monthly) followed by a start date and time.
- The report can be scheduled to run once, on a certain day each month. The report can be repeated, stopped if it runs longer than a selected amount of time, or can expire on a certain date and time.


