Change orders
Last updated: 2025-10-02
Roles:
- Contract Specialist, Project Engineer = modify access
- Contractors, Project Manager, Supervisor, Chief, Inspector, FHWA, ReadonlyConstr = read only access
Change orders are created to modify contract language, add new items, increase or decrease item quantities, or adjust contract site time. Contact your region Contract Specialist if you need to add a new project with categories or add an additional contract site time. Categories cannot be added to existing projects. A contract modification justification is required for all change orders. It is recommended that project staff review CMM 242 Change Orders prior to creating change orders.
Tip: Click on the thumbnail images below to expand and view the content.
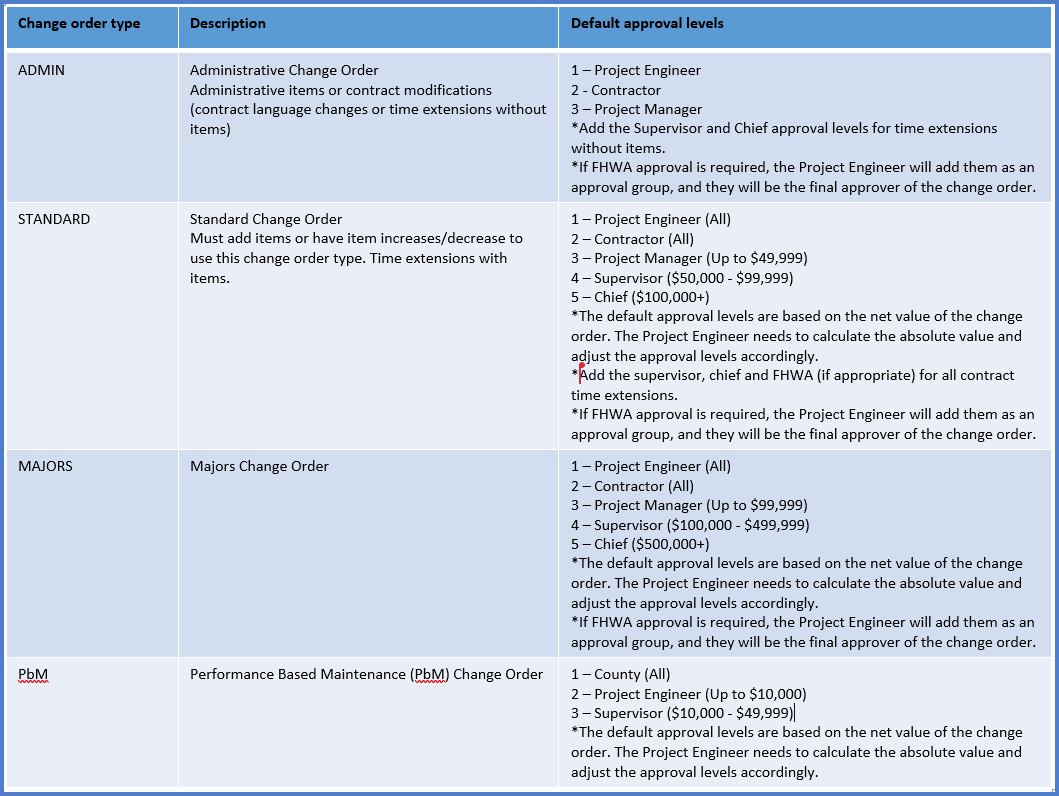
Three change order types:
- Admin - The Change Order With No Items type is used for contract language changes without items or time extensions without items.
- Standard - The Standard Change Order type is used to add items, increase / decrease items and time extension with items on non Mega/Major contracts. Most contracts use this change order type.
- Majors- The Mega/Majors Project Change Order type is used to add items, increase / decrease items and time extension with items on designated Mega/Major contracts.
Six change order statuses:
- Draft - Initial creation of and editing status.
- Pending Approval - The Project Engineer submits the change order for approvals based on change order type (see table above). System notifications are sent to each change order approver when it is their turn to review and approve the change order electronically.
- Approved - When final approval is received, a system email notification is sent to the Project Engineer, Contractor, Project Manager and Contract Specialist. The change order is locked and cannot be changed. The historical change order report is created.
- Rejected - A change order can be rejected by a change order approval group. The Project Engineer and Project Manager should meet to discuss how to handle a rejected change order (e.g. update it and resubmit for approval, delete it, etc.).
- Deleted - If the change order is the last one that was created, the Project Engineer can change the status to deleted and it will not be included in the contract.
- Void - If the change order is not the last one that was created, the Project Engineer needs to work with the AWP System Administrators to change the status to void and it will not be included in the contract.
Change order approval process:
- The system utilizes an automated electronic process to approve change orders.
- Each change order type is assigned default change order approval levels based on the type and dollar amount of the change order. The Project Engineer can add or remove approval levels to a change order as directed by region management prior to the start or during the approval process as long as the change order is in draft status.
- If multiple Project Engineers or Prime Contractor representatives have contract authority to the contract, staff should identify internally who has signatory approval for change orders with the understanding that multiple staff will receive the system generated note requesting change order review and approval BUT ONLY ONE staff member per role can approve each change order.
Time adjustments:
- To add a time extension on a change order, the site time record must be active.
- After approving a change order with a time adjustment, review the current completion date and time for a completion date site OR the current number of time units for a calendar day or working day site. If the field values do not match the entries on the change order, contact the AWP System Administrators for assistance.
- The Time Adjustments section of a Change Order report is inaccurate until the change order is approved. For example on a Working Day Contract time adjustment, the Current and New fields are incorrect but the Original and Adjustment fields are correct. See the example below for details.

Other tips:
- Change order examples are available in Box at https://wisdot.app.box.com/s/sfpd8ttvu2efaz4nbpgoftbmommnmijq
- When adding a disincentive, credit, or non-conforming item on a change order make sure only the unit price is entered as a negative value. DO NOT enter the quantity field on any item as a negative value as this will result in an error upon saving the change order.
- After adding new items to a contract on a change order, the items need to be assigned to the subcontractor. If the approved sublet request form reflects a higher sublet item price than the original contract bid item price, enter the higher sublet item price when adding the items to the subcontractor.
- When creating a change order, if project staff cannot find a contract bid item in the drop down list, the item may be marked obsolete because of spec book changes. Project staff can go to the dashboard (home page), and select Items under Reference Data to confirm this. If the item is obsolete, contact the AASHTOWare Project System Administrators for assistance. They can temporarily un-obsolete the item so project staff can add the item to the change order. Once the change order is approved, notify the AASHTOWare Project System Administrators to obsolete the item again.
- Do not attach the Contract Modification Justification form (DT2355) to the change order in AWP Construction. This file is saved in Box and is accessible by select region staff only.
- Change order attachments are supported in AASHTOWare Project. See "How to add attachments to a change order" for instructions to do this. An attachment example would be plan sheet revisions.
Data entry is broken down into these key areas:
- Log into AASHTOWare Project.
-
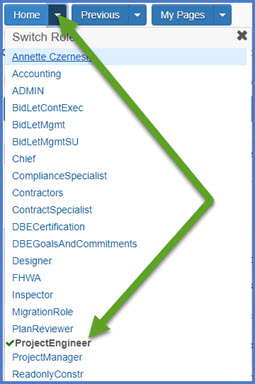
Select the appropriate role (click the Expand Home action arrow | role).
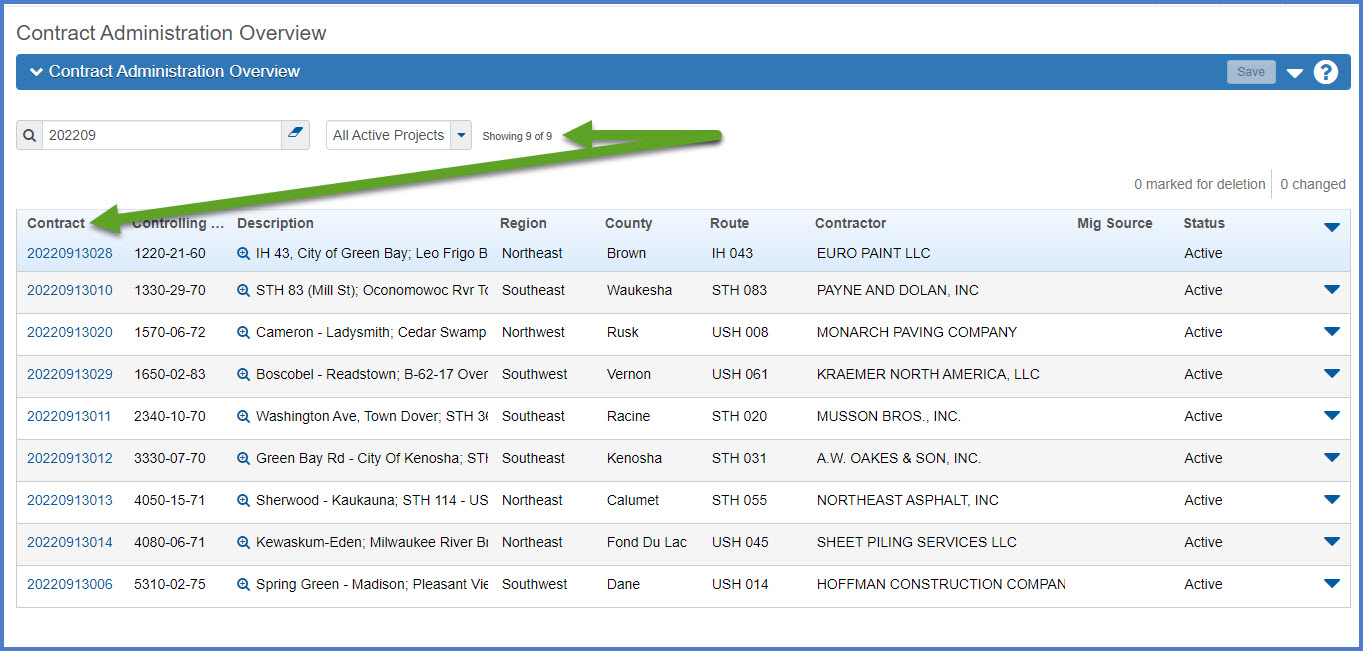
- Select the contract under Contract Administration Overview by searching for the Contract ID, controlling project ID, region, county or contractor in the search box.
Tip:
Go to How to Search for the Contract ID by Project ID if only an associated project ID is known. - Click on the contract ID hyperlink for the project you are working on.
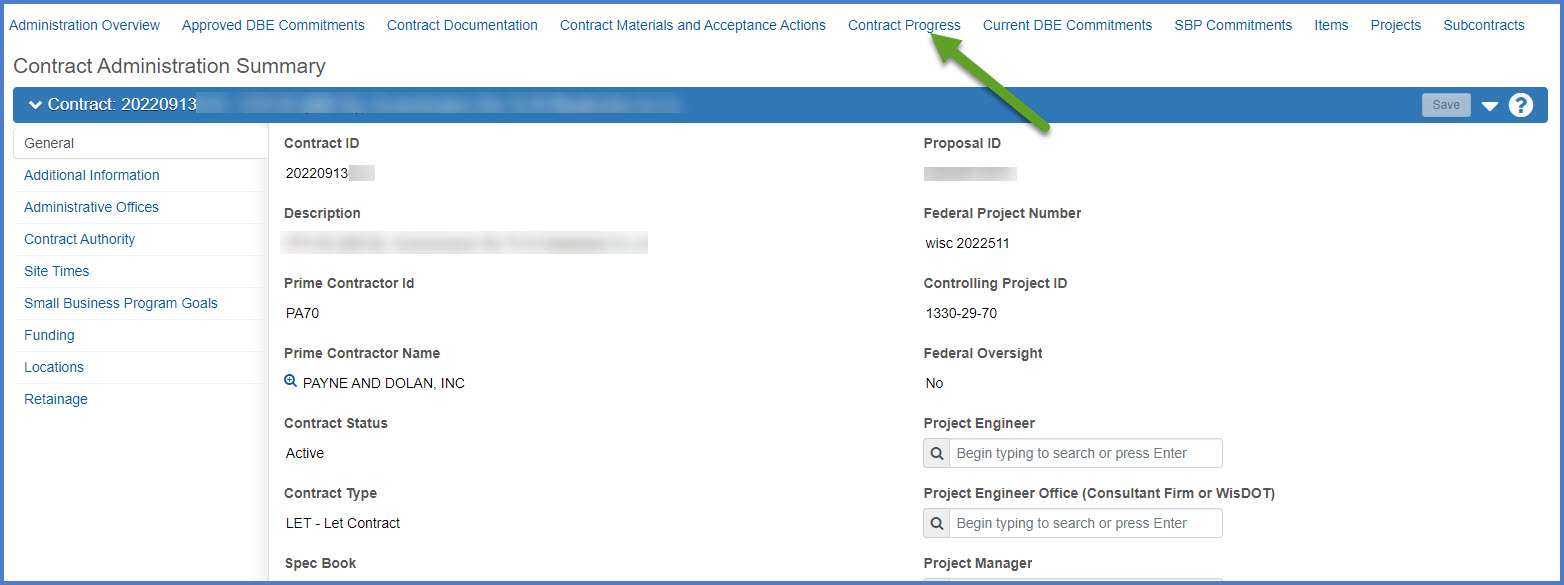
- Click the Contract Progress quick link located at the top of the screen.
- Select the Change Orders tab.
- Click <Add> to add a new change order.
OR
Select an existing change order by searching for the change order number or description in the search box. - Click on the change order number (CO num) hyperlink to open the change order.

- When creating a change order, there are five required fields - change order date, description (short description), change order type, author (project engineer) and change order reason code. See the table below for field details.
- Click <Save> to create the change order.
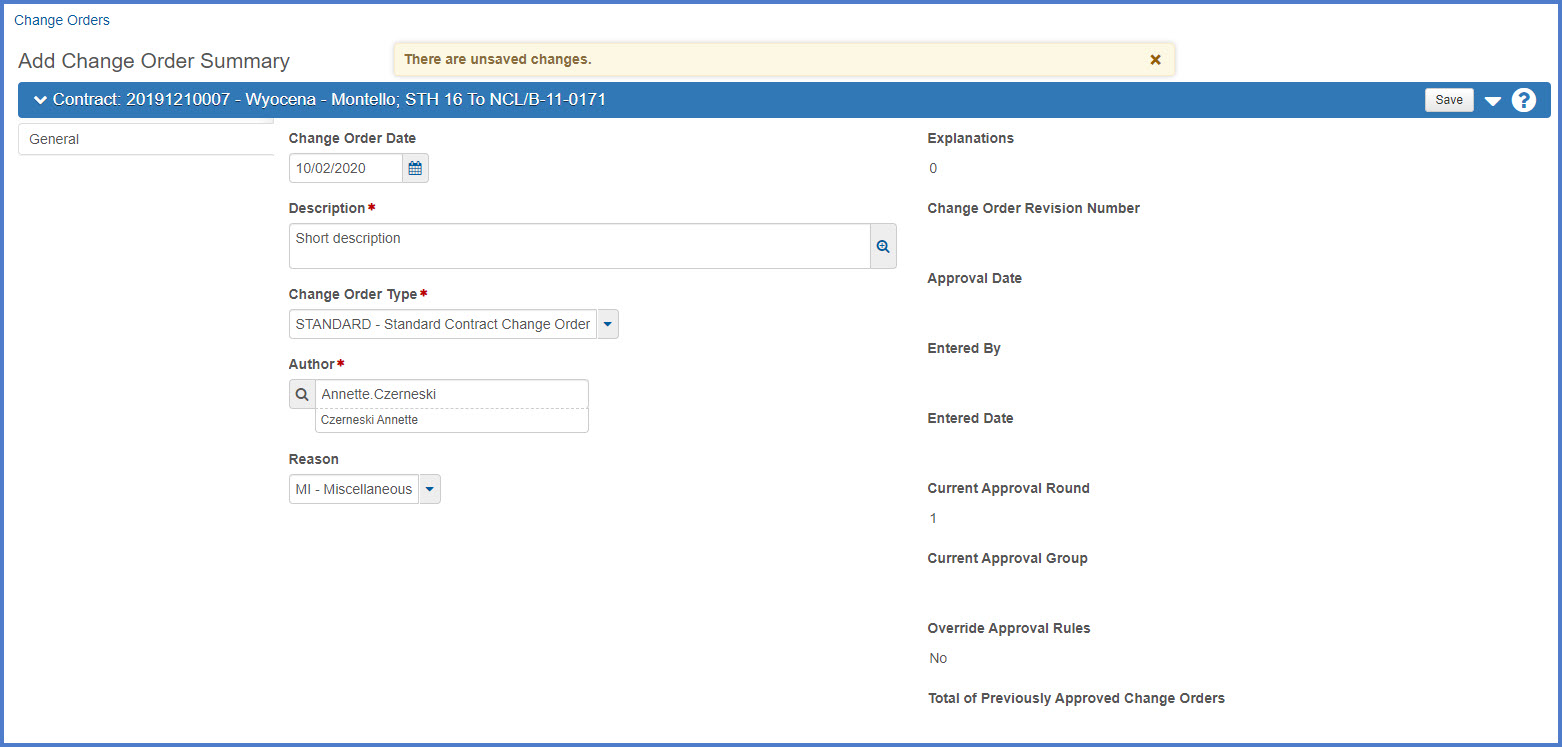
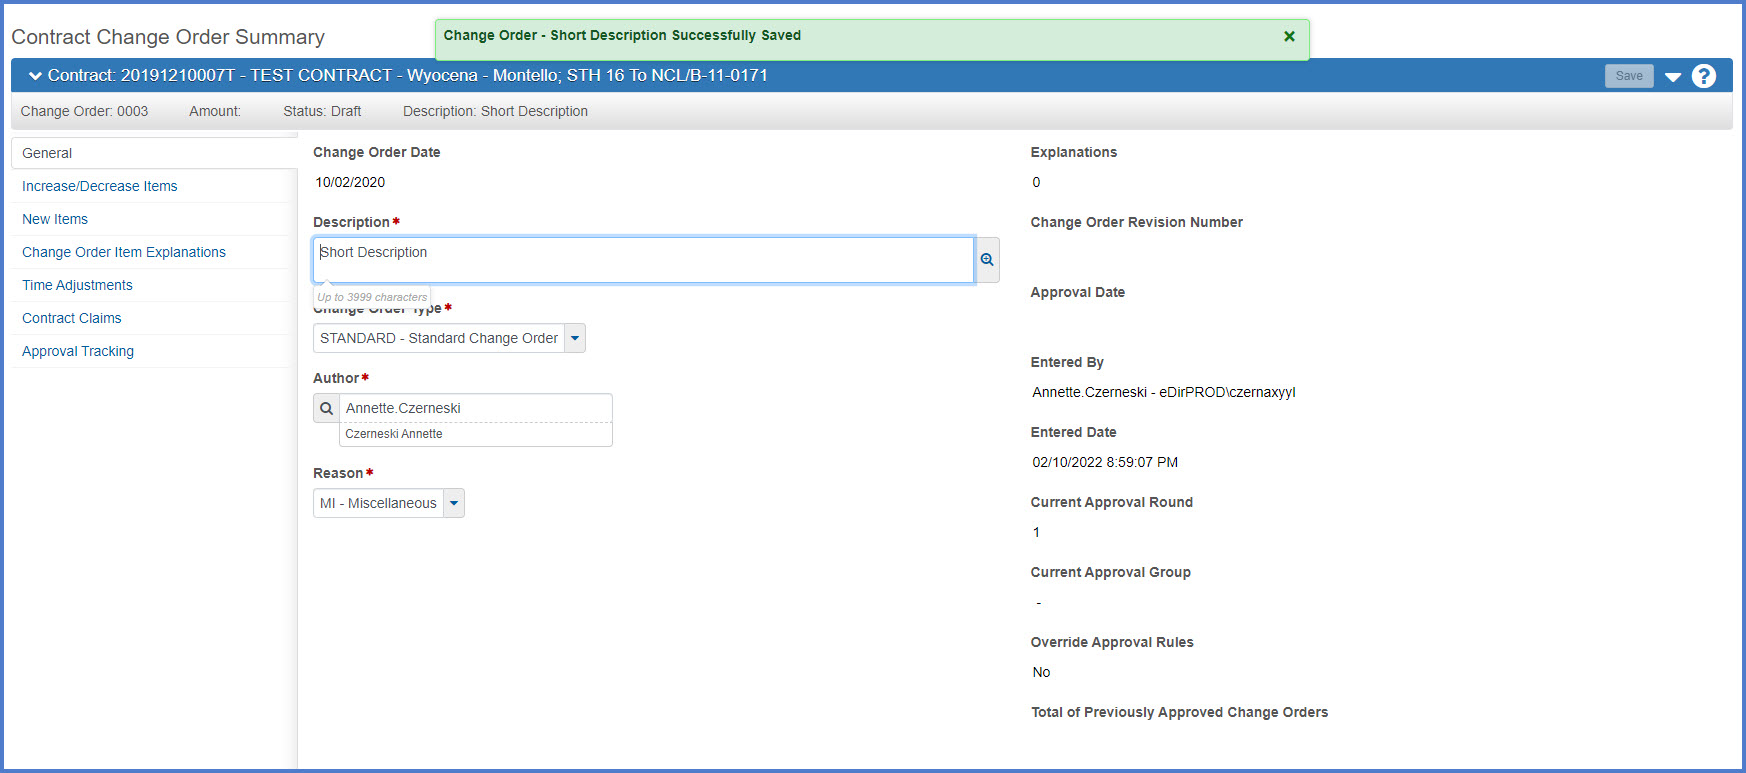
| Field | Required | Description |
|---|---|---|
| Change order examples are available in Box at https://wisdot.app.box.com/s/sfpd8ttvu2efaz4nbpgoftbmommnmijq | ||
| Change Order Date | Yes |
Defaults to current date but can be changed. Info: This date will be overwritten once the final approval is received on the change order with the approval date. |
| Description | Yes |
Provide a short description summarizing the change order. Do not enter a project ID, funding information, or make any reference about federal oversight in the short description. The information entered will become the title of the change order. Examples:
|
| Change Order Type | Yes |
Chose the correct change order type from the drop down list. Work with the Project Manager to determine which change order type should be selected. |
| Author | Yes |
Defaults to the current logged in user account but can be changed by searching for a different person account by entering the first or last name. Requirements: The person account selected must have contract authority to this contract and the Project Engineer or Contract Specialist role to create or edit change orders.
|
| Reason | Yes |
Chose the overarching change order reason code for the change order from the drop down list:
If the change order contains multiple item changes and there is no overarching reason code that matches all the changes, select the MI - Miscellaneous reason code. |
| Change Order Explanations - Order | Yes | Enter a numeric value (e.g. 1, 2, 3, etc.) |
Upon creation of the change order, the General tab becomes available plus six other tabs. Add the long description under the Change Order Explanations subsection. See the table below for details.
- Expand the Change Order Explanations subsection.
- Order = Enter a numeric value (e.g. 1, 2, 3, etc.) in order of perceived importance.
- Description of Changes = Enter the long description of changes being made to the contract through this change order. Enter up to 32,000 characters in this field. Expand the data entry area by selecting the magnifying glass. Click <Apply> to save data entered in the pop window.
- Click <Save>.
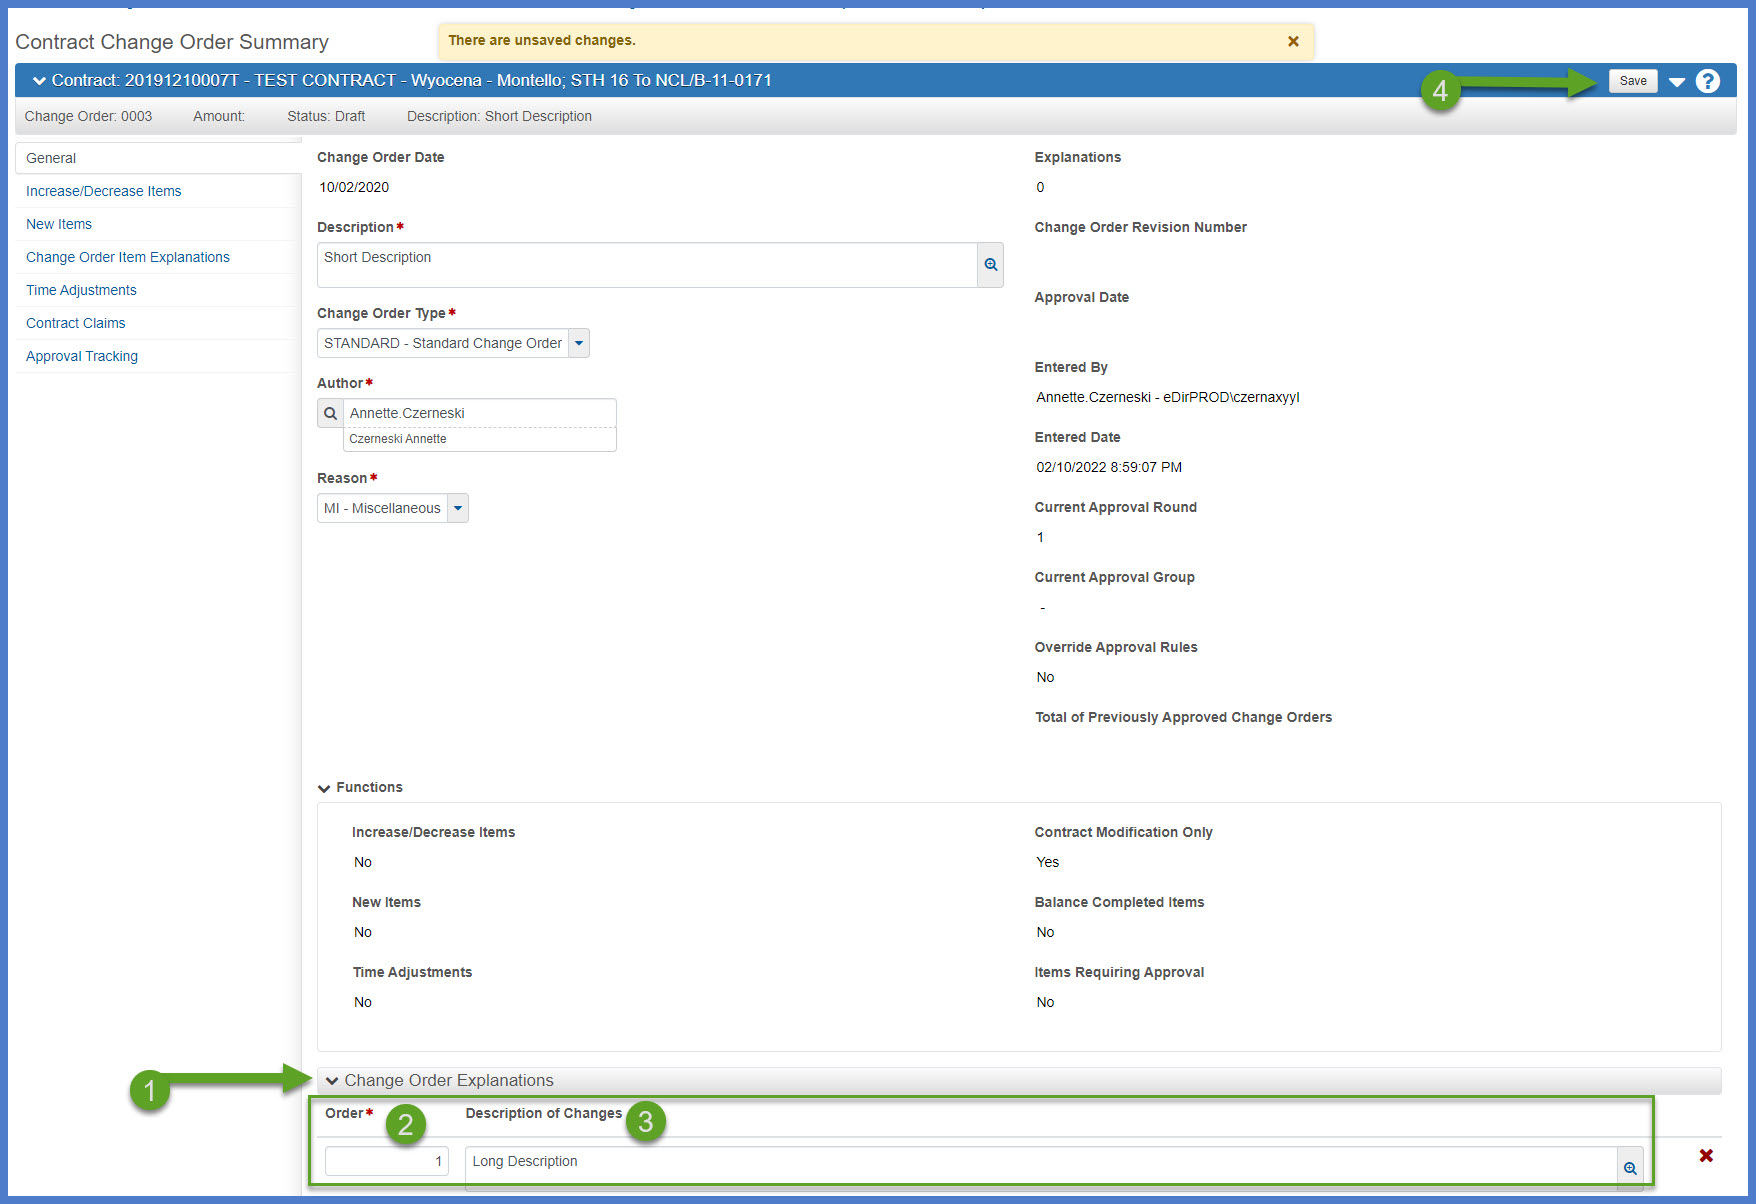
| Field | Required | Description | ||||||
|---|---|---|---|---|---|---|---|---|
| Change Order Explanations - Order | Yes | Enter a numeric value (e.g. 1, 2, 3, etc.) | ||||||
| Change Order Explanations - Description of Changes | Yes |
The following is an example of details that may be included in the Description of Changes. These details follow the format found in the Standard Specifications. Check with your region for specific details that they may require. If these details are lengthy or require special formatting, consider attaching these details to the change order. However, if you do so it must be referenced here in the Description of Changes.
|
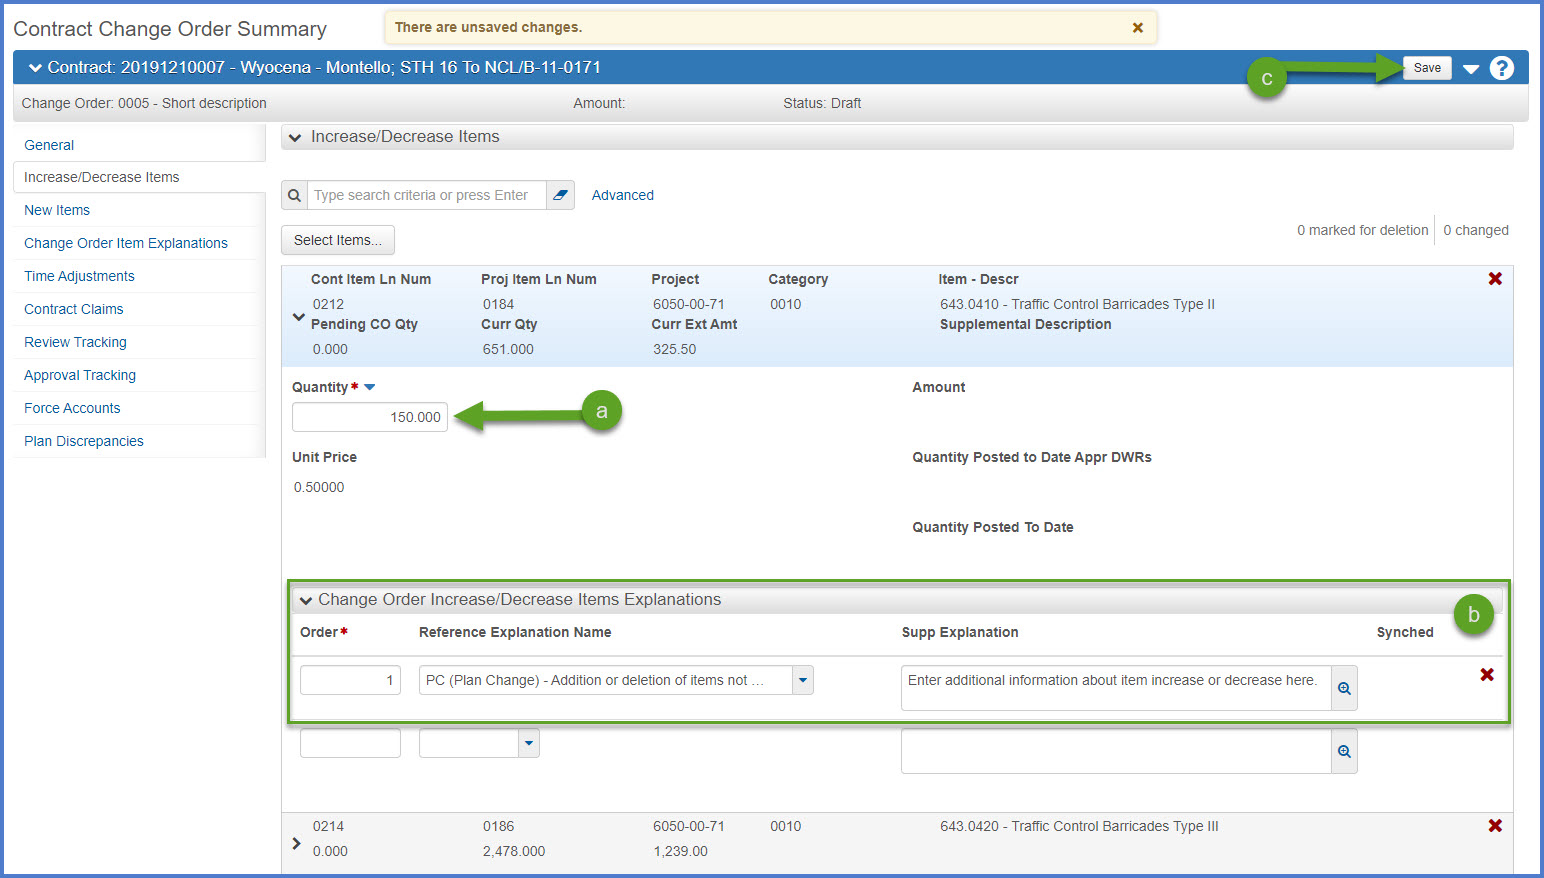
This tab can be used to increase or decrease item quantities for items that are part of this contract or to balance complete items on the contract.
To increase or decrease item quantities on items that are part of the original awarded contract.
Info: In AWP Construction, the quantity of a lump sum item can be reduced to zero like all other contract items. No additional offsetting change order items need to be added to the contract. This is different than how lump sum items were handled in FieldManager and the Construction Administration System (CAS), where the lump sum quantity was required to be one and only one.
- Click <Select Items>.
- On the Select Items component, click "Show first 10" or search for the item by item number or description in the search box.
- Select the item(s) and click <Add to Change Order>.
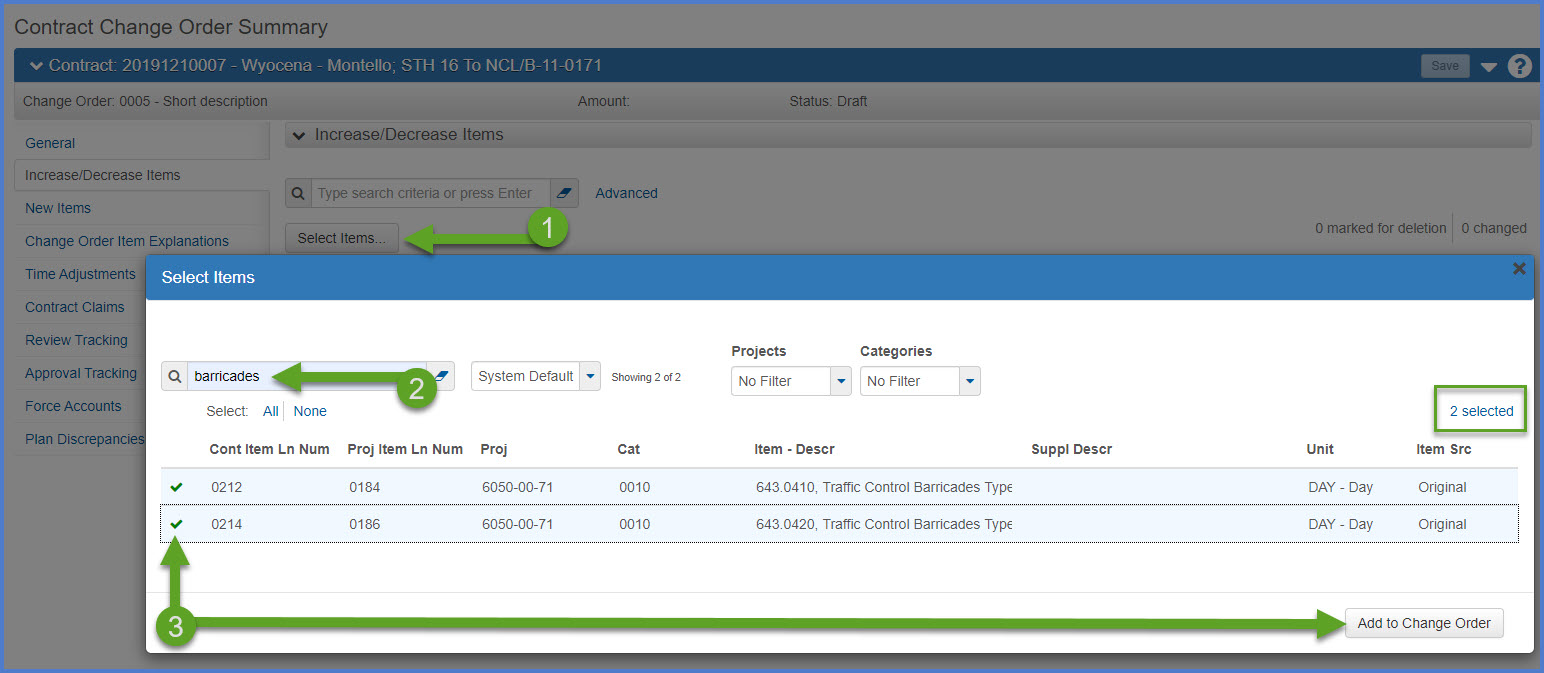
- Expand each item:
- Quantity - Enter the amount of increase or decrease.
- Under the Change Order Increase/Decrease Items Explanations section enter all three required fields.
- Order - Enter a Order Number (e.g. 1, 2, 3, etc.). This determines the order that the items will appear on the report.
- Reference Explanation Name - Select a reason codes from the drop down list. The reason code is specific to the item being increased or decreased. It does not need to match the reason code for the change order.
- Supp Explanation - Enter a brief supplemental explanation to describe why the item quantity was increased or decreased.
- Click <Save>.
- Repeat above steps for each item.
Warning: The change order cannot reduce the current quantity of an item to an amount less than the quantity paid to date for the item.
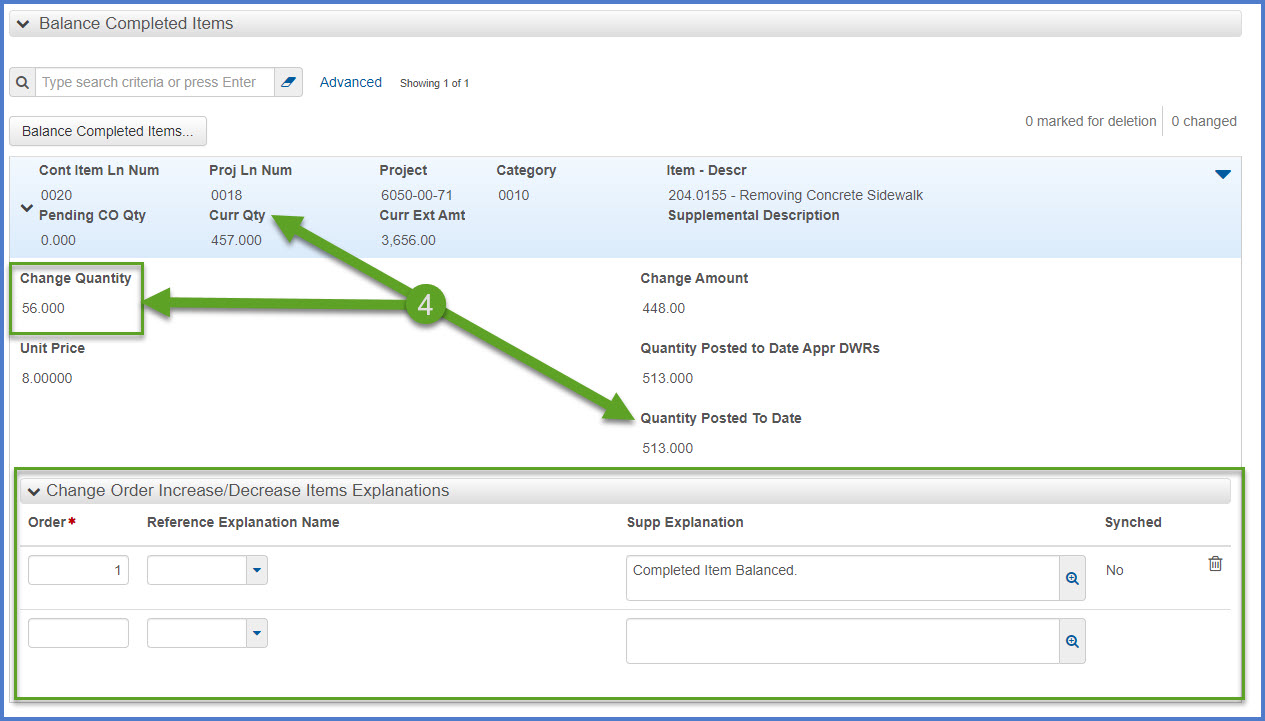
For items that are marked complete on the contract but the quantity used does not match the approved contract quantity, use this section to balance the item quantity.
Requirement: Normally WisDOT does not balance completed items on change orders. Check with your Project Manager to see if this applies to your contract.
- Click <Balance Completed Items>.
- Search for items that are marked complete on the contract.
- Select the item(s) and click <Balance Completed Items>.
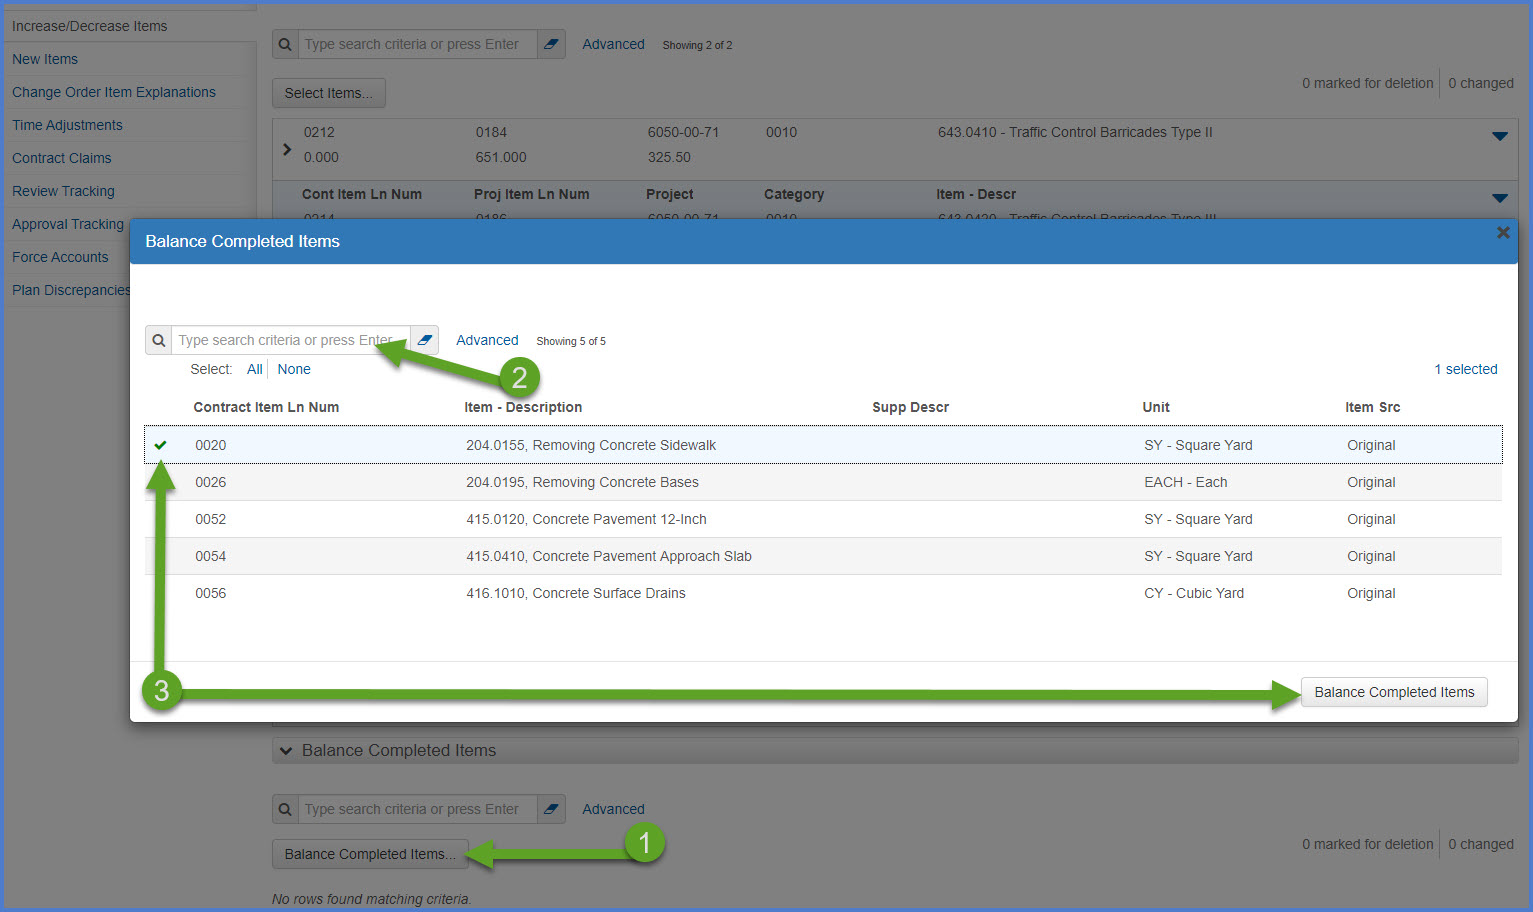
- The items are saved automatically with a Change Quantity (Quantity Posted to Date - Current Quantity). Under Change Order Increase/Decrease Items Explanations, senter all three required fields. Repeat for each item. Click <Save> to save changes.
- Order - Enter an Order Number (e.g. 1, 2, 3, etc.). This determines the order that the items will appear on the report.
- Reference Explanation Name - Select a reason codes from the drop down list. The reason code is specific to the item being balanced. It does not need to match the reason code for the change order.
- Supp Explanation - Enter a brief supplemental explanation to describe why the item needs to be balanced.
This tab can be used to add new items that are not part of this contract or to add contract items to a different project or category.
- After adding new items to a contract on a change order and the change order is approved, the items need to be assigned to the subcontractor. See Assign items to subcontractors.
- An unattached item is an item added to the contract after the contract has been executed as a new item on a change order.
- Unattached items can be posted on DWRs but are not recognized as contract items by the system until the change order is approved.
- Complete these steps to post to an unattached item on a DWR:
- Add the Prime Contractor on the Contractors tab.
- Select the item on the Postings tab.
- Select the prime contractor from the Contractors drop down list.
These new contract items, if posted on an approved DWR, will appear automatically on the next payment estimate created after the change order is approved.
To add new items that are currently not part of the contract, a project, or a category. This includes adding an item to a new project / category even if the item has the same price as the original bid item and there is no supplemental description change.
- The Reference Item table of current items is available for use by the Project Engineer or Project Manager. This table includes obsolete items and items that may not pertain to your contract based on the letting date of the contract. For more information, see the standard spec and CMM 238 Administrative Items in accordance with your contract.
- Go to the dashboard (home page).
- Scroll down to the Reference Data section.
- Click on the Items hyperlink.
- Set the Spec Book to 03
- Use Searching, Sorting and Filtering Lists to locate specific items in the Reference Item table.
- Watch for obsolete items as they may or may not pertain to your contract based on the letting date. If an item is obsolete and needs to be added on a change order, contact the AASHTOWare Project System Administrators for assistance.
- The new item will be assigned a new Contract Item Line Number and a new Item record.
- When adding an administrative disincentive item on a change order make sure only the unit price is entered as a negative value. DO NOT enter the quantity field on any item as a negative value as this will result in an error upon saving the change order.
- Use this function to show that an item was added or changed on a change order. The reason the item was added and the change order number will appear on the following reports and components:
- Item History To Date Report (Item Type = Change Order)
- Contract Items XLS report (Item Source = Change Order and the CO Number)
- Contract Project Items XLS report (Item Source = Change Order and the CO Number)
- Contract Items component - new item record with Item Source = ChangeOrder and Change Order Number
- Contract Project Items component - new item record with Item Source = ChangeOrder and Change Order Number
Warning: After an item has been added to a change order and you no longer need it or want to replace it with a different item, don’t change the contract project item line number or the project item line number fields of that item. Instead, delete the item row record for the unneeded item and re add the item.
- Click <Select New Item>.
- On the Select New Item component, search for an item in the Reference Item field by entering the item number or description. Select the new item from the list.
- Select the project and category to add the item to.
- Click <Add to Change Order>.
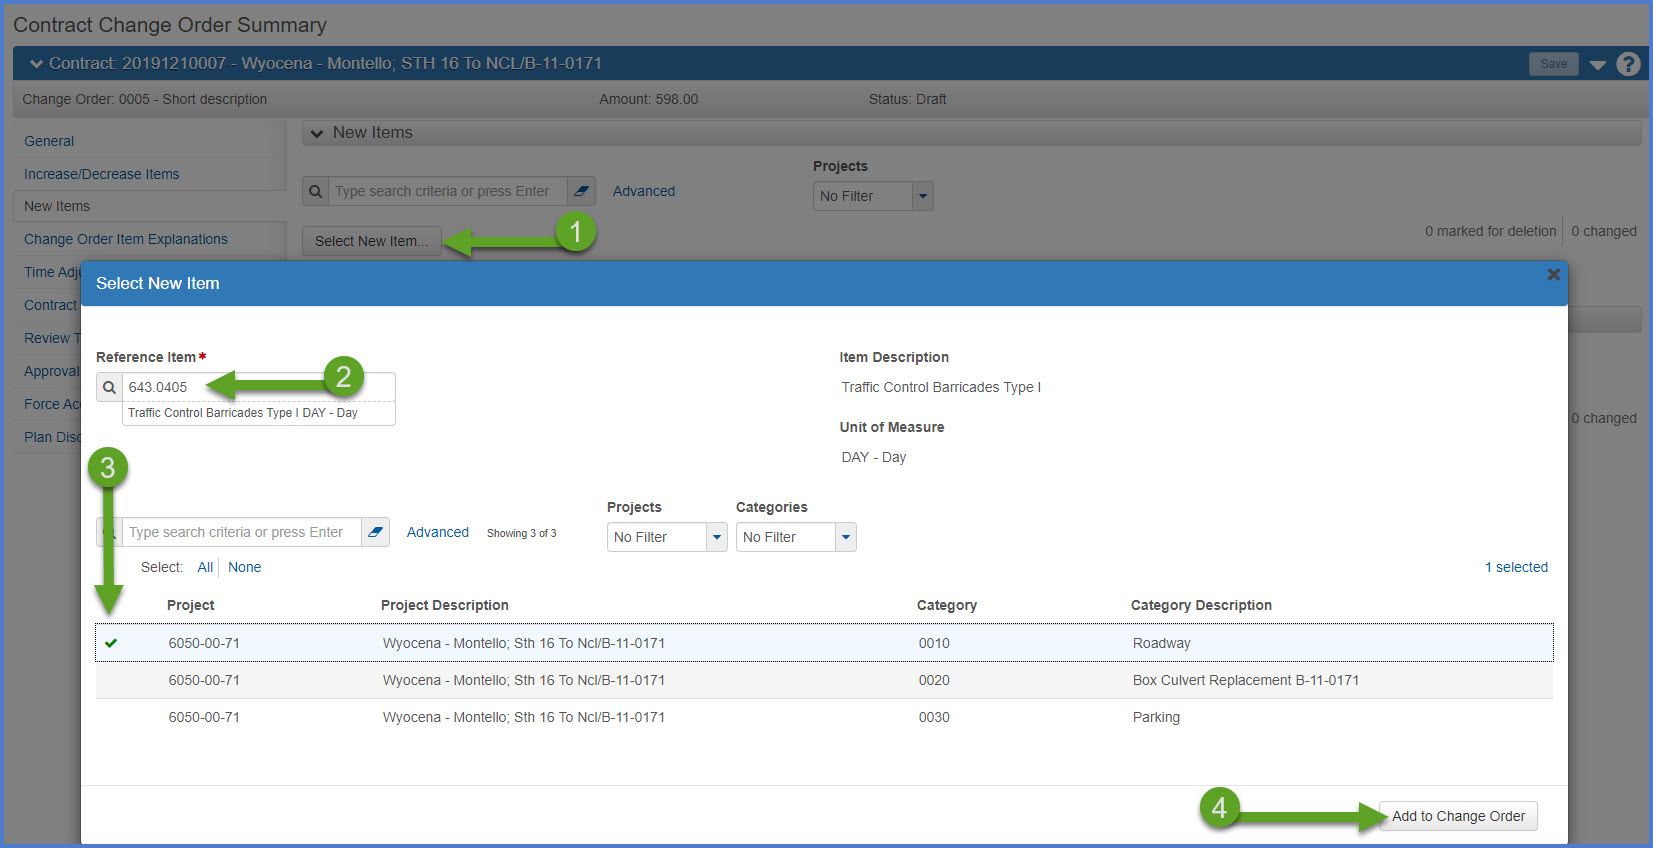
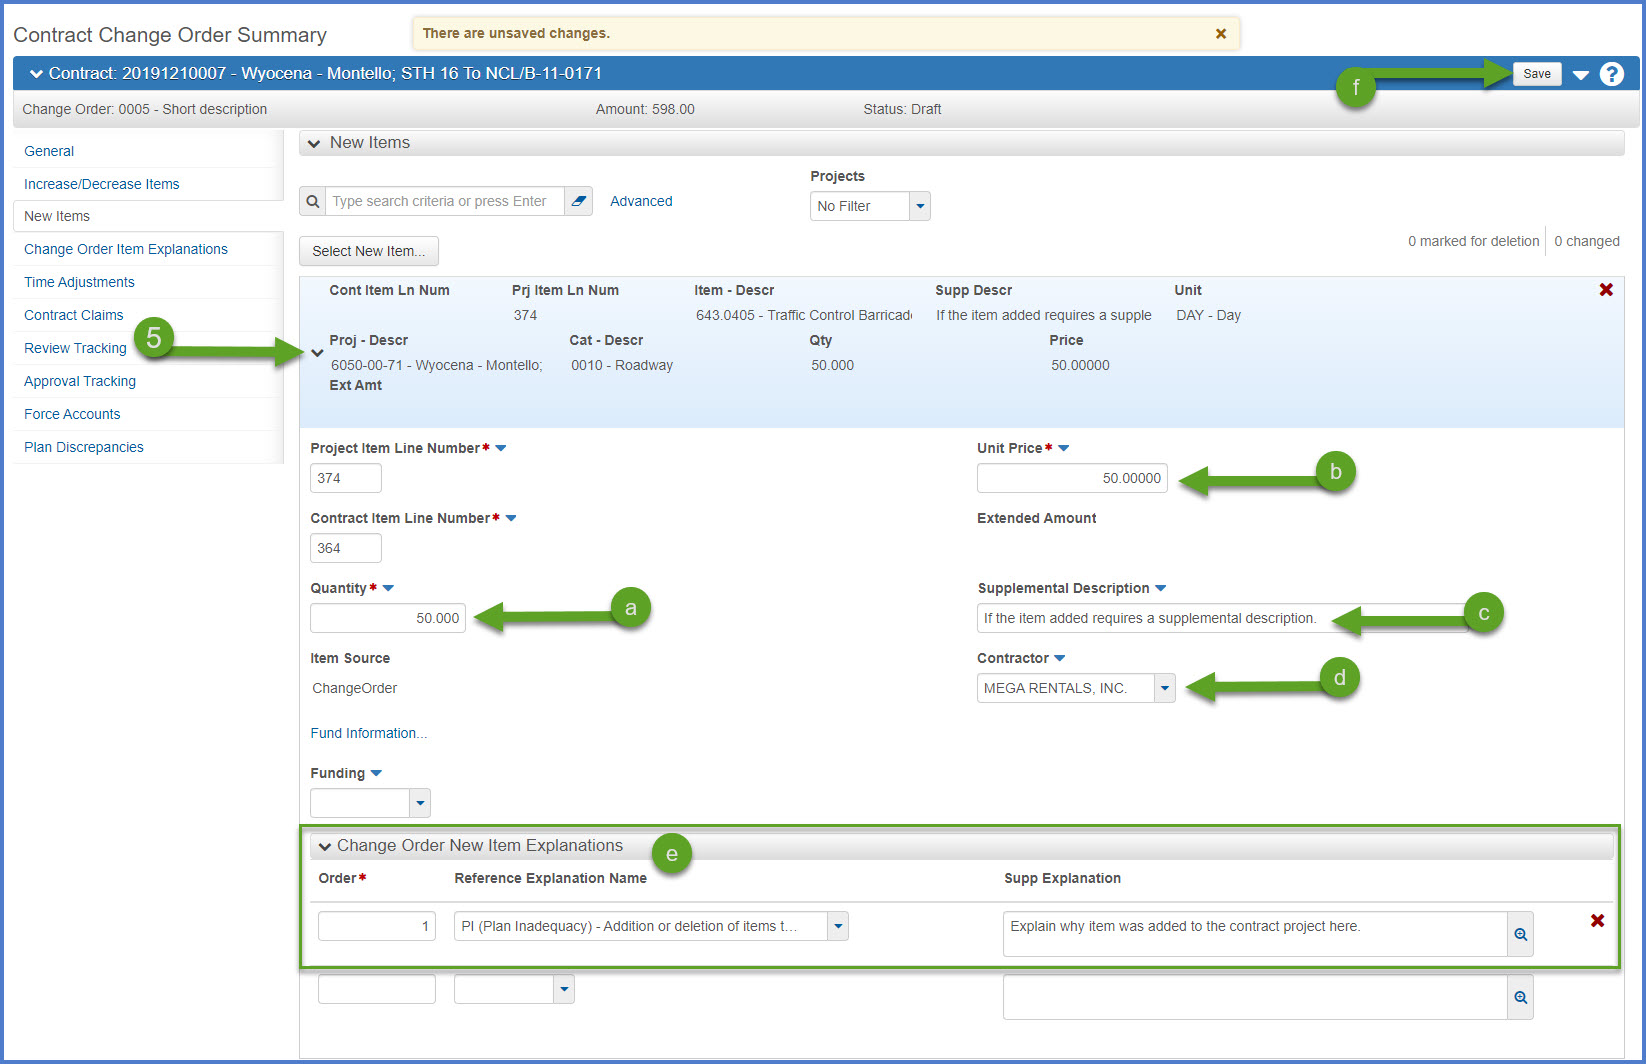
- For each new item, expand the item row and complete the following required fields:Warnings: DO NOT modify the Project Item Line Number or Contract Item Line Number. These are automatically updated upon saving the item addition record.
- Quantity - number of units of the item to be added.
- Unit Price
- Supplemental Description (if required)
- Contractor - Select from the drop down list.
- Under Change Order New Item Explanations enter all three required fields:
- Order - Enter a Order Number (e.g. 1, 2, 3, etc.).
- Reference Explanation Name - Select a reason codes from the drop down list. The reason code is specific to the item being added. It does not need to match the reason code for the change order.
- Supp Explanation - Enter a brief supplemental explanation to describe why the item was added.
- Click <Save>. Repeat the required data entry for each new item added to the contract.
- Once the change order is approved, follow the steps under Assign Items to Subcontractors to add the new items to the subcontractor so the items can be posted to on future DWRs.
- Keep in mind that if this step is skipped, the items can be posted to by adding the prime contractor to the DWR Contractors On Site tab.
- Note that if the approved sublet request form reflects a higher sublet item price than the original contract bid item price, enter the higher sublet item price when adding the items to the subcontractor.
- Funding will be assigned upon saving based on the project ID and category selected for the new item.
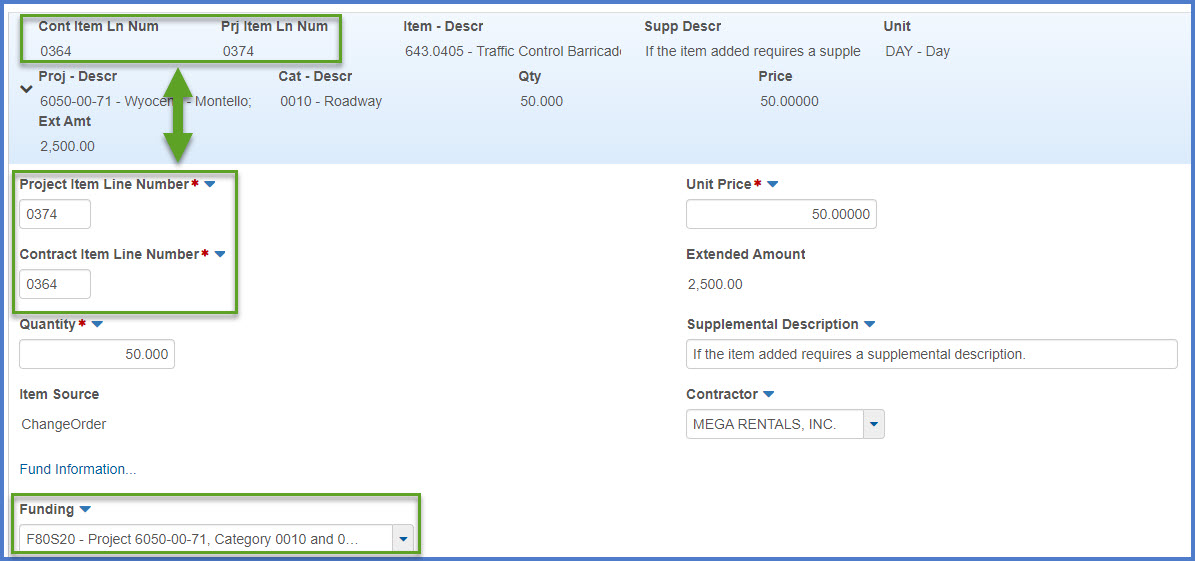
- The Project Item Line Number and Contract Item Line Number are incremented automatically by 2 in AASHTOWare Project. Upon saving, these values with be updated with leading zeros so that the final number is four digits in length and falls in numerical order with the existing project and contract item line numbers.
To reallocate (redistribute) an existing contract item quantity to different projects or categories.
- Click <Select Contract Item...>.
- On the Select Contract Item component, search for an item in the Reference Item field by entering the item number or description. Select the item from the list.
- Select the project and category to add the item to.
- Click <Add to Change Order>.
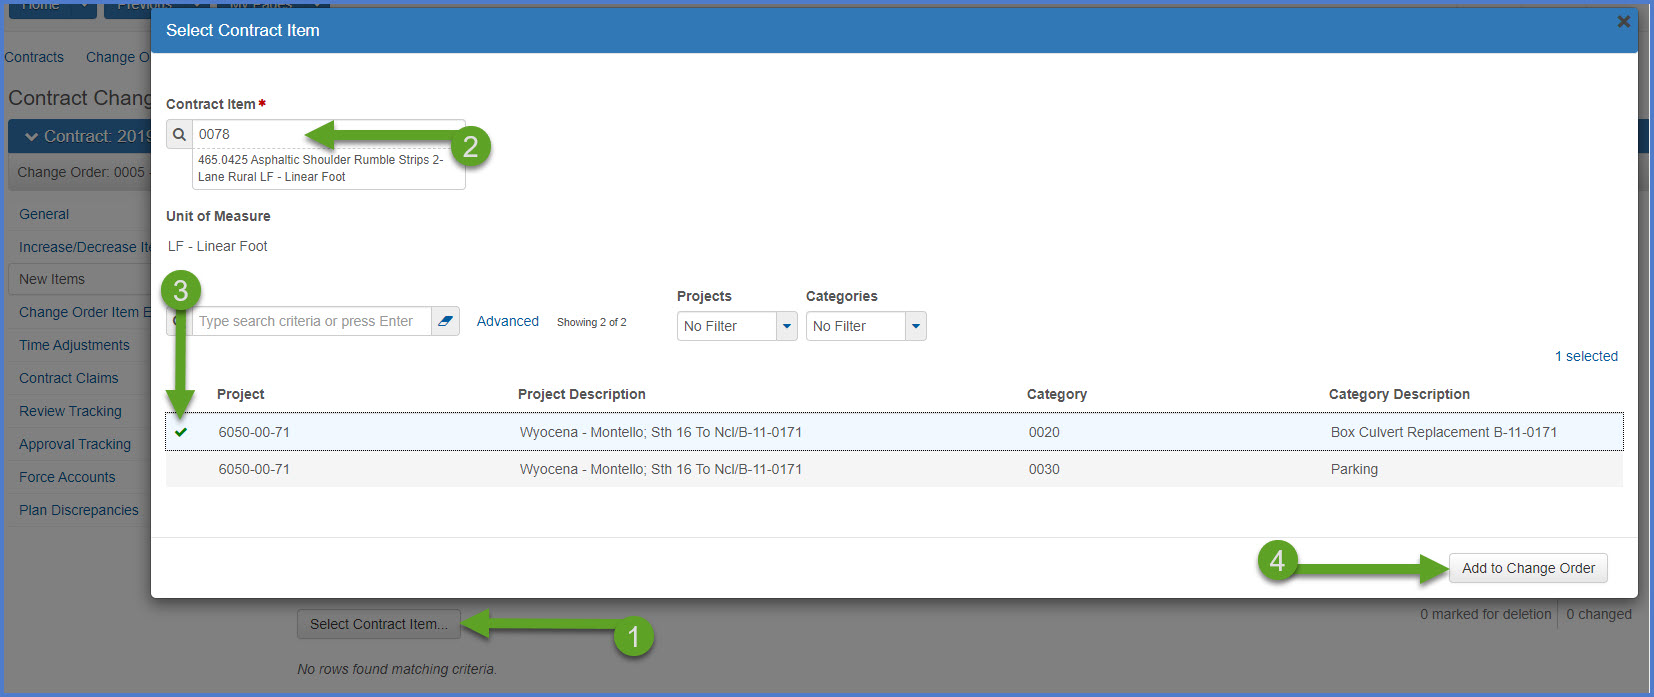
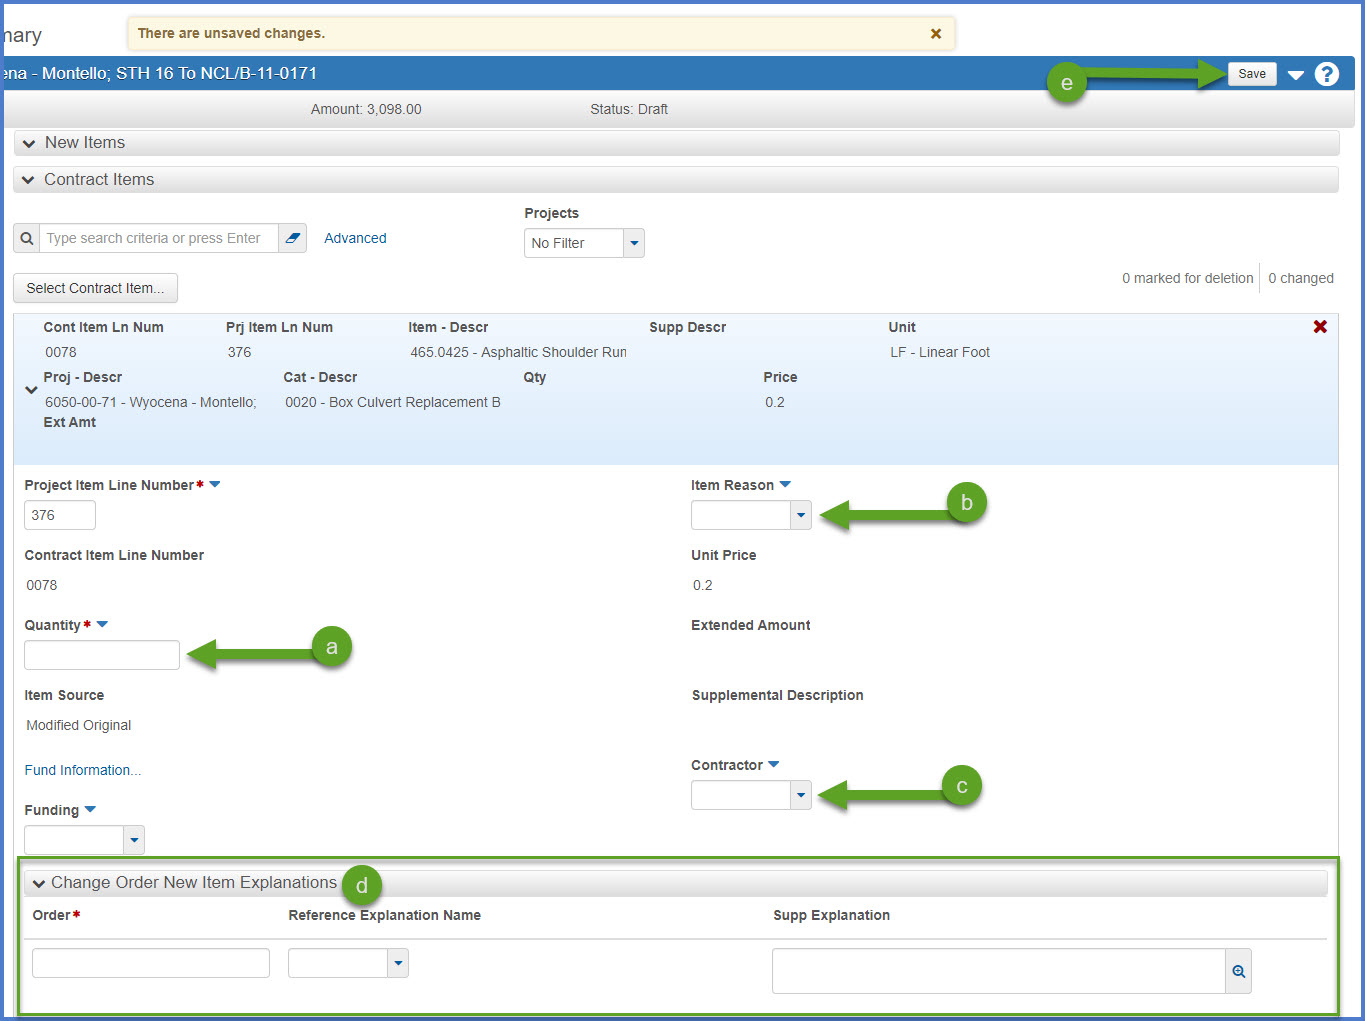
- For each item, expand the item row and complete the following required fields:
- Quantity - number of units of the item to be added.
- Item Reason - Select 00 - Original Item, CO - Change Order , or FA - Force Account from the drop down list.
- Contractor - Select from the drop down list.
- Under Change Order New Item Explanations enter all three required fields:
- Order - Enter a Order Number (e.g. 1, 2, 3, etc.).
- Reference Explanation Name - Select a reason codes from the drop down list. The reason code is specific to the item being added. It does not need to match the reason code for the change order.
- Supp Explanation - Enter a brief supplemental explanation to describe why the item was added to the project and category.
- Click <Save>. Repeat the required data entry for each item.
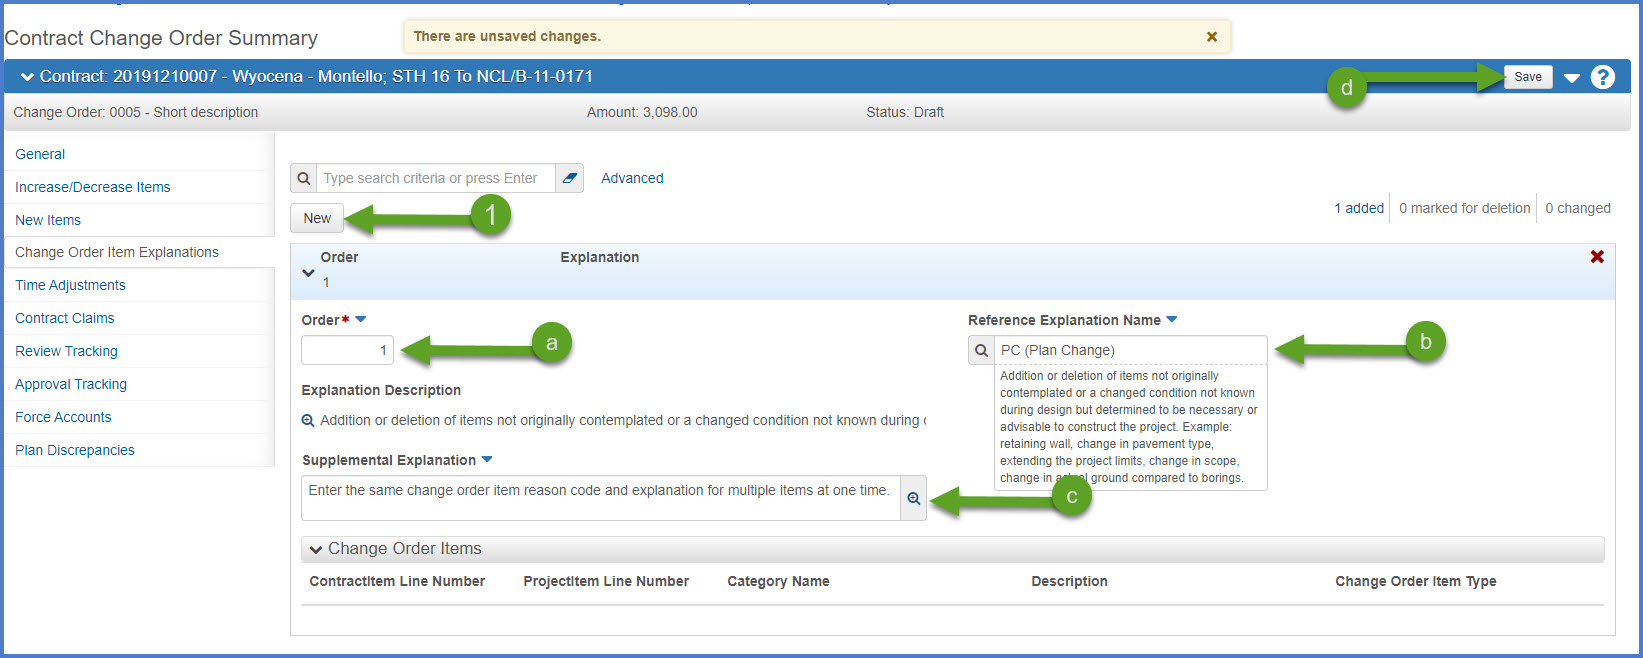
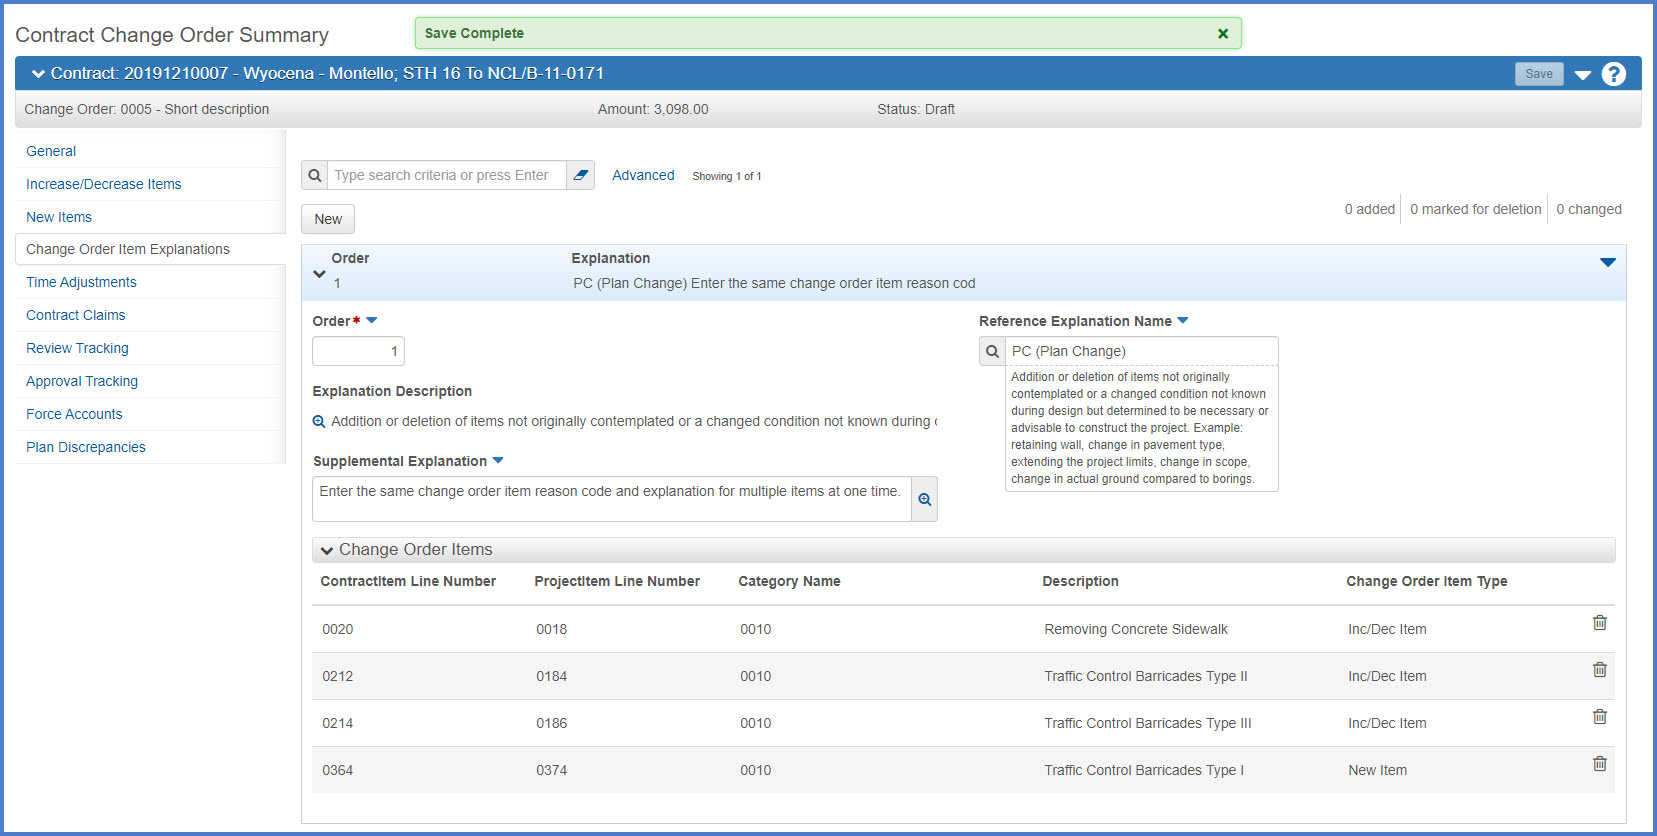
Project staff can assign the same change order item reason code and explanation to multiple items and to a time extension. These items can be existing contract items or new items.
- Use this option when multiple items and/or a time extension have the same change order item reason code and explanation.
- Project staff should not previously assign a change order reason code or explanation to these items on this change order.
- Click <New>.
- Under Change Order New Item Explanations enter all three required fields:
- Order - Enter a Order Number (e.g. 1, 2, 3, etc.) in order of perceived importance.
- Reference Explanation Name - Select a reason code from the drop down list for multiple items. The reason codes does not need to match the reason code for the change order.
- Supp Explanation - Enter a brief supplemental explanation to describe why the items were changed or added.
- Click <Save>.
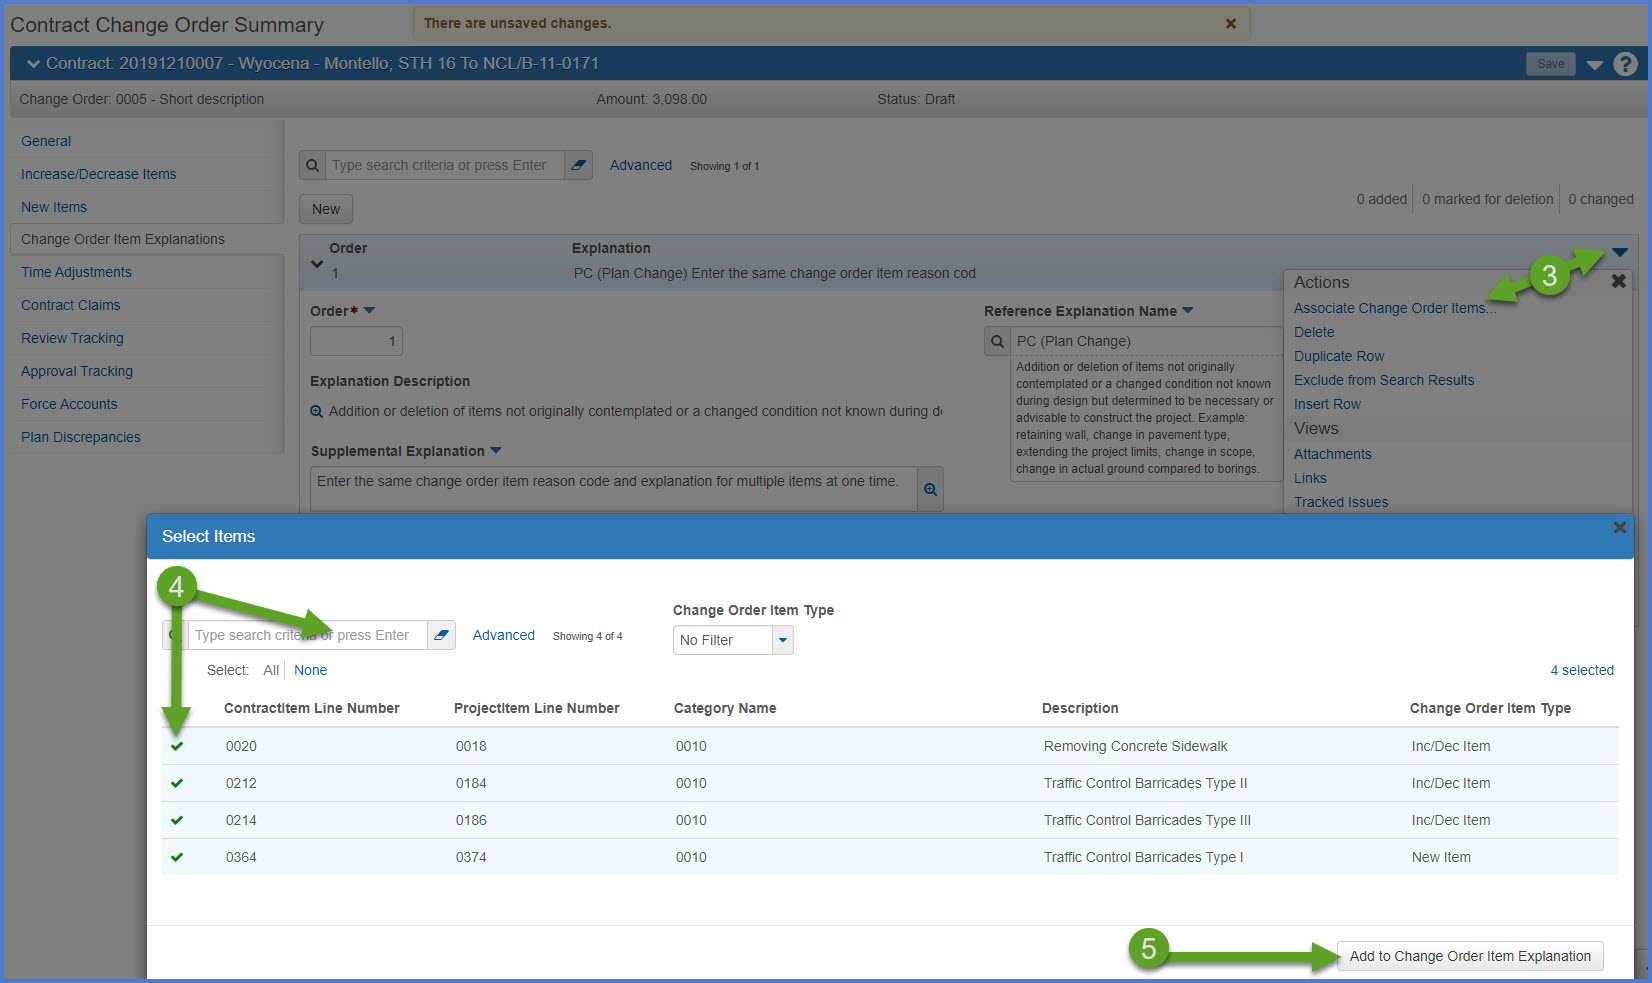
- Select Open Row Actions Menu | Associate Change Order Items...
- On the Select Items component, search for and select the items to associate with the reason code and supplemental explanation.
- Click <Add to Change Order Item Explanation>. The selected items are all added with the same reason code and brief supplemental explanation.
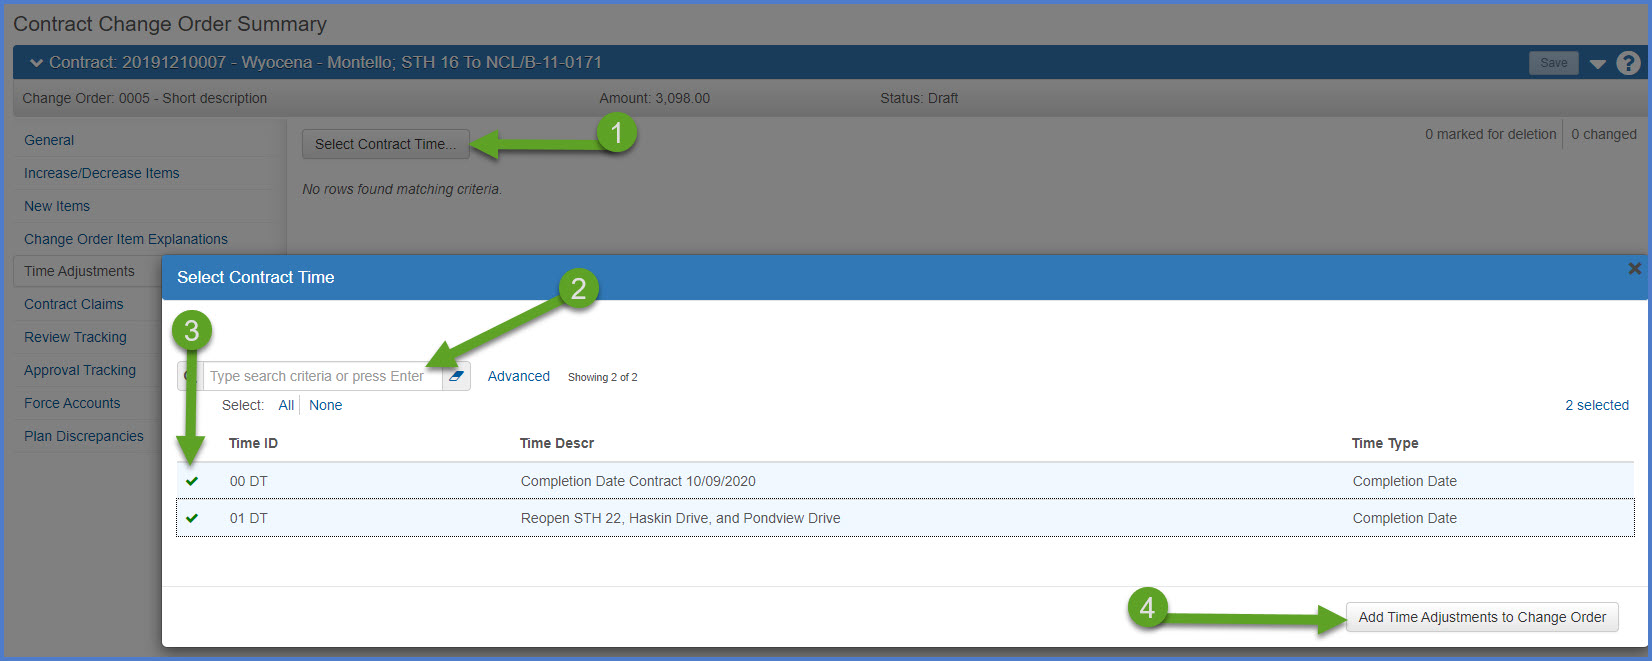
- Click <Select Contract Time>.
- On the Select Contract Time component, click "Show first 10" or search for the site time by entering the time ID or time description in the search box. Only "Active" sites will be displayed.
- Select the site time(s) to adjust.
- Click <Add Time Adjustments to Change Order>.
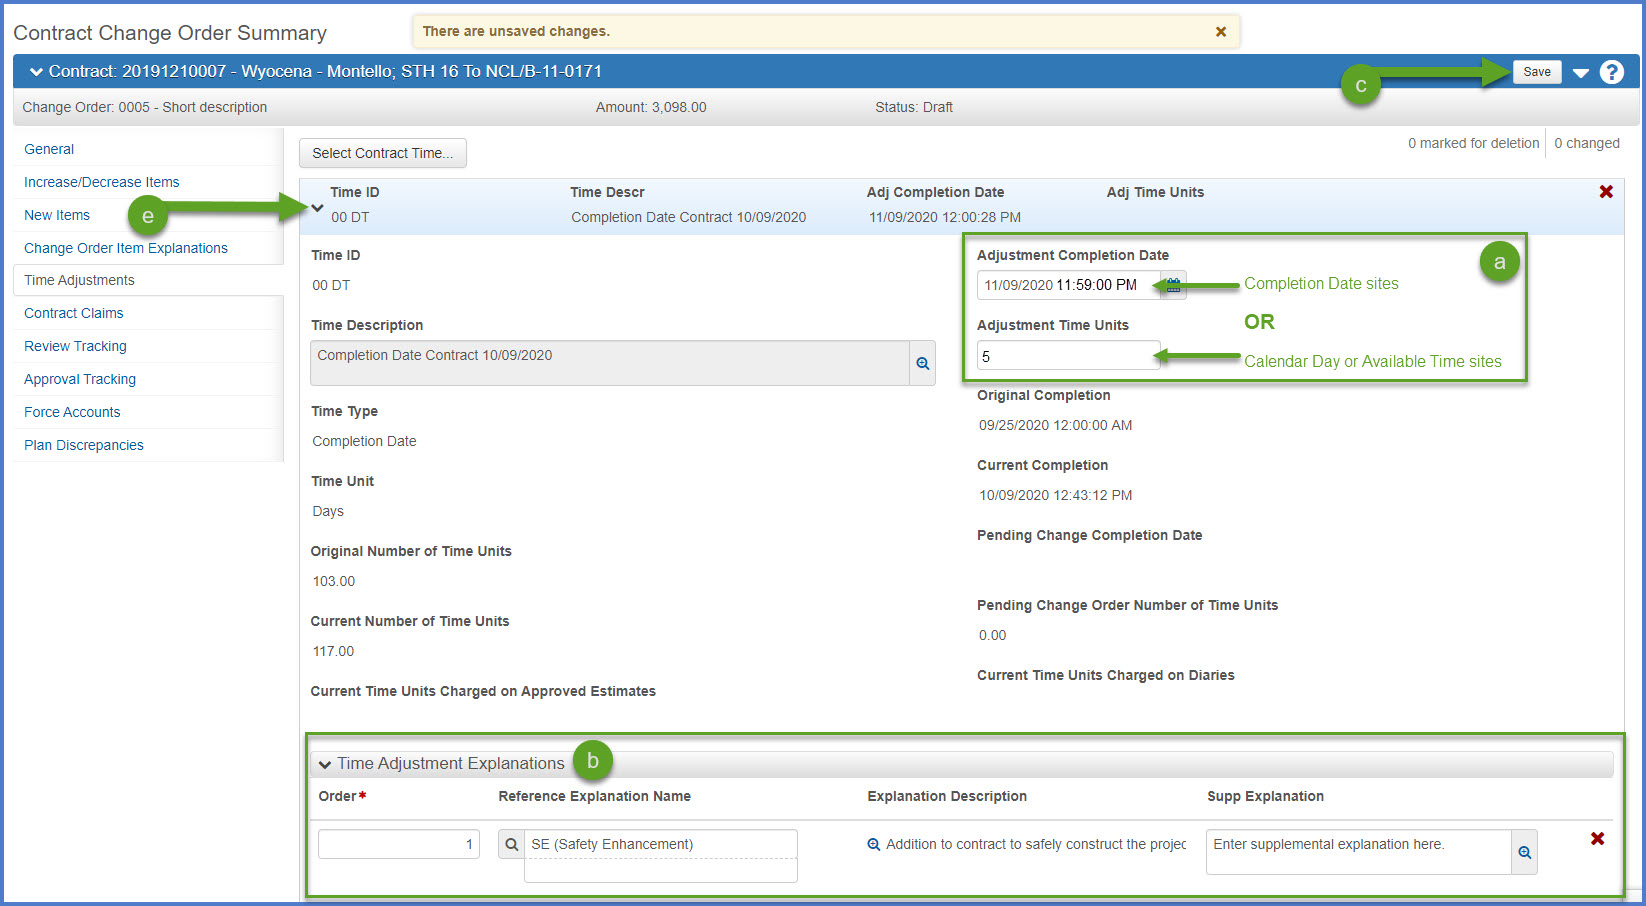
- For each site time record, expand the site row and enter the following fields.
- Enter the Adjustment Completion Date field for Completion Date sites OR enter the Adjustment Time Units field for a Calendar and Working Day (Available Time) sites.
- Completion Date sites
Enter the Adjustment Completion Date field on the site following this format MMDDYYYY HH:MM:SS AM or PM. Do not enter seconds as this portion of the data entry is not saved. - Calendar Day and Working Day (Available Time) sites
Enter the number of additional Adjustment Time Units (days).
Calendar Days must be entered as a whole number only.Examples:- Enter MMDDYYYY 11:59:00 PM to provide the contractor with the entire day to complete work.
- If your contract states to complete the work by MMDDYYYY 12:01 AM, backdate this to the previous day at MMDDYYYY 11:59:00 PM
- Enter MMDDYYYY 08:00:00 AM if the contractor must complete work by 8:00 a.m. on the date indicated.
Info:- Project staff may only change the completion date and not the associated time on a completion date site time adjustment. If the completion date and time were both updated and one or both are incorrect, contact the AWP System Administrators for assistance.
- Review the date and time adjustments once the change order is approved. If there are any errors,
contact the AWP System Administrators for assistance. - Review the draft change order report when entering time adjustments.
Once a site record is created on the Change Order Time Adjustment tab, the user cannot edit the number of working days or calendar days added. The site record must be deleted on the Change Order Time Adjustments tab and reentered.
- Enter MMDDYYYY 11:59:00 PM to provide the contractor with the entire day to complete work.
- Completion Date sites
- Under Time Adjustment Explanations enter the following fields enter all three required fields:
- Order - Enter a Order Number (e.g. 1, 2, 3, etc.).
- Reference Explanation Name - Select a reason codes from the drop down list. The reason code is specific to the item being added. It does not need to match the reason code for the change order.
- Supp Explanation - Enter a brief supplemental explanation to describe why time is being extended on the site.
- Click <Save>. Repeat the above steps for each site time record to be updated.
- Enter the Adjustment Completion Date field for Completion Date sites OR enter the Adjustment Time Units field for a Calendar and Working Day (Available Time) sites.
This tab serves multiples purposes and is an important part of the change order approval process:
- Allows the Project Engineer to assign the default change order approval groups.
- Provides the status of the change order in the approval process.
- Provides the ability for the Project Engineer to add or remove approval groups based on region requirements. This step is completed AFTER assigning the default change order approval groups. The change order must be in draft status to add or remove change order approval groups.
WisDOT has default approval groups based on change order type and the total dollar amount of the change order (new items and increases/decreases). See table below for the default approval level breakdown. The Project Engineer should add the default approval groups to each change order. Additional approval levels can be added or removed to meet the needs of the change order.
- On the Approval Tracking tab, select the <Add Approval Group> action arrow | Assign Default Approval Groups.
- The default approval groups will appear and changes are saved automatically. The list of approvers is based on the total amount of the change order.

There are a few reasons to modify the default change order approval levels from what is set with the default. Work with your Project Manager to determine what levels should be removed or added.
- To adjust the approval levels based on the absolute value of the change order.
- To adjust the approval levels based for time extensions.
- Region management requires different approval levels for a particular project or type of change order.
- If the contractor refuses to sign a change order the Project Manager can direct the Project Engineer to remove the contractors approval group.
To add approval groups:
- Ensure the default approval groups have been added.
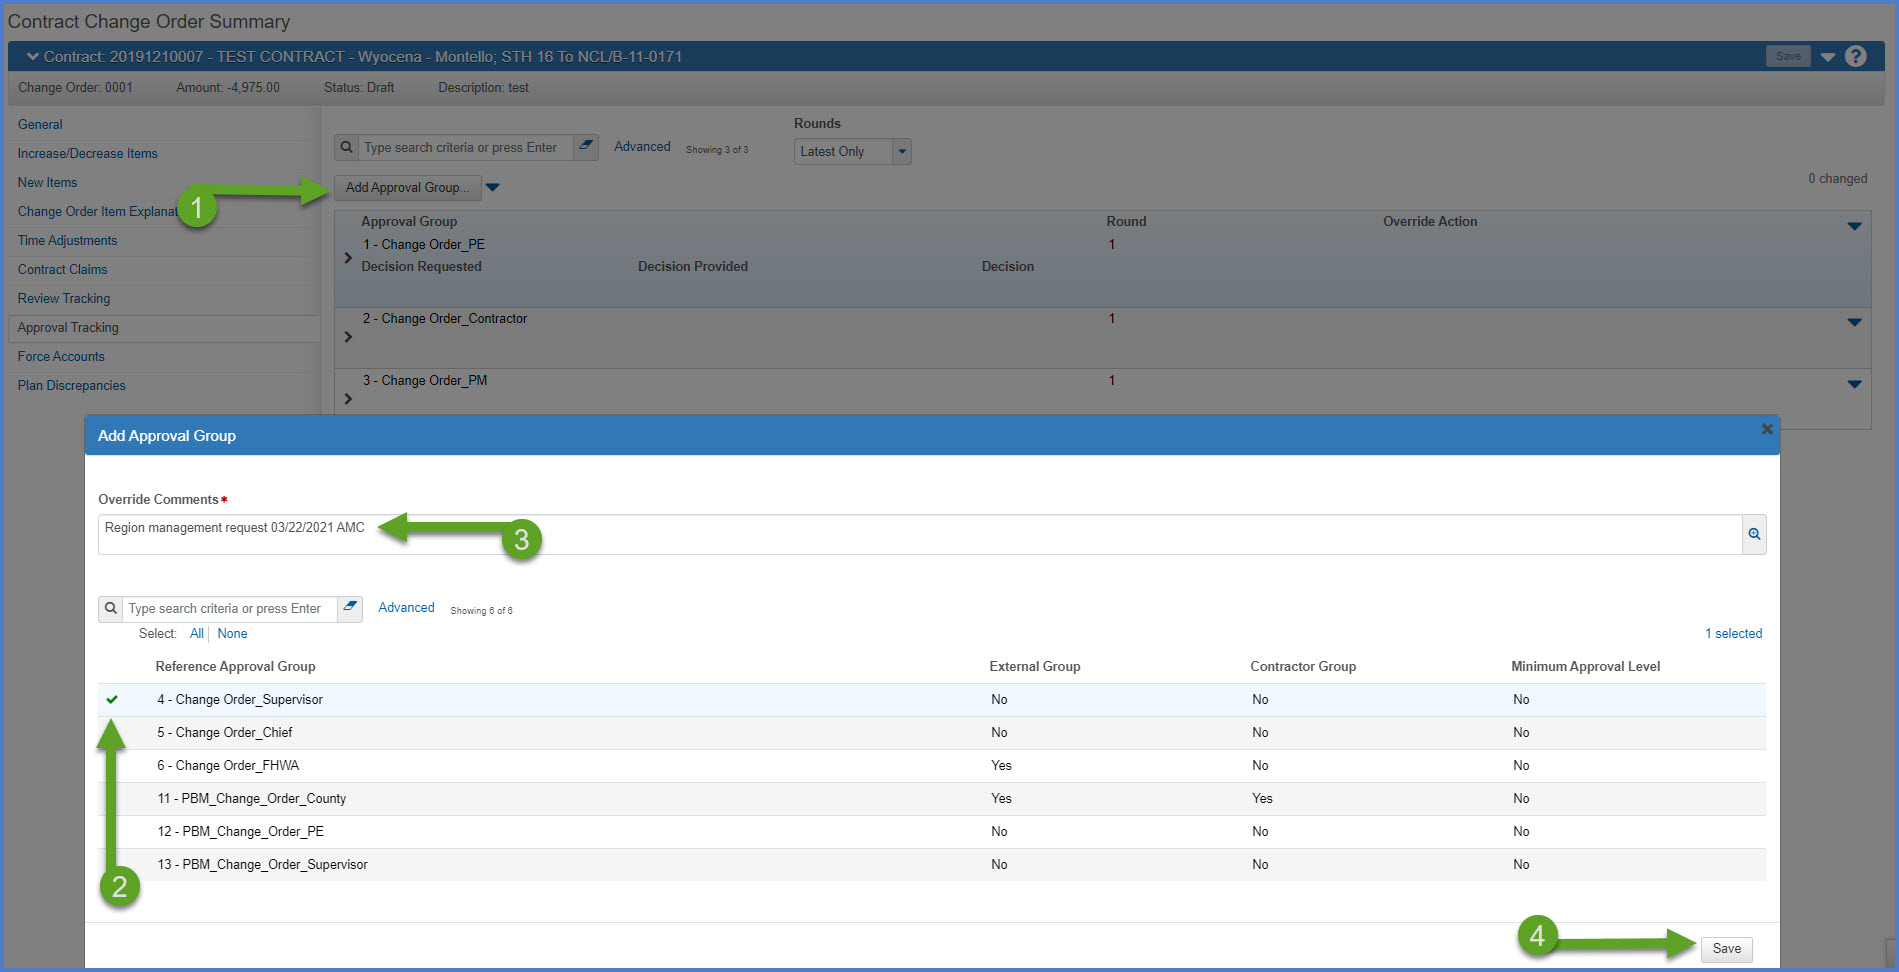
- On the Approval Tracking tab, click <Add Approval Group>.
- From the Add Approval Group window, select the approval group(s) to add to this change order.
- Enter Override Comments explaining why the additional approval group(s) were added to the change order. The comments can include the date of the request and the initials of the Project Engineer.
- Click <Save> when complete. The new approval groups will appear and changes are saved automatically. Change order approval groups have a preset system approval order that cannot be changed.
- Go to Change order approval process for the Project Engineer to continue.
Examples:
Adding Supervisor due to absolute value.
Adding Supervisor and Chief due to time adjustment
To remove approval groups:
- Ensure the change order is in draft status.
- On the Approval Tracking tab, select the <Add Approval Group> action arrow | Assign Default Approval Groups.
- On the Approval Tracking tab, locate the approval level to remove. Select Open Row Actions Menu | Remove Approval Group.
- On the Remove Approval Group component, enter Override Comments. Click <Save>.
- On the Approval Tracking tab, the Override Action column for the removed approval group will display "Removed".
- Go to Change order approval process for the Project Engineer to continue.
Once a change order is complete AND the correct approval groups have been assigned, the Project Engineer completes these steps to submit the change order for approval and approve the change order.
- It is the Project Engineer and the Project Manager's responsibility to confirm the correct approval groups are displayed BEFORE approving the change order. Changes can be made up until the final approval group approves the change order. Go to Update a change order in pending approval status (e.g. update items, descriptions or approval groups) for details on adding or removing change order approval groups.
- If an approval level is missing on an approved change order, the Project Engineer or Project Manager must work with the Contract Specialist to obtain the missing signatures. Go to Construction & Materials FAQs | Change orders - approved change order missing approval levels for more information.
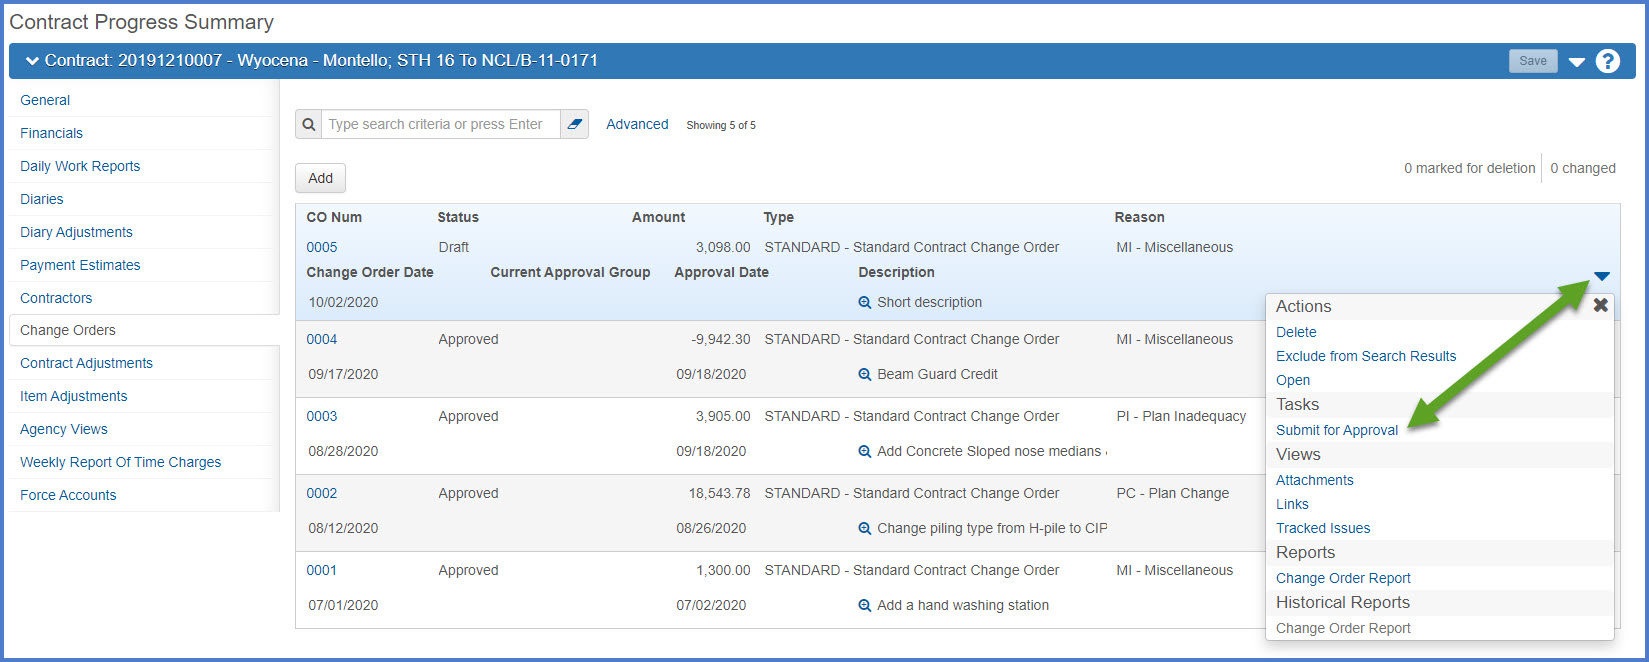
- Select the Component Actions Menu | Submit for Approval.
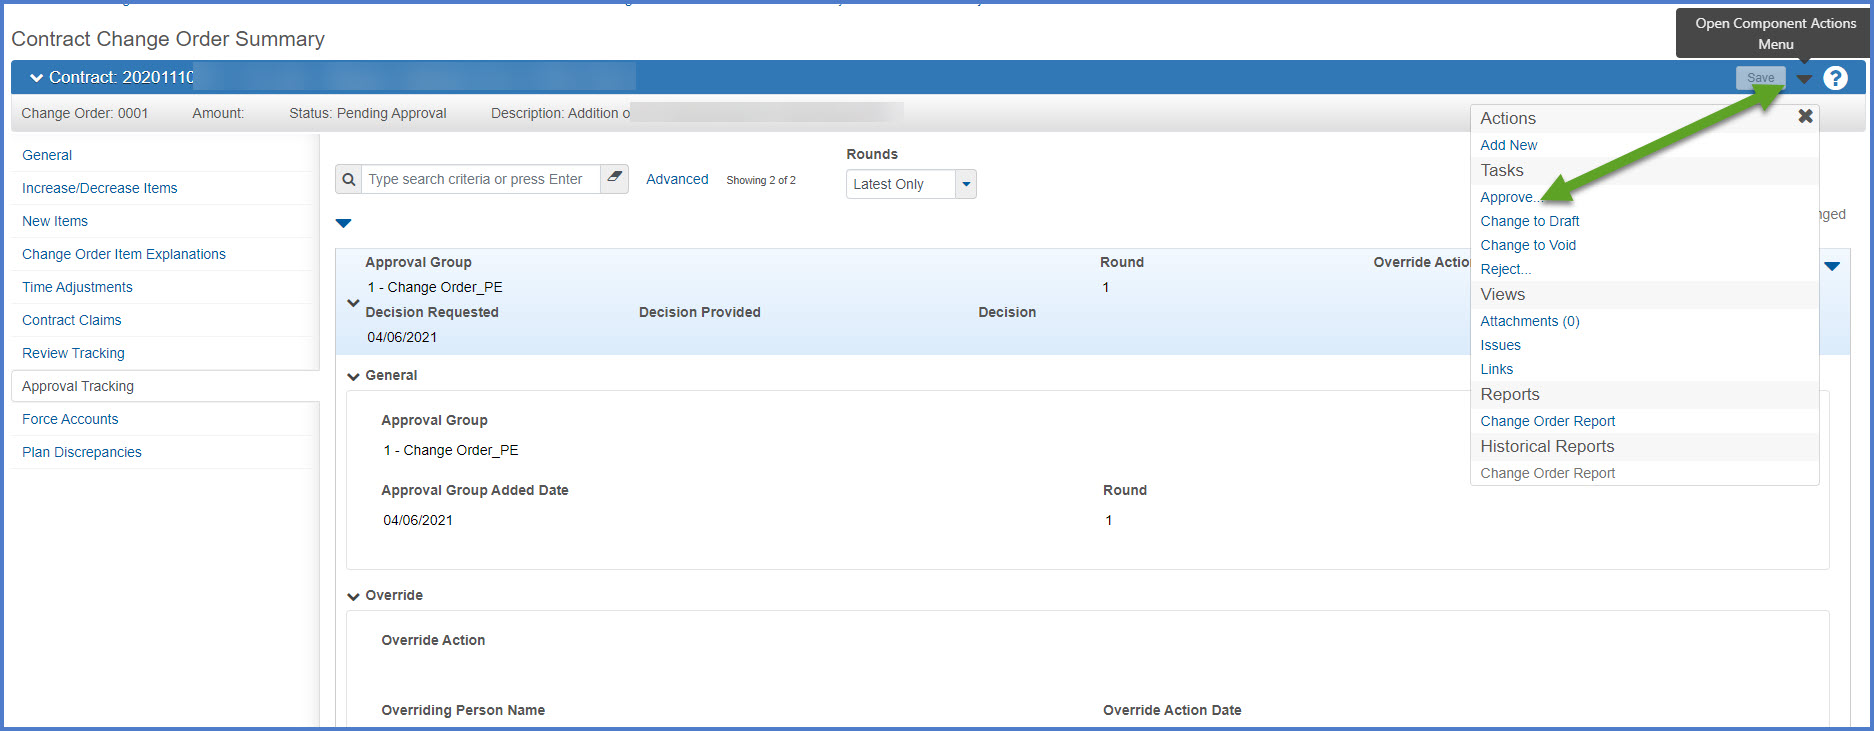
- Select the Component Actions Menu | Approve.
- On the Approve window, complete the Required Decision Comments field. Click <Save>.
- Approved on MM/DD/YYYY by Initials
- Approved by Initials
- Plus any additional comments
- An email notification will be sent to the next approval level for this change order based on the change order type and the dollar amount of the change order.
- Click on the Approval Tracking tab to monitor the approval process.

Go to Change order approval process for other approval groups for the change order approval process for all other roles including the Contractor, Project Manager, Supervisor, Chief, and FHWA.
The Approval Tracking tab displays the status of the change order in the approval process, if any override actions have taken place (addition of change order groups), and what round the change order is in.
In this example, change order 0002 is in Pending Approval status.
- The 1 - Change Order_PE approval group approved the change order on 3/15/2021.
- The change order is pending 2 - Change Order_Contractor approval. Staff with the Contractors role on this contract have received a system notification email message requesting their review and approval.
- Approval levels were added to this change order for the contractor, supervisor and chief. The default approval groups were the 1 - Change Order_PE and 3 - Change Order_PM.
- The change order is in round number 2 which means that the round number 1 was closed for a business reason.
If the approval process has begun and staff realize that a change order requires changes (e.g. missing approval groups(s), missing an item or attachment, incorrect sort or long description), the Project Engineer can update the change order status from Pending Approval to Draft, make the changes, and resubmit for approval.
- On the Contract Change Order Summary component, select the Component Action Menu | Change to Draft. This will close the current approval round.
- Update the change order as necessary (e.g. add new items, change current contract items, adjust time, update the description, etc.). Click <Save>.
- The default approval group will need to be reassigned. On the Approval Tracking tab, select the <Add Approval Group> action arrow | Assign Default Approval Groups. The default approval groups will appear and changes are saved automatically. The list of approvers is based on the total amount of the change order. If additional approval groups are required, go to Add or remove change order approval levels.
- Select the Component Actions Menu | Submit for Approval. This will place the change order back in Pending Approval status.
- On the Approve window, complete the Required Decision Comments field. Click <Save>.
- Approved on MM/DD/YYYY by Initials
- Approved by Initials
- Plus any additional comments
- An email notification will be sent to the next approval level for this change order based on the change order type and the dollar amount of the change order.
A change order can be rejected during the approval process but only by the current approval level. For example, if the Project Manager wants to reject a change order, this MUST be done after the previous approval levels have approved the change order. If a different approval level refuses to sign a change order (e.g. Contractor), complete the steps under Refusal to approve a change order.
For situations where it is determined that the change order is no longer needed and project staff would like to delete it, contact the AASHTOWare Project System Administrators for assistance.
- Only the most recent draft change order can be deleted.
- If staff intend to delete a prior draft change order, the AASHTOWare Project System Administrators will "Void" the change order.
- To reject a change order, select the Open Components Action Menu | Reject. If this option does not appear, contact the AASHTOWare Project System Administrators for assistance.

- Enter the reason for the change order rejection. Click <Save>.


The Project Engineer should discuss the rejected change order with the Project Manager to determine if the change order can be updated to accommodate the rejection.
- From the Contract Progress Summary Component | Change Orders tab, open the change order. Select Open Component Actions Menu | Change to Draft.

- Update the change order and save the changes.
- Resubmit the change order for approval following the steps below:
- Approval Tracking tab (adding change order approvers and submitting for approval)
- Change Order Approval Process for the Project Engineer
- These steps will place the change order in the next round of the approval process (meaning that the previous round was closed due to the rejection).
- Go to Change order approval process for the Project Engineer
- Go to Change order approval process for other approval groups for the change order approval process for all other roles including the Contractor, Project Manager, Supervisor, Chief, and FHWA,
If the contractor refuses to sign a change order, the Project Manager or Supervisor can direct the Project Engineer to remove the contractors' approval group from the Approval Tracking tab.
- From the Contract Progress Summary Component | Change Orders tab, open the change order. Select Open Component Actions Menu | Change to Draft.

- If necessary, update the change order and save the changes.
- Resubmit the change order for approval following the steps below:
- Adjust the approval groups for the change order by removing the Contractor - Approval Tracking tab (adding change order approvers and submitting for approval)
- Begin the change order process again - Change Order Approval Process for the Project Engineer
- Only the most recent draft change order can be deleted after removing all new items, any item increases or decreases, and time adjustments from the change order.
- If staff intend to delete a prior draft change order, staff must work with the System Administrators to update the change order to "Void" status.
- Approved change orders are a permanent part of the contract and cannot be deleted.
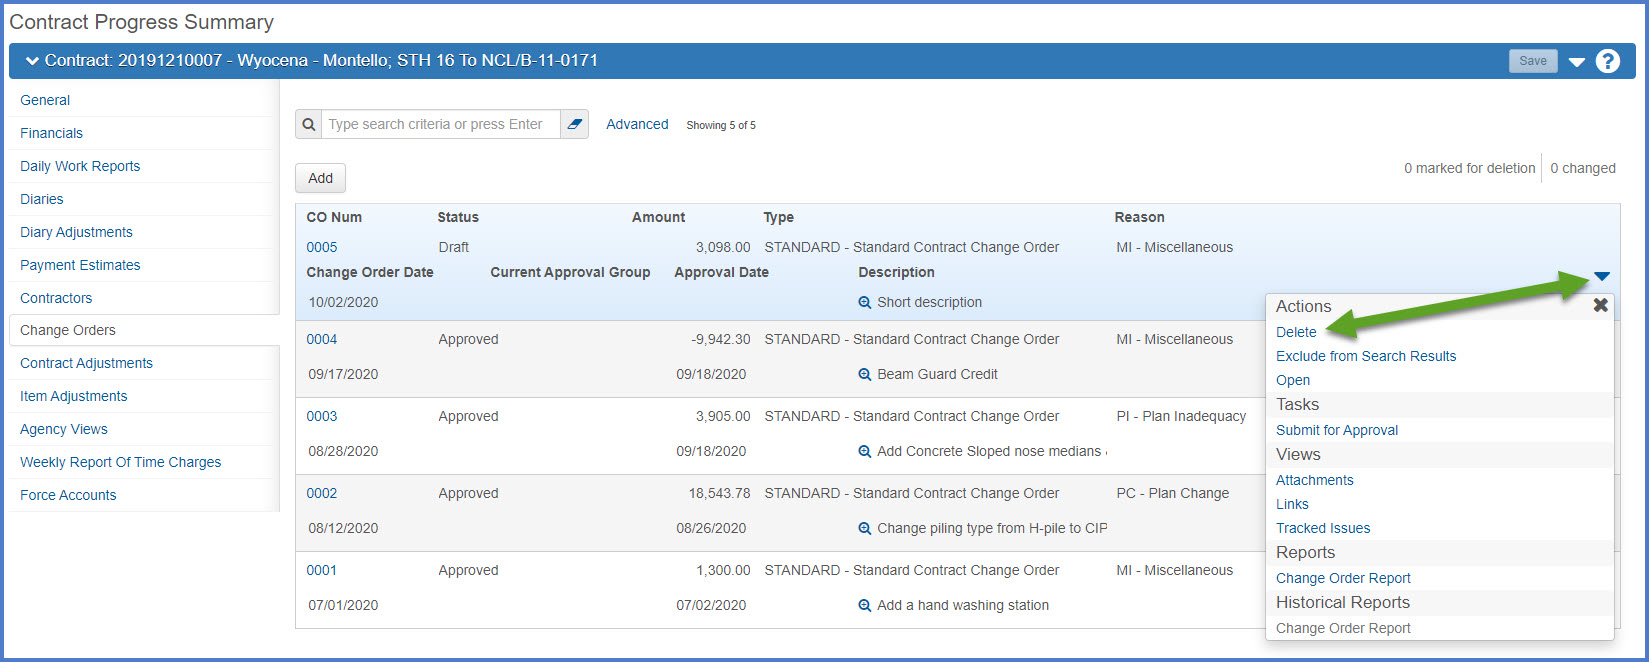
- From the Contract Progress Summary | Change Orders tab, locate the change order to delete.
- Select Open Row Actions Menu | Delete
- The change order is marked for delete. Click <Save> to complete the change order deletion process.
OR
Project Engineers can attach supporting documentation and files to their change order. Added or revised plan sheets are the most common type of file to attach. Other documentation includes construction details, special provisions, or special revisions with formatted tables that are easiest to create in Microsoft Word and save as an PDF file (rather than try to enter into the Description of Changes field on the Change Order General tab.
- Do not attach the Contract Modification Justification form (DT2355) to the change order in AWP Construction. This file is saved in Box and is accessible by select region staff only.
- Project Engineers cannot add attachments to change orders in Pending Approved or Approved status. Attachments must be added when the change order is in Draft status.
-
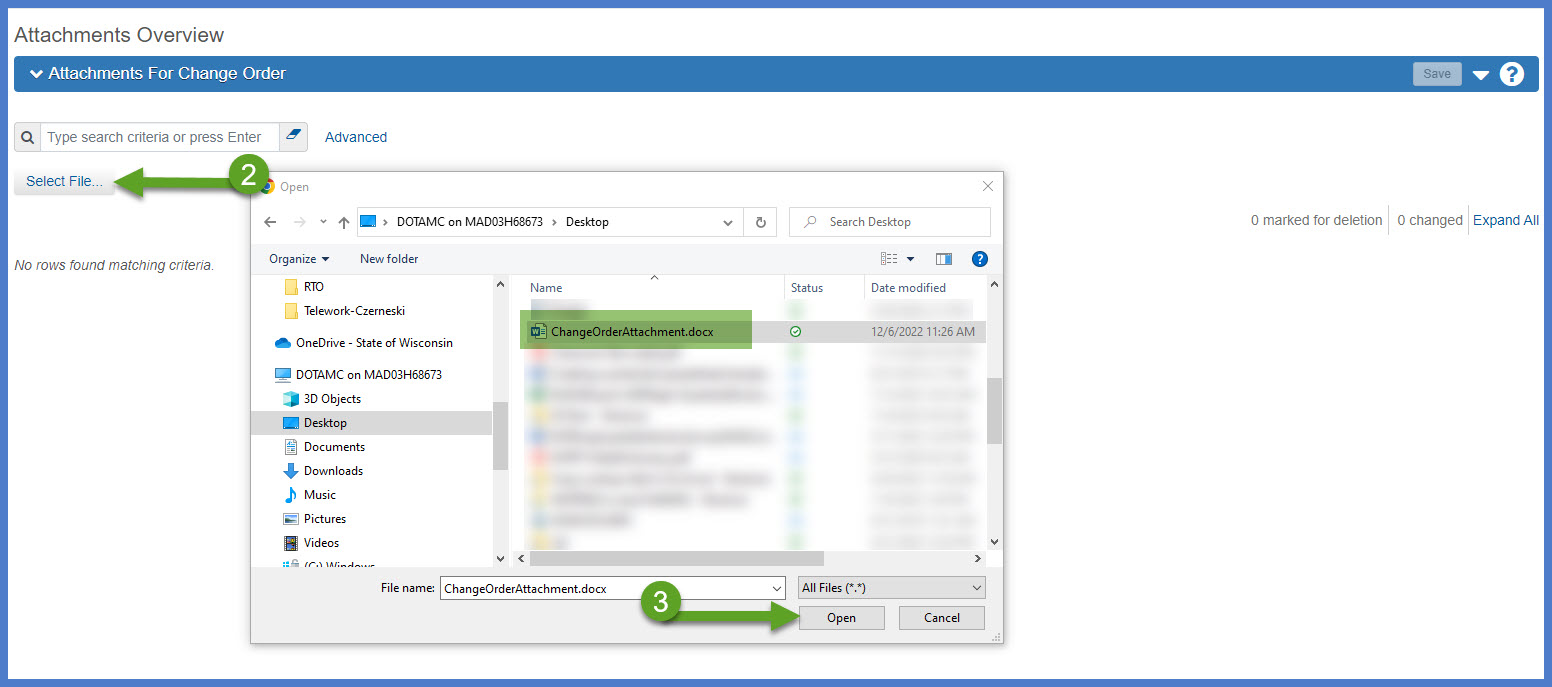
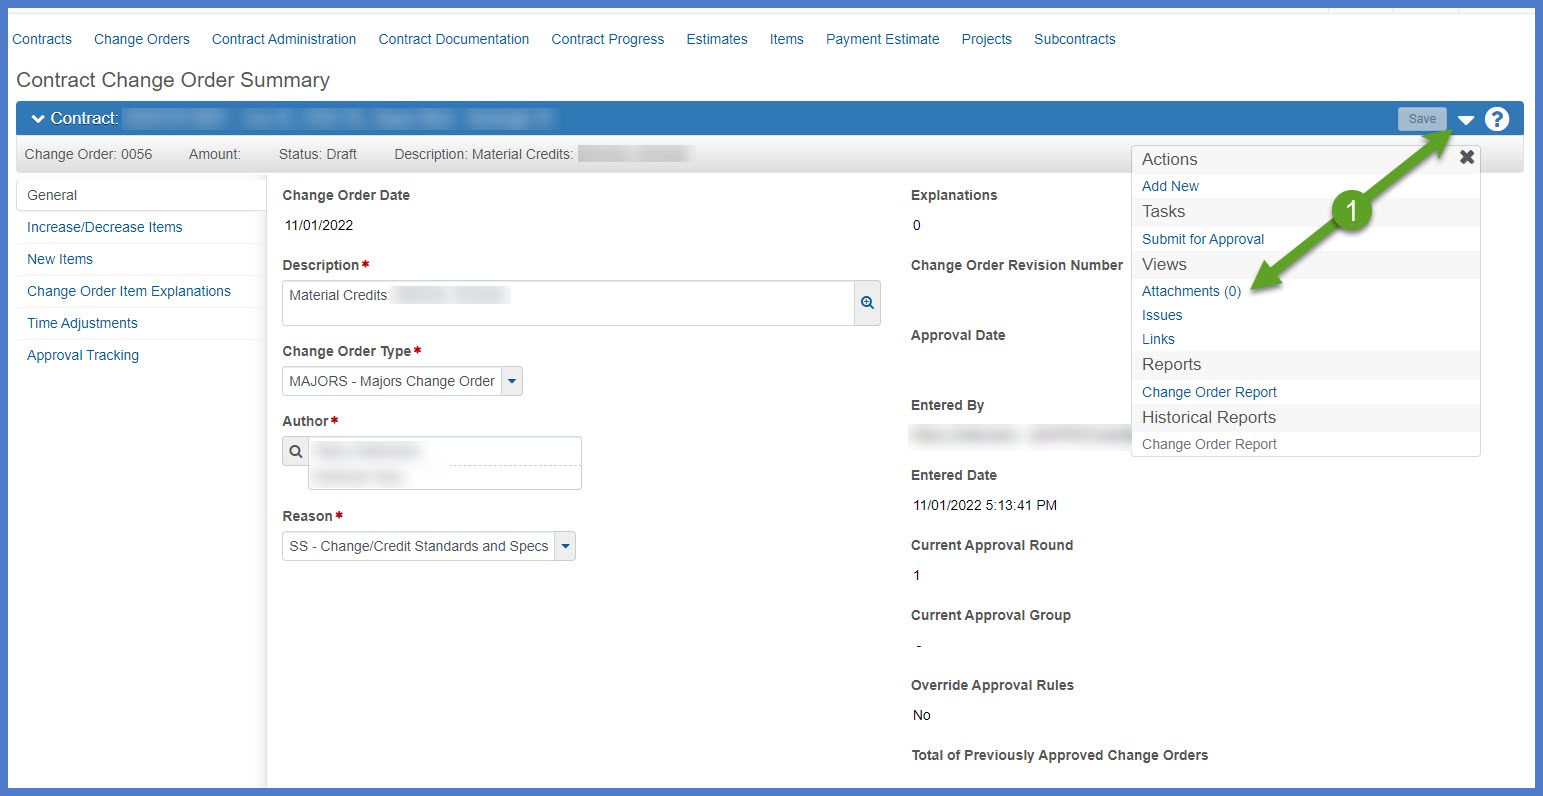
On the Contract Change Order Summary component, select the Components Action Menu | Views |Attachments.
-
On the Attachments for Change Order component, click <Select File>
-
Add the optional description field and click <Save> to attach the file to the change order.

-
On the Contract Change Order Summary component, under the Components Action Menu | Views |Attachments (#), the # is equal to the number attachments on this change order.
Project Engineers can note the URL for supporting documentation and files within their change order.
Do not provide the URL for the Contract Modification Justification form (DT2355) within the change order in AWP Construction. This file is saved in Box and is accessible by select region staff only.
-
On the Contract Change Order Summary component, select the Components Action Menu | Views |Links.
-
On the Links for Change Order component, enter the URL for the location of the document and a link name (e.g. Project ####-##-## Information). The description field is optional.
-
Click <Save>.
