Change project spec book
Last updated: 2026-02-04
WisDOT maintains an item spec book. The spec book is the master item list and it is updated each year with the Standard Specification effective each November and for STSP changes. In addition, WisDOT updates the Estimator catalog each year to stay in sync with the latest version of the spec book. Major spec book changes coincide with the August PS&E as these projects are slated to be in the November, December and January lettings.
If major changes are required in the item spec book, a new one may be created. The designer will complete these steps to change the spec book tied to their projects(s) and proposal.
- Select the Projects hyperlink from the dashboard.
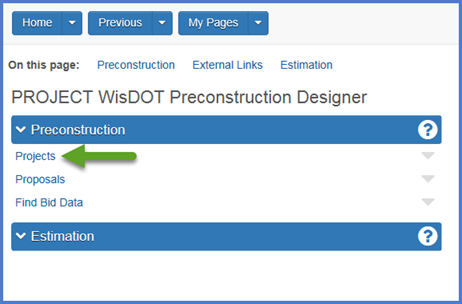
- On the Project Overview component, search for the project by entering all or a portion of the project ID in the search or using the advanced filter. Select the project.

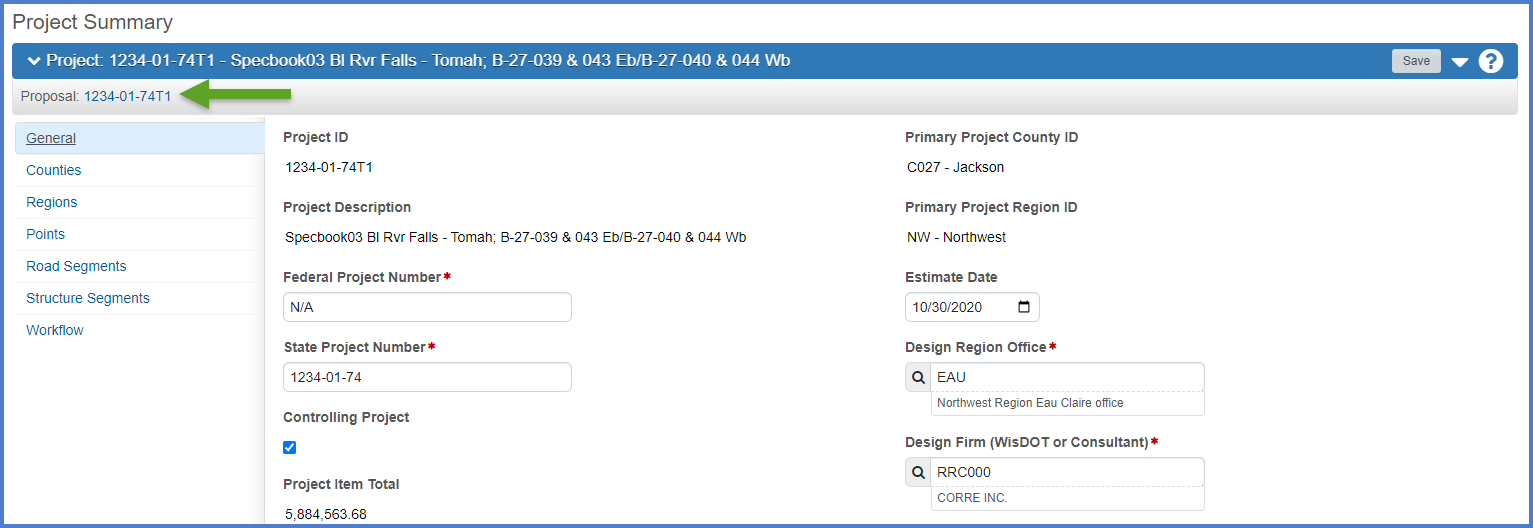
On the Project Summary component, check to see if there is an associated proposal. If there is, complete steps 1-3 below.
- Click on the proposal hyperlink.
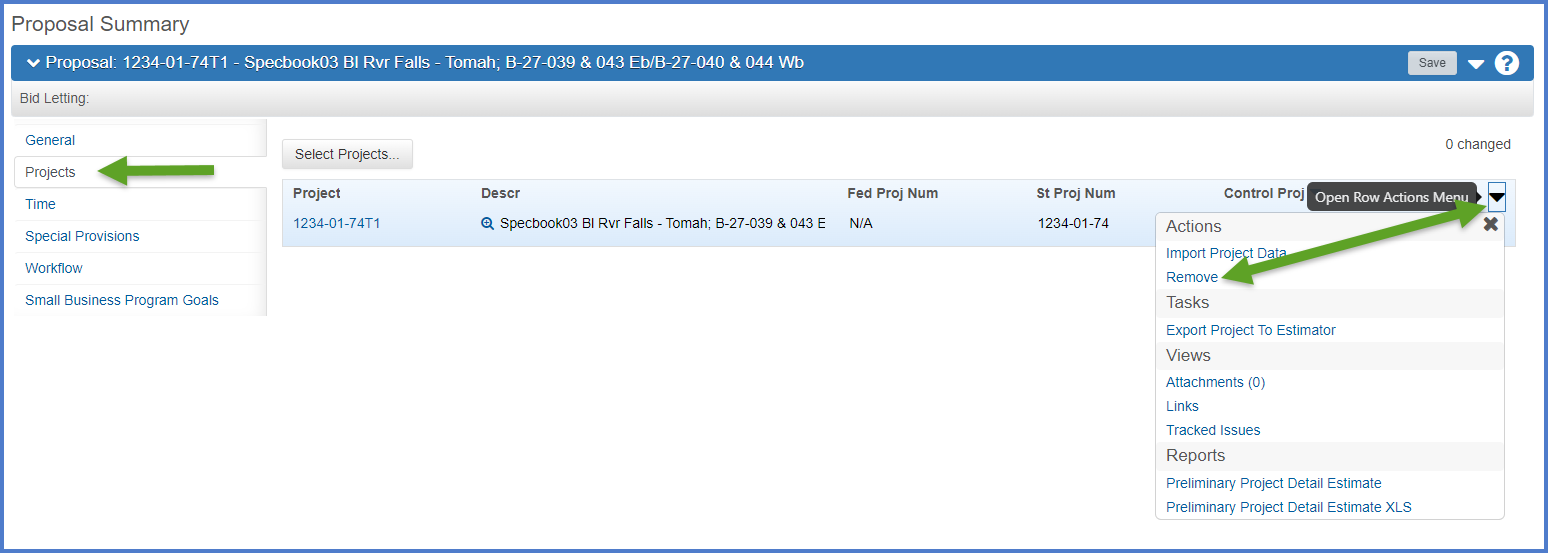
- On the Projects tab, click Open Row Actions Menu | Remove. This will remove the project from the proposal. This will NOT delete the project from AASHTOWare Project. Requirements:
Repeat this step for all the projects associated to this proposal.
- Click on the drop down arrow next to <Go to the previous page> . Select the hyperlink for the project summary component for the project to be updated.

- On the Project Summary component, click Open Component Actions Menu | Change Project Spec Book.Requirements: Ensure the project is not associated to a proposal. if it is, go back to Disassociate project(s) from the proposal.

- On the Change Spec Book Project ####-##-## component, update the following required fields and click <Save>.
- Source Project ID - Edit the source project ID (this will become a copy of the current project) to a max of 13 characters. We recommend using the current project ID with an "old" suffix at the end.Examples: :
1234-04-71old
Note: The old project will be deleted automatically by the AWP System Administrators at the end of each month. - Destination Spec Book - The new Spec Book ID as provided by WisDOT.

- Source Project ID - Edit the source project ID (this will become a copy of the current project) to a max of 13 characters. We recommend using the current project ID with an "old" suffix at the end.
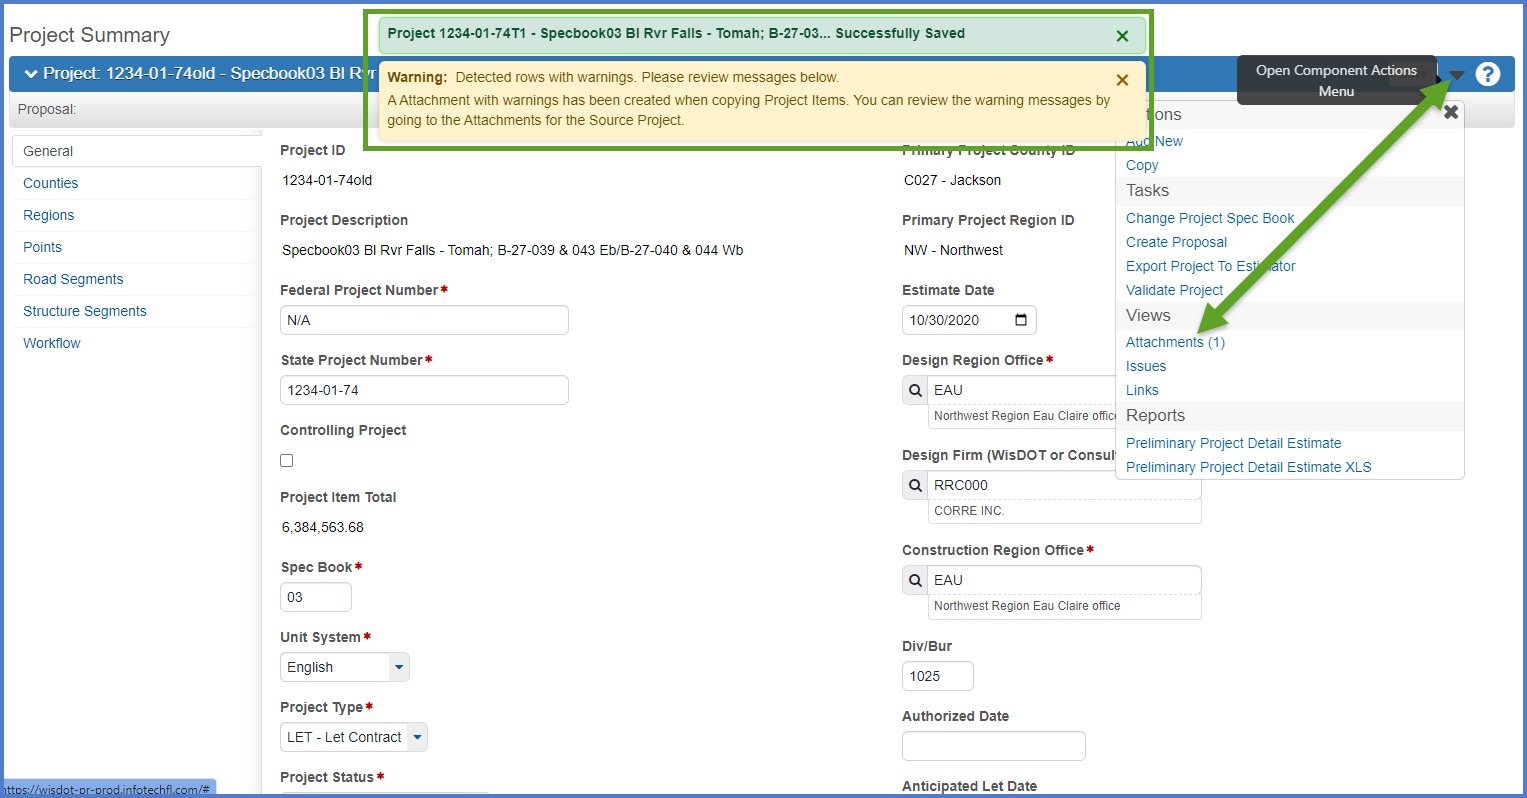
- At the completion of the process, the message Project ####-##-## - Specbook## Project Description and Limits - Successfully Saved should appear. In addition, there may be a yellow warning box. If there are warnings, complete the steps below to review and resolve them.
- Click Open Component Actions Menu | Attachments (1).
- On the Attachments Overview component, click on the hyperlink for the ProjectItemsNotCopied.txt file to download and open it. The file will be saved to the \Downloads folder on the local computer.


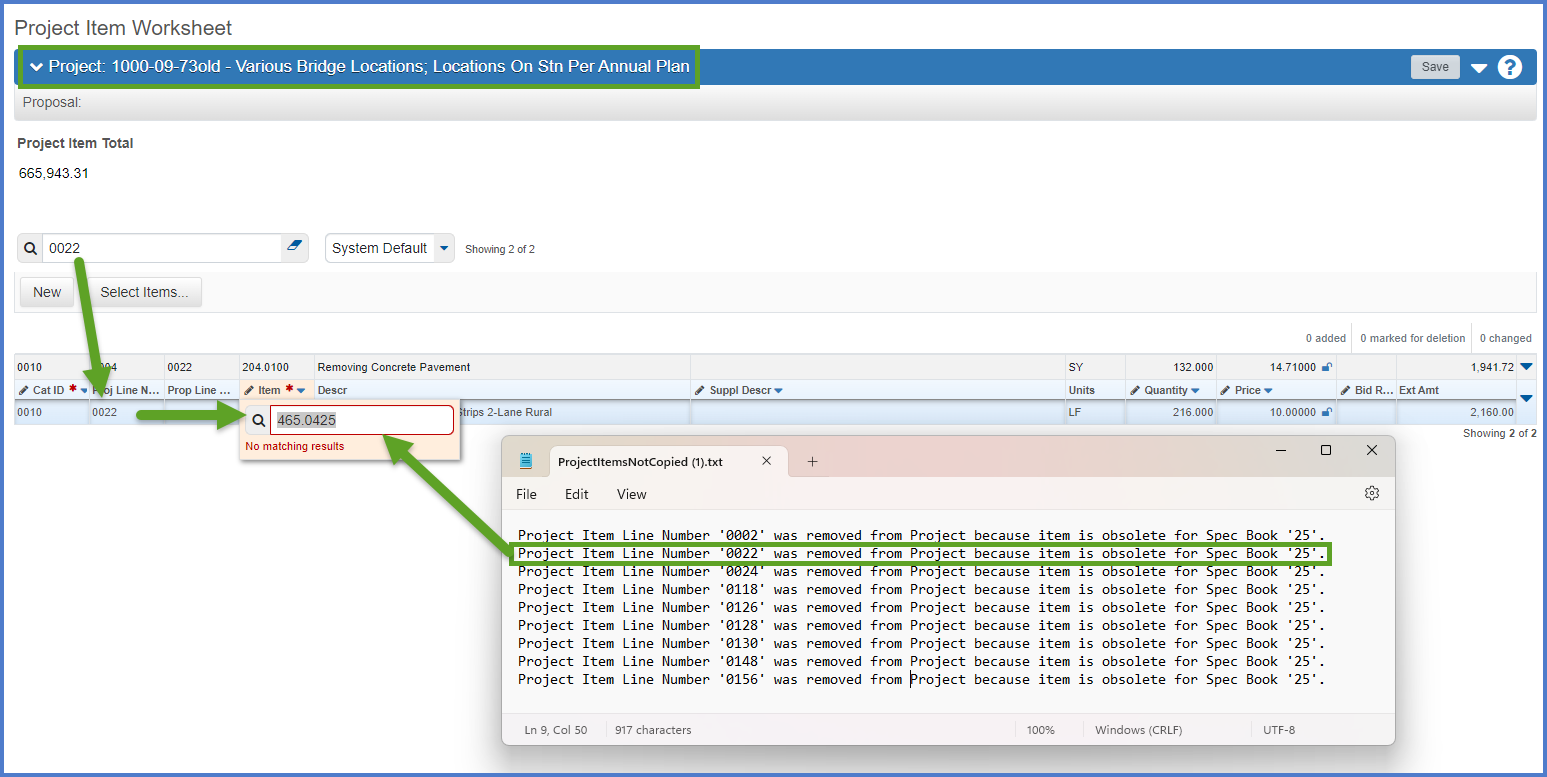
- This is an example of the file output. Each obsolete project item line number is listed.

- An automated process will delete the "old" project file on a monthly basis.
If there were obsolete items found during the change spec book process and the ProjectItemsNotCopied.txt file was created, complete steps 1-7 below.
- Select the Projects hyperlink from the dashboard.

- On the Project Overview component, search for the project by entering all or a portion of the project ID in the search or using the advanced filter. Select the project hyperlink to open the old project.

- Select the Item worksheet quick link.
- Search for and identify the obsolete items in the old project. Make note as these items must be added to the new project.
- Go back to the dashboard and select Projects hyperlink.

- On the Project Overview component, search for the project by entering all or a portion of the project ID in the search or using the advanced filter. Select the project hyperlink to open the 'new" project.

- Add the missing (obsolete) items to the project. See Project Item Worksheet for details.
After creating the project, designers MUST enter the workflow and workflow phase. These steps MUST be complete for each project that will be associated to the proposal in the next step.
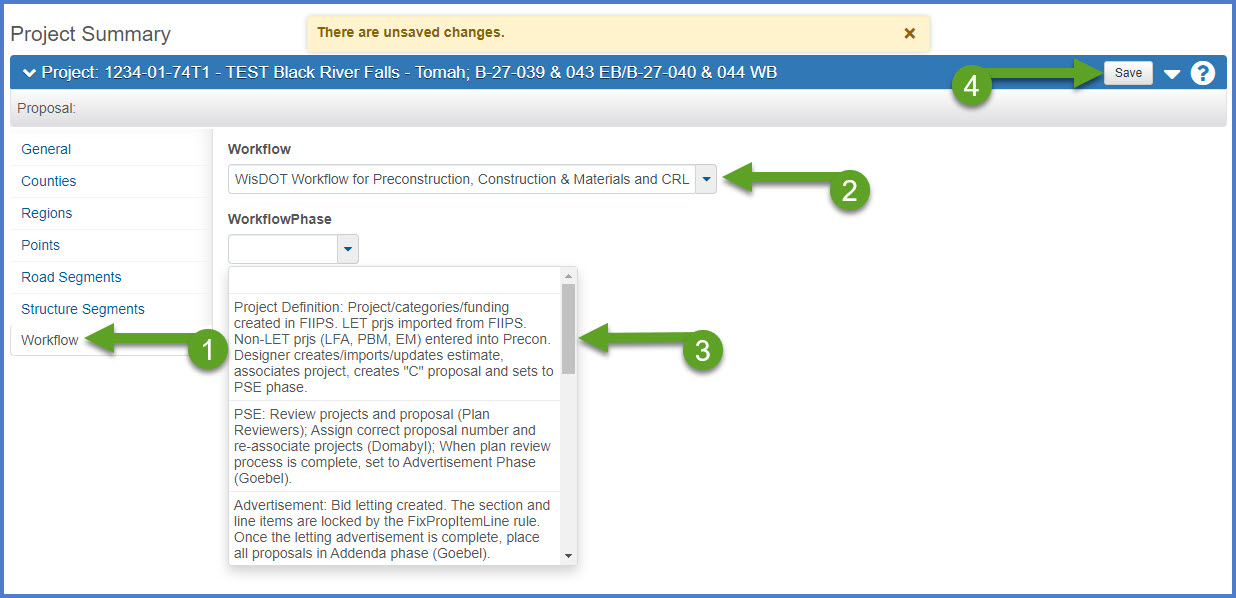
- From the Project Summary component, select the Workflow tab.
- From the Workflow drop down list select:
"WisDOT Workflow for Preconstruction, Construction & Materials and CRL" - From the Workflow Phase drop down list select:
"Project Definition: Project/categories/funding created in FIIPS. LET prjs imported from FIIPS. Non-LET prjs (LFA, PBM, EM) entered into Precon. Designer creates/imports/updates estimate, associates project, creates "C" proposal and sets to PSE phase." - Click <Save>.
Designers should validate the project again at this point.
- From the Project Summary component, select Open Component Actions Menu | Validate Project.
- If errors are found, the designer must correct them and rerun the validation. All projects to be included in a proposal must be validated.
- If errors are not found, the project is valid.
A proposal can contain a single project or many projects. When more than one project is assigned to a proposal, all the projects must have the same spec year and unit system. The proposal will also inherit the workflow phase from the associated projects so make sure this is set be associating them.
To add the project(s) back to the proposal, complete the steps below:
- Select the Proposals hyperlink from the dashboard.
- Search for and select the proposal on the Project Overview component.
- From the Proposal Summary component, select the Projects tab..
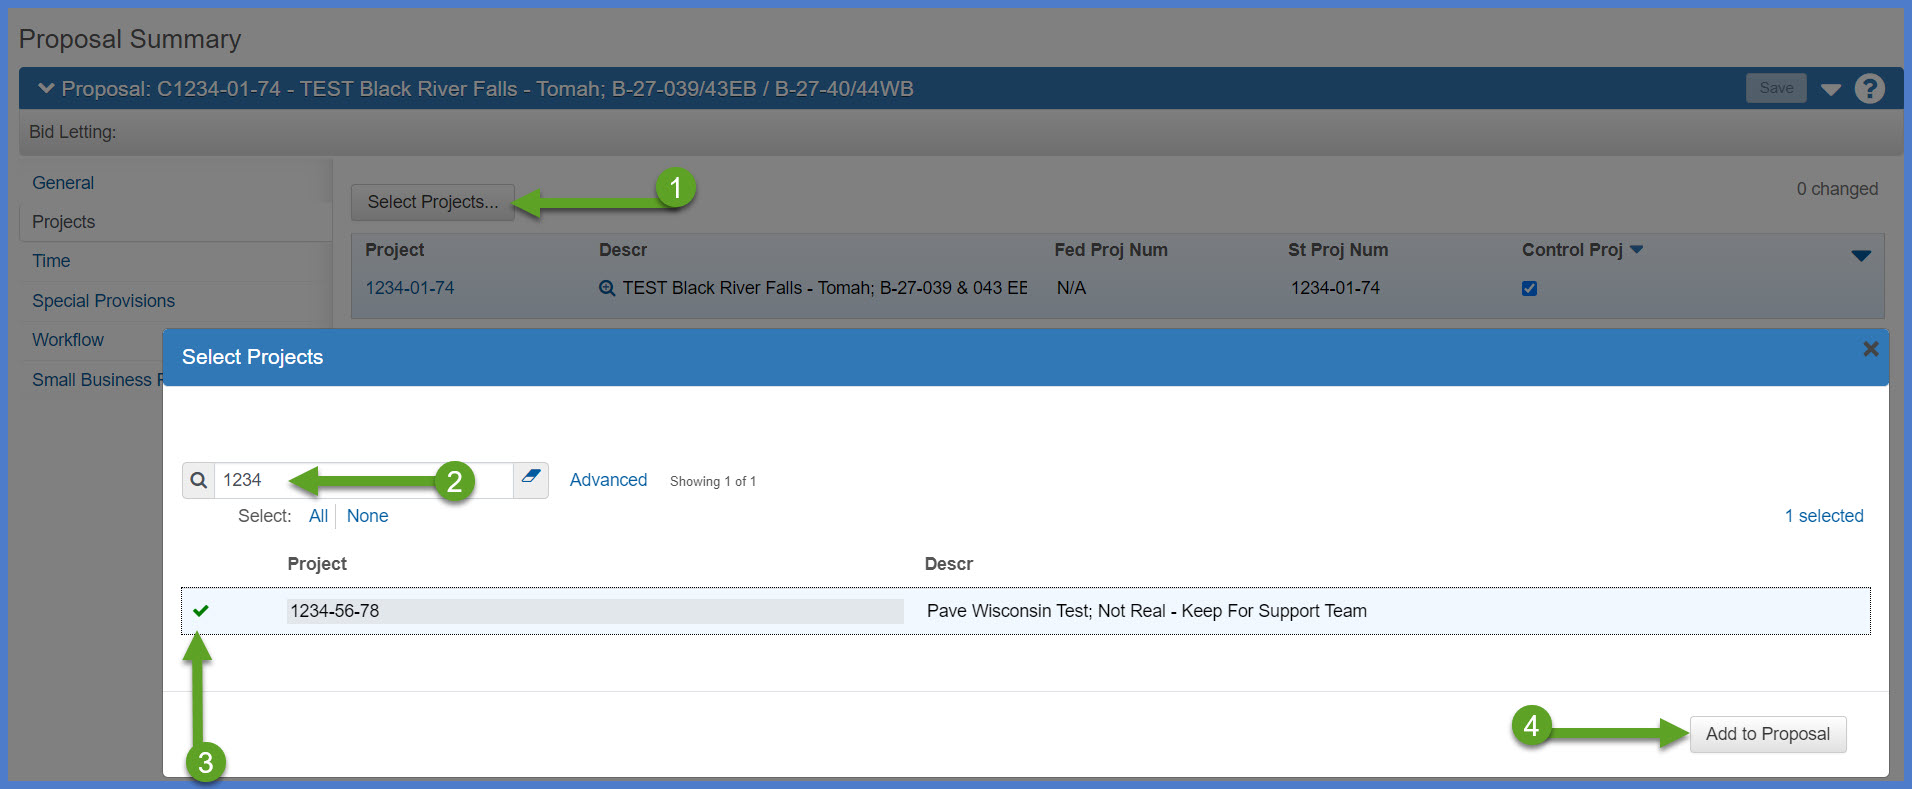
- Click <Select Projects...>.
- Search and select the project(s) to be added.
- Select one or more projects to associate with this proposal by clicking in front of the project number. Projects to be added will be noted with a green check mark. In addition, a count of the number of projects selected is shown in the upper right hand corner of the screen.
- Click <Add to Proposal> to add the selected projects.
- The projects to be added will be displayed on the Proposal Summary component Projects tab.
- Select the checkbox next to the controlling project.
- Click <Save>.

The Proposal Sections and Items component allows you to organize the project items into the proposal section 0001 and generate proposal item line numbers.
Depending upon where the designer is at in the PS&E process, select one of the options below.
Designers should validate the proposal at this point.
- From the Proposal Summary component, select Component Actions Menu | Validate Proposal.
- If errors are found, the designer must correct them and rerun the validation.
- If errors are not found, the proposal and all associated projects are valid.