How to add a project after award
Last updated: 2025-09-17
Roles:
- Contract Specialist, Project Engineer = modify access
- Contractors, Project Manager, Supervisor, Chief, Inspector, FHWA, ReadonlyConstr = read only access
Typically, all projects are loaded into the system during the FIIPS import process. The projects are later tied to proposals, bid on by contractors, awarded to a contractor and transitioned to construction.
On occasion, a project may need to be added to a previously awarded contract for additional unforeseen work. In AWP Construction, both the Contract Specialist and the Project Engineer will work together closely to add a new project to a contract by completing these steps:
- The Project Engineer will create a Contract Modification Justification (CMJ) to describe why a project will be added to the contract.
- The Contract Specialist will ensure the project has been created and authorized in FIIPS.
- The Contract Specialist will create the project in AWP Construction following a process similar to the one used in AWP Preconstruction.
- After the Contract Modification Justification is approved, the Project Engineer can create the change order to add the project BUT cannot add items to the change order until the project creation and approval process is complete.
- When the project creation and review process is complete, the Project Engineer can add the items to the project on the change order.
- When all the new items have been added and the change order is complete, the Project Engineer will follow the steps to add additional approval groups, if necessary, and begin the approval process.
- Once the change order is approved, the Project Engineer will add the new items to the subcontractors so the items can be posted to on future DWRs.
Tip: Click on the thumbnail images below to expand and view the content.
-
Log into FIIPS.
-
Search for the project.
-
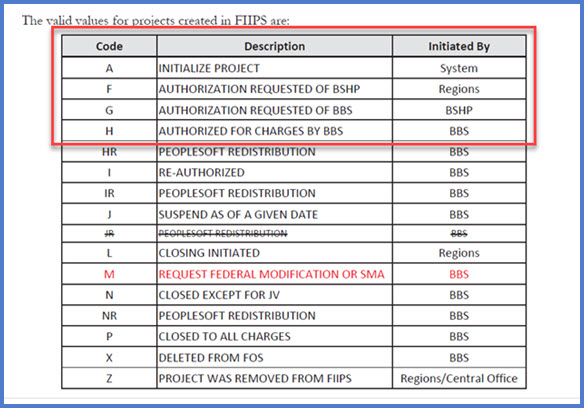
On the FIIPS – Project Description page, check the Review Control field to see if the project is authorized. The region FIIPS Coordinator begins the authorization process by changing the project from “A – Initialize Project” to “F – Authorization Requested of BSHP”. A project cannot be created in AWP Construction until the FIIPS Review Control field is “H – Authorized for Charges by BBS” and the project is in PeopleSoft. The Contract Specialist or Project Manager needs to monitor the project's process in FIIPS.
- If 100% state funded, the project will get authorized within a few days. If federally funded, the authorization process could take several weeks.
- A project that is at “I – Re-Authorized”, can be considered the same as “H – Authorized for Charges by BFM”. For example, a project that was previously moved to “H” but had a failed LET is normally moved to “J – Suspend As of a Given Date”. When the project is LET again, the project is Re-Authorized but it cannot be moved back to “H” and is instead moved to “I”.
- Log into AASHTOWare Project.
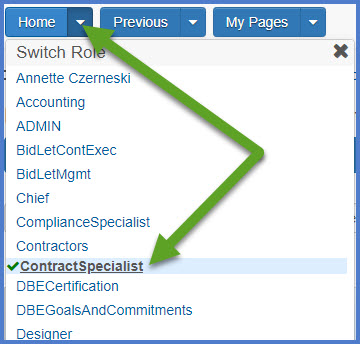
- Select the Contract Specialist role (click the Expand Home action arrow | ContractSpecialist).
- Select the contract under Contract Administration Overview by searching for the Contract ID, controlling project ID, region, county or contractor in the search box.
Tip: Go to How to Search for the Contract ID by Project ID if only an associated project ID is known.
- Click on the contract ID hyperlink for the project you are working on.

- Click the Projects quick link located at the top of the screen.
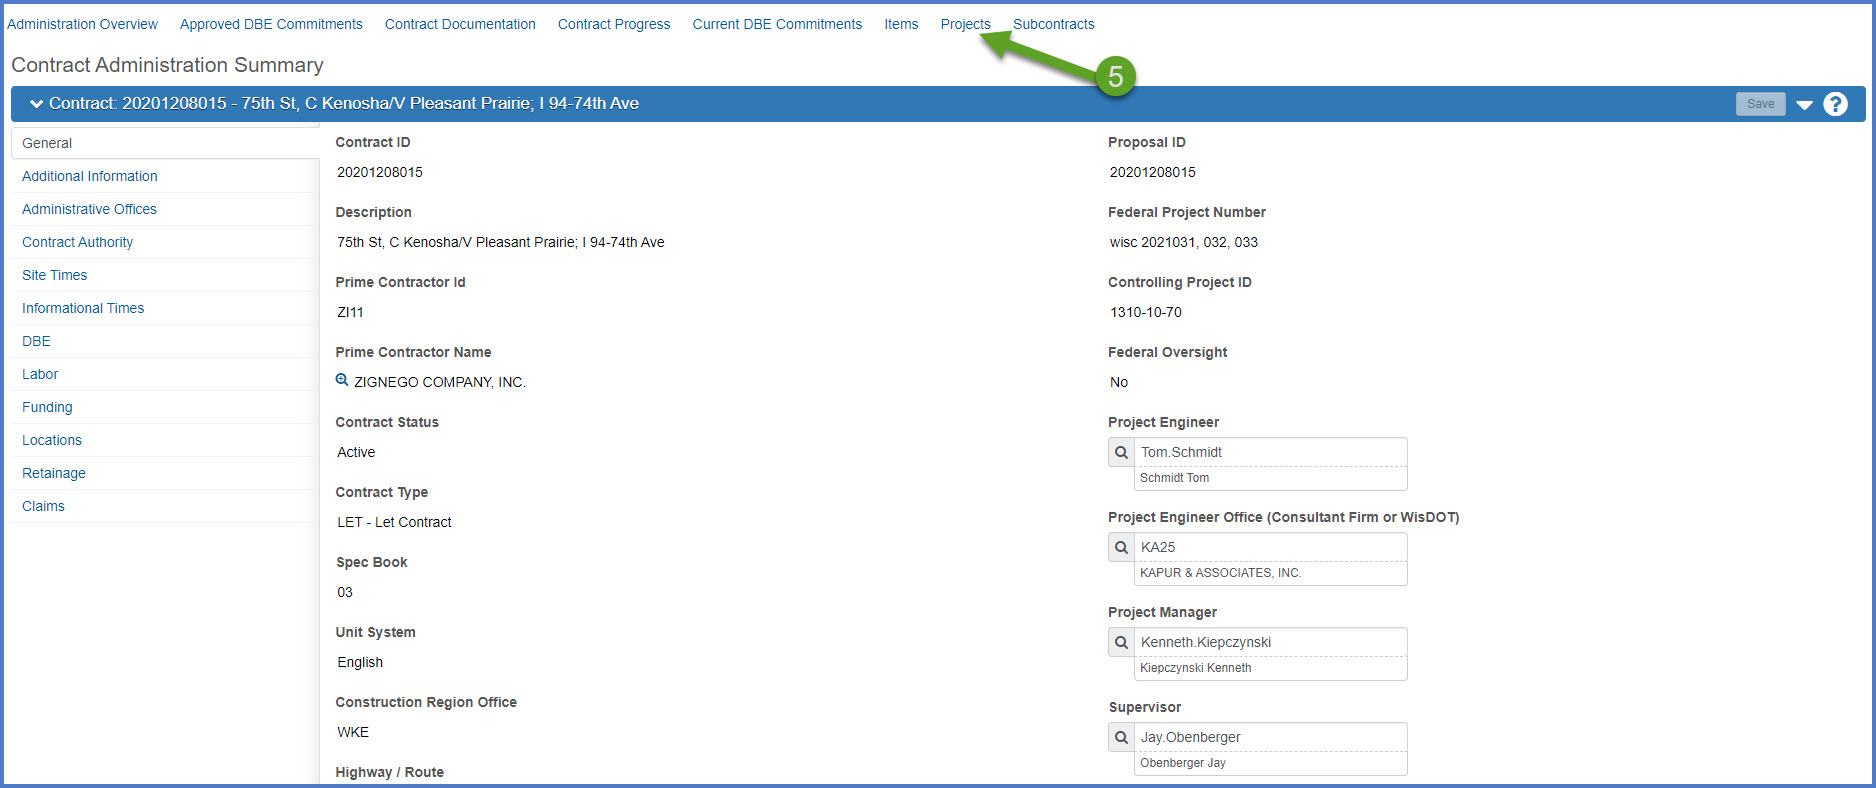
- From the Contract Project Overview component, select Open Component Actions Menu | Add.

- Enter the following fields based on the table below. Click <Save> when done entering the required fields.
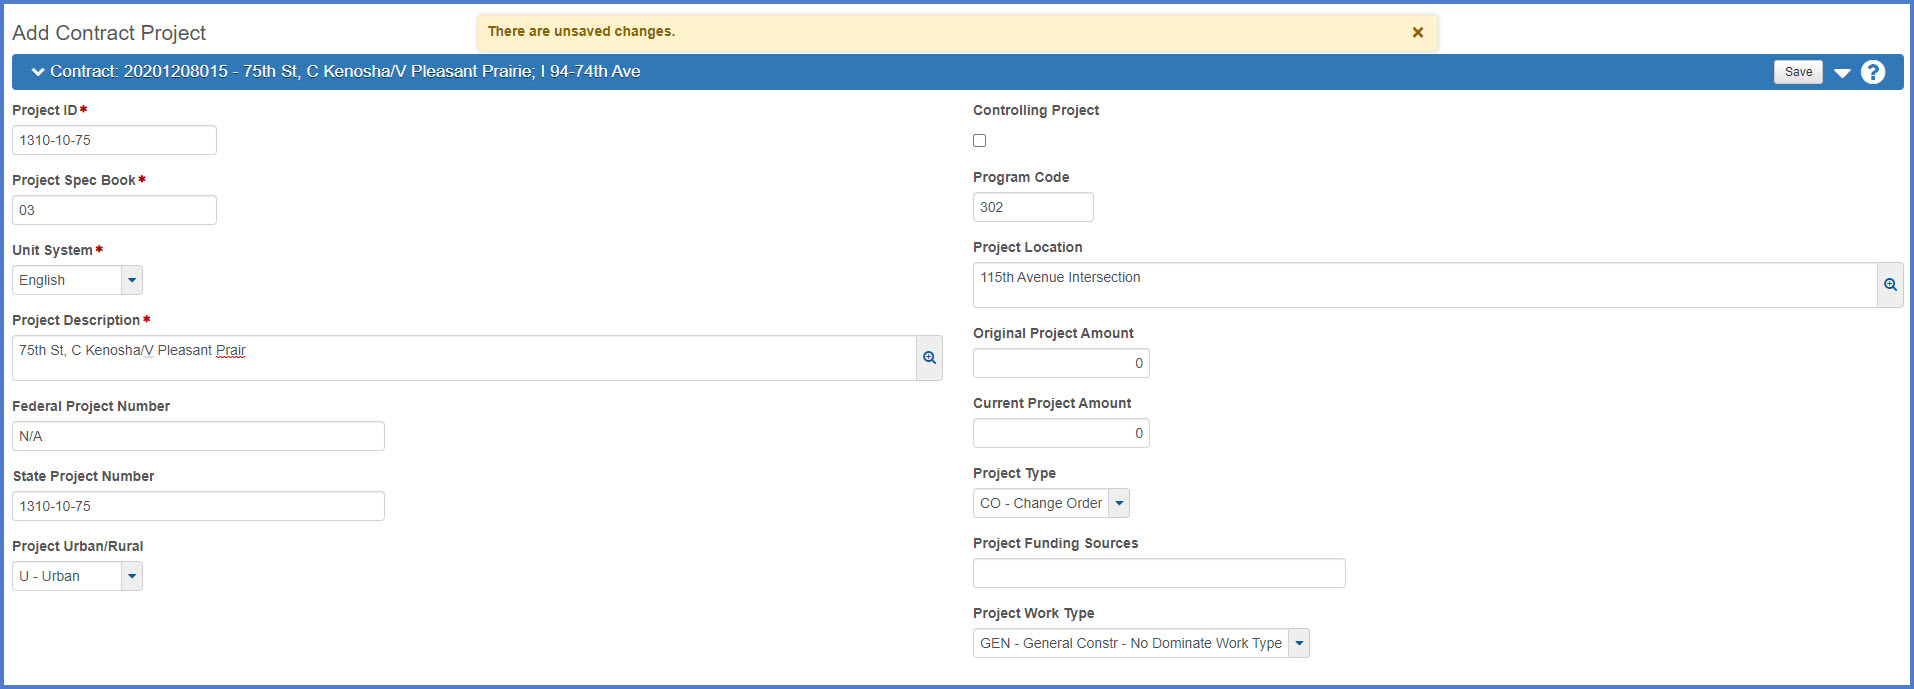
| Field | Required | Description | FIIPS Data Location |
|---|---|---|---|
| Project ID | Yes | Construction Project ID to be added to the contract. Field entered in this format with hyphens (e.g. 1310-10-75). | |
| Project Spec Book | Yes | Enter “03” for English projects. The Spec Year code refers to the name of the master item file project items will be chosen from. | N/A |
| Unit System | Yes | English | N/A |
| Project Description | Yes | FIIPS Project Title (camel case) |
The Project Description is a combination of the project title and limits fields from FIIPS. This field must be entered in camel case and is limited to 72 characters based on the FIIPS field size limitations (35 character project title + 2 characters for the semi colon and space + 35 character project limits). Select Project | Description
Title field Example: Wyocena - Montello; STH 16 To NCL/B-11-0171 |
| Federal Project Number | Yes | Enter the Federal ID. If there is no federal funding, enter N/A. | Select Project | Federal Federal ID field |
| State Project Number | Yes | Same as the Construction Project ID entered in the Project ID field. | |
| Project Urban / Rural | Yes | Project location – rural or urban community. | Select Project | Location Federal urban area field |
| Controlling Project | No | Always "No" when adding projects to an existing contract in AWP Construction. | |
| Project Location | Yes | FIIPS Project Limit (camel case) |
Route, County Example: USH 045, Washington County |
| Original Project Amount | No | Do not enter a value. | N/A |
| Current Project Amount | No | Do not enter a value. | N/A |
| Project Type | Yes | Select CO - Change Order from the drop-down list. (Code Table: PROJTYP) |
N/A |
| Project Funding Sources | No | Do not enter a value. | N/A |
| Project Work Type | Yes | Select the appropriate work type from drop-down list. (Code Table: PWRKTYP) |
Select Project | Description; Review the Impt cncp (Concept) and Work Type/HSIP Project Category(s) fields. If unsure what to select, discuss with the Project Manager. GEN - General Constr - No Dominate Work Type is commonly used. |
- Use camel case. DO NOT USE upper case if that is what appears in FIIPS for the project title, limit, or category description.
- Data entry MUST match FIIPS. If something appears to be incorrect, the region FIIPS Coordinator MUST update FIIPS to reflect the correct information first.
Categories are used to group items based on the type of work to be done on the project. The category number, category description, and federal work category must match FIIPS exactly, except that the description should be camel case. The Federal Work Category code is equivalent to the Federal Improvement Type code in FIIPS.
- Select the Categories tab.
- Click <New>.
- Enter the following fields based on the table below. Click <Save> when done entering the required fields.
| Field | Required | Description | FIIPS Data Location |
|---|---|---|---|
| Category ID | Yes | FIIPS Category Number | Select Project | Funding Category # field |
| Category Description | Yes | FIIPS Category Description (camel case) | Select Project | Funding Category desc field |
| Federal Work Category | Yes | Select the appropriate option from drop-down list if the project is federally funded. If not federally funded, select "NFP - No Federal Participation" | Select Project | Funding | Fed Imp Ty (Federal Improvement Type) field |
| Combine Like Categories | Yes | Checked | N/A |
| Section Group | Yes | 0001 | N/A |
| E & C Percent | Yes | Numeric value | Select Project | Estimate Delivery percent field |
| Unit Number | Yes | 000 | N/A |
| Unit Description | No | Leave Blank | N/A |
After creating categories, the Contract Specialist will assign categories to road segments or structure segments, or a combination of both.

Select the region(s) where work will be performed for this project. Work will normally be performed in only one county but occasionally a project may span multiple counties.
Select the county(s) where work will be performed for this project. The county(s) selected MUST match what appears in FIIPS.
- Select the Counties tab.
- In the County ID field, begin typing the county name or the 4 digit county code.
- In the Pct field, enter the percentage of project length for the selected county.
- Check the Primary checkbox if this is the primary or the only county for this project.
- Click <Save>.

Examples:
For example, to chose a specific county, enter "Kenosha" or "C030" and Kenosha county will appear.
Enter "Statewide" or "C072" and the Statewide county option will appear.
Enter "Region" and the region wide options will appear.
A project point is a location that can be described by a single latitude and longitude measurement and is used to locate a specific site for project work or the site for a portion of the project’s work.
- Select the Points tab and click <New>.
- In the Type field, enter "Midpoint".
- In the Description field, enter a combination of the project route and county as they appear in FIIPS. These fields should be separated with a comma.
- STH 050, Kenosha County
- CTH D, Wood County
- IH 039, Portage County
- STH 053, Chippewa County
- LOC STR, Dane County
- USH 029, Shawano County
- VAR HWY, Milwaukee County and Racine County
- VAR HWY, Northeast Region
- VAR HWY, Statewide
- In the Latitude field, enter the actual midpoint of the project OR enter the latitude for the center of Wisconsin (43:05:00.72).
- In the Longitude field, enter the actual midpoint of the project OR enter the latitude for the center of Wisconsin (92:20:00.72).
- Click <Save>.
The other fields are not required. A begin point and an end point are not required either.
A road segment describes all or a portion of a road, is identified by the name, type, and highway number, and is associated to a category. A structure segment describes all or a portion of a bridge, culvert, or other structure, and is associated to a category.
A road segment is required for every category that is not a structure segment. To add a structure segment, go to Add Structure Segments below.
- Every category MUST be associated to either a road segment OR a structure segment.
- A category can only be associated to one road segment OR one structure segment.
- A primary road segment is required for all projects, even projects with only structure categories.
- Select the Road Segments tab.
- Click <New> and create the Primary Road Segment (required). Enter the three required fields below for the Primary Road Segment. Click <Save> to save the Primary Road Segment record.
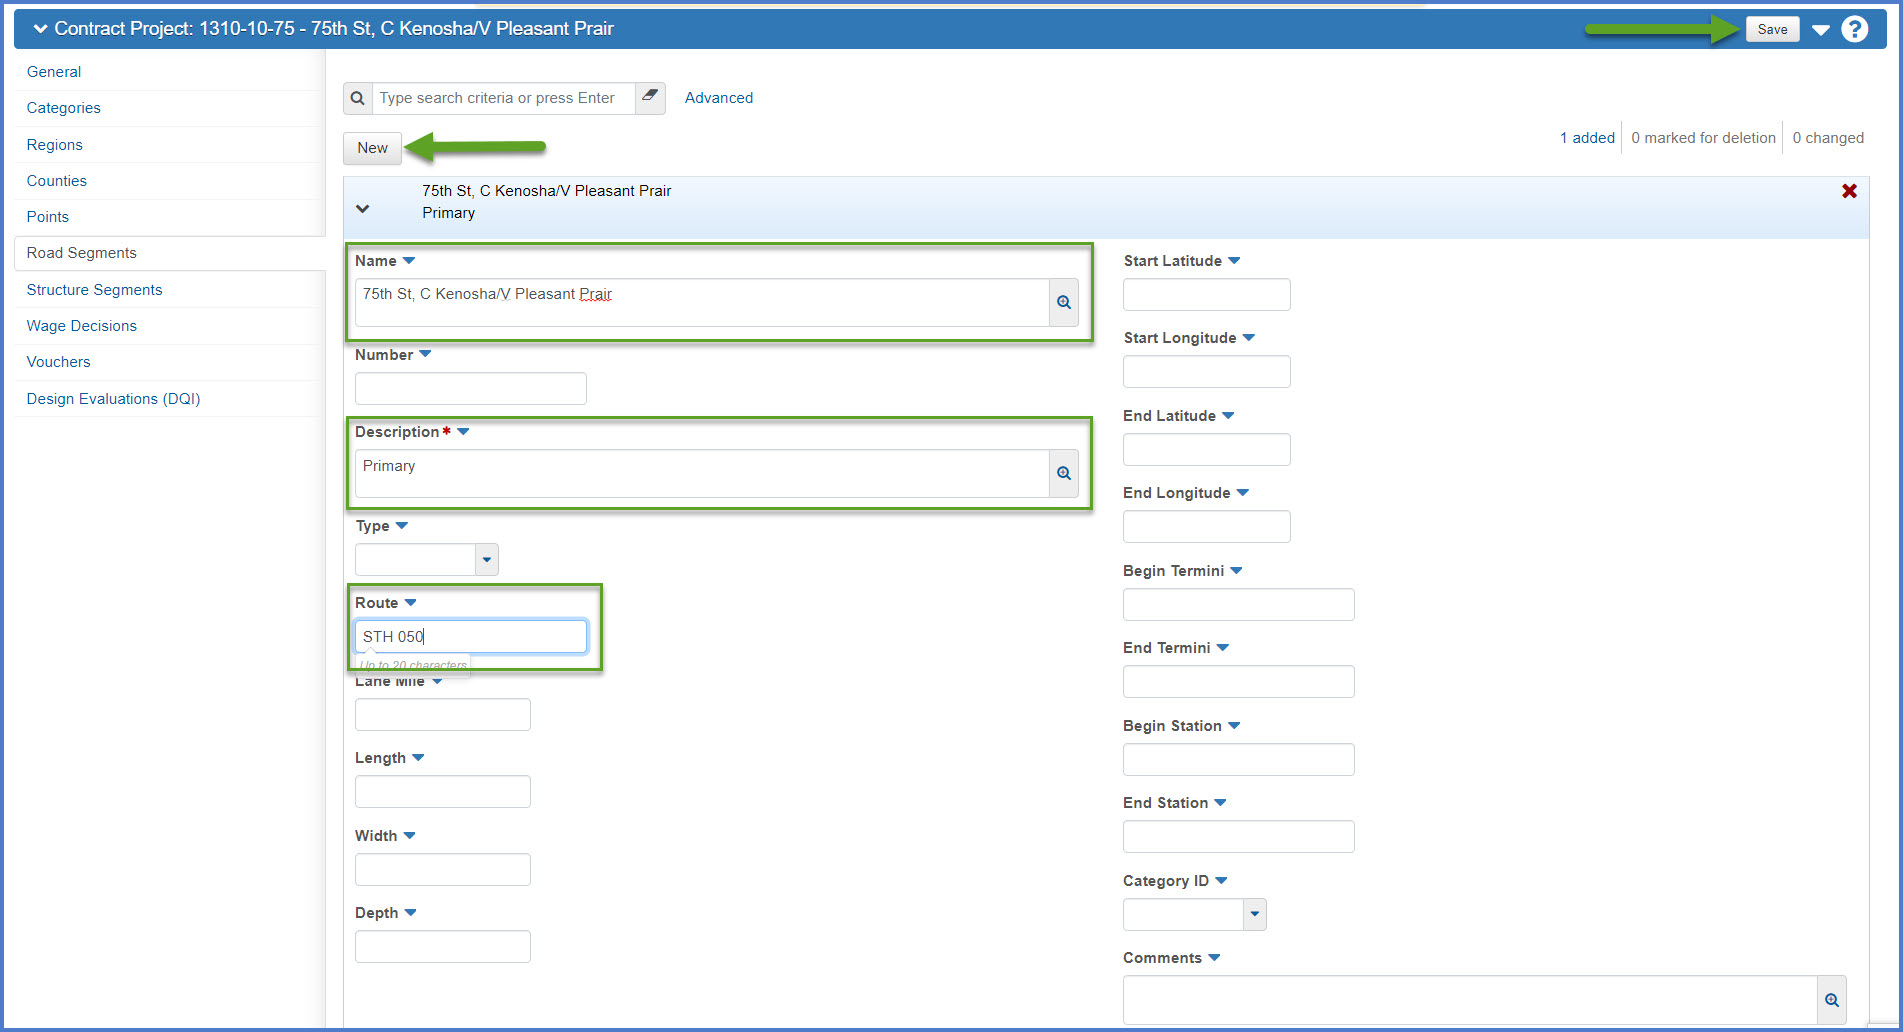
Required Fields Required Data Entry FIIPS Data Location Name FIIPS Project Description Title only in camel case.
Example: "Holmes Road" is the project description title for "Holmes Road, Town Of Gibson East Twin River Bridge and Approaches"Select Project | Description Title* field Description Primary N/A Route FIIPS Highway Route field
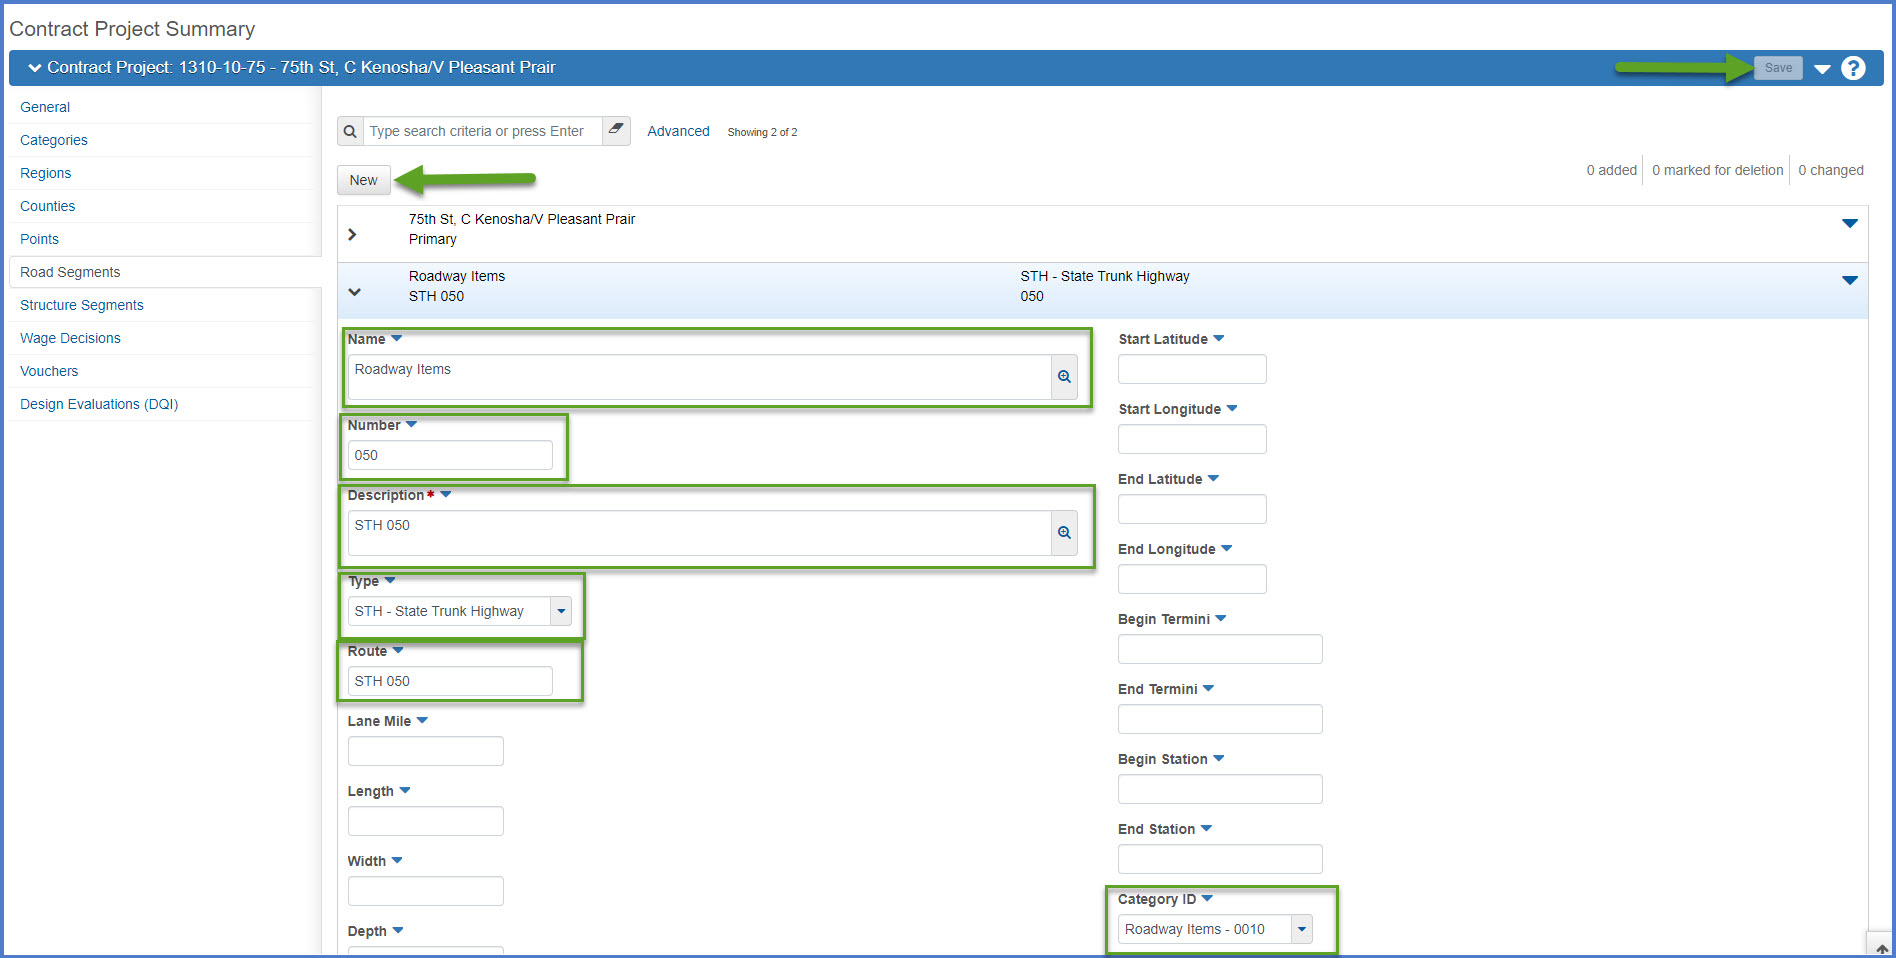
Examples: IH 090, USH 029, STH 034, CTH HH, VAR HWY, LOC STR, BUS 051Select Project | Description Rt field - Click <New> and create a Road Segment record. Enter the six required fields below for the Road Segments tied to categories. Click <Save>. Repeat this for each category to be created for this project that is not a structure category (bridge or culvert).
| Required Fields | Required Data Entry | FIIPS Data Location |
|---|---|---|
| Name | FIIPS Category Description (camel case) |
Select Project | Funding Category Desc field |
| Number |
Highway number with leading “0” if less than 3 digits for IH, USH, and STH routes (e.g. "039" for IH 039, "043" for USH 043, or "050" for STH 050) |
Select Project | Description Rt field but only enter the highway number or name designation |
| Description | FIIPS Route field Examples: IH 090, USH 029, STH 034, CTH HH, VAR HWY, LOC STR, BUS 051 |
Select Project | Description Rt field |
| Type | Choose the route type from the drop-down list based on the FIIPS Route field. | Select Project | Description Rt field |
| Route | FIIPS Route field Examples: IH 090, USH 029, STH 034, CTH HH, VAR HWY, LOC STR, BUS 051 |
Select Project | Description Rt field |
| Category ID | Select the match category ID from the drop-down list. | Select Project | Funding Category # field |
A structure segment describes all or a portion of a bridge, culvert, or other structure. A structure segment is identified by the structure ID, structure type, length, width, and number of spans.
- A structure segment is required for every category that is not a road segment category. To add a road segment, go to Add Road Segments above.
- Every category MUST be associated to either a structure segment OR road segment.
- A category can only be associated to one structure segment or road segment.
- Select the Structure Segments tab.
- Click <New> and create the Structure Segment (required). Enter the three required fields below for the Structure Segment. Click <Save> to save the Structure Segment record.

| Required Fields | Required Data Entry | FIIPS Data Location |
|---|---|---|
| Structure ID | Enter the structure ID as it appears on the FIIPS Category Description. Example: B-23-0136 or C-17-0029 |
Select Project | Funding Category Desc field |
| Description | FIIPS Category Description (camel case) | Select Project | Funding Category Desc field |
| Category ID | Select the corresponding category ID from the drop-down list. | Select Project | Funding Category # field |
Funding must be added for each category on the new project.
Info: Funding is entered at the Contract level in AWP Construction and not the individual project level.
- Refer to the new project in FIIPS. Select Project | Funding and note the funding for each category.

- Select the Contract Administration quick link from the top of any Contract Project Summary component.
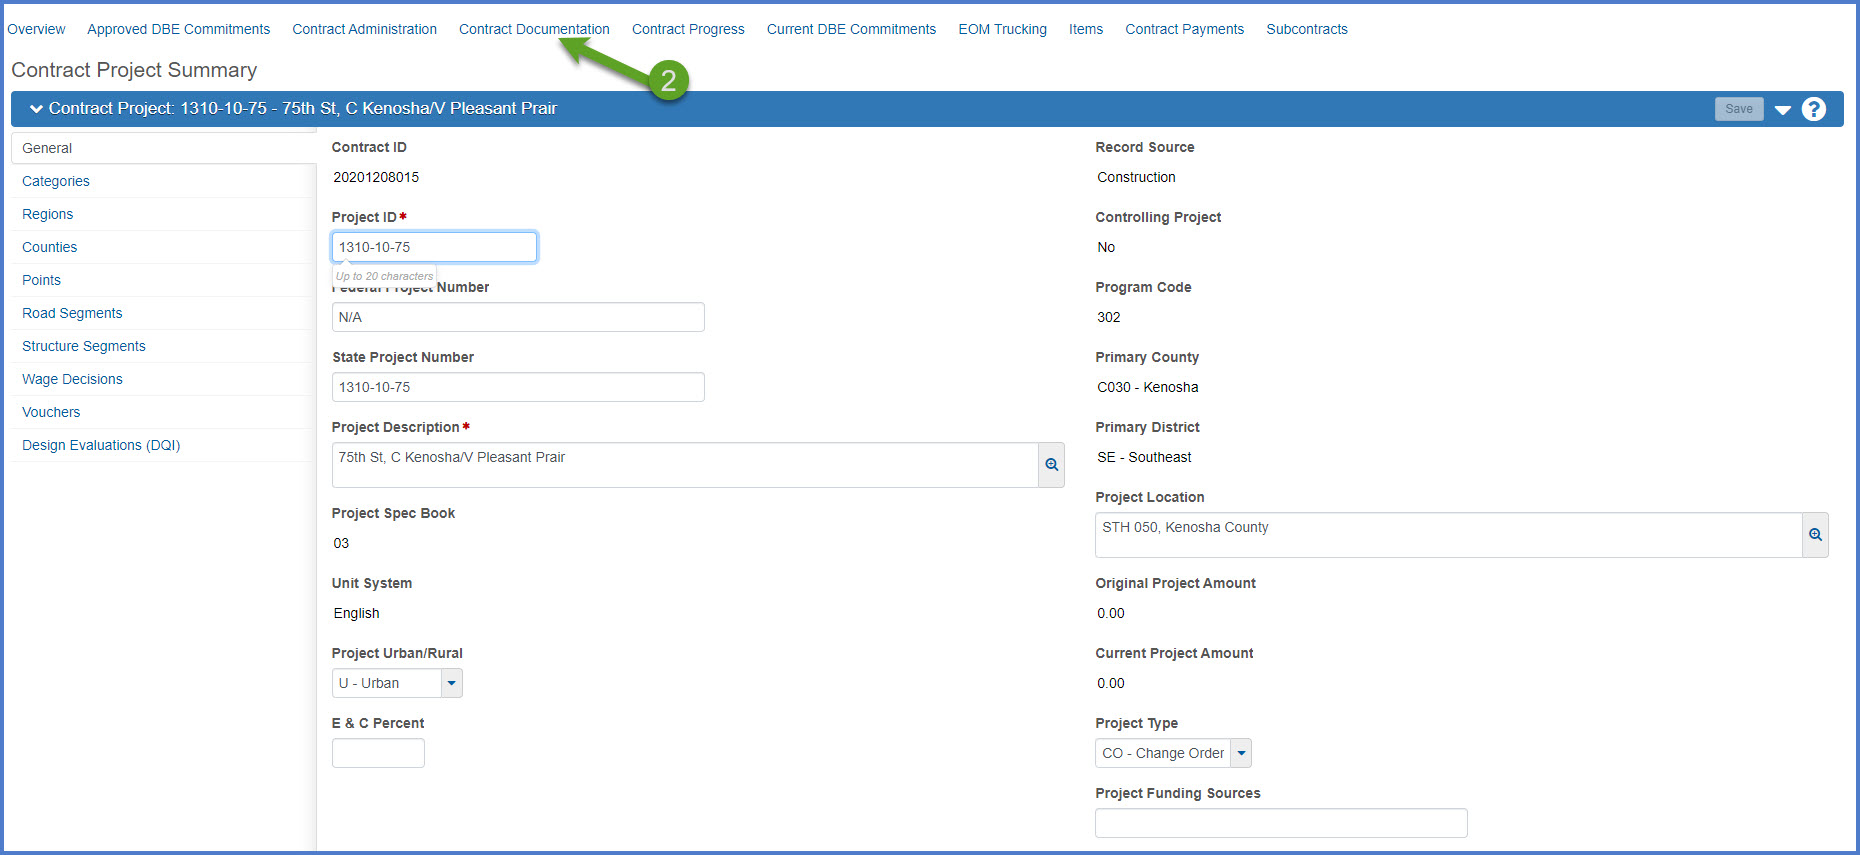
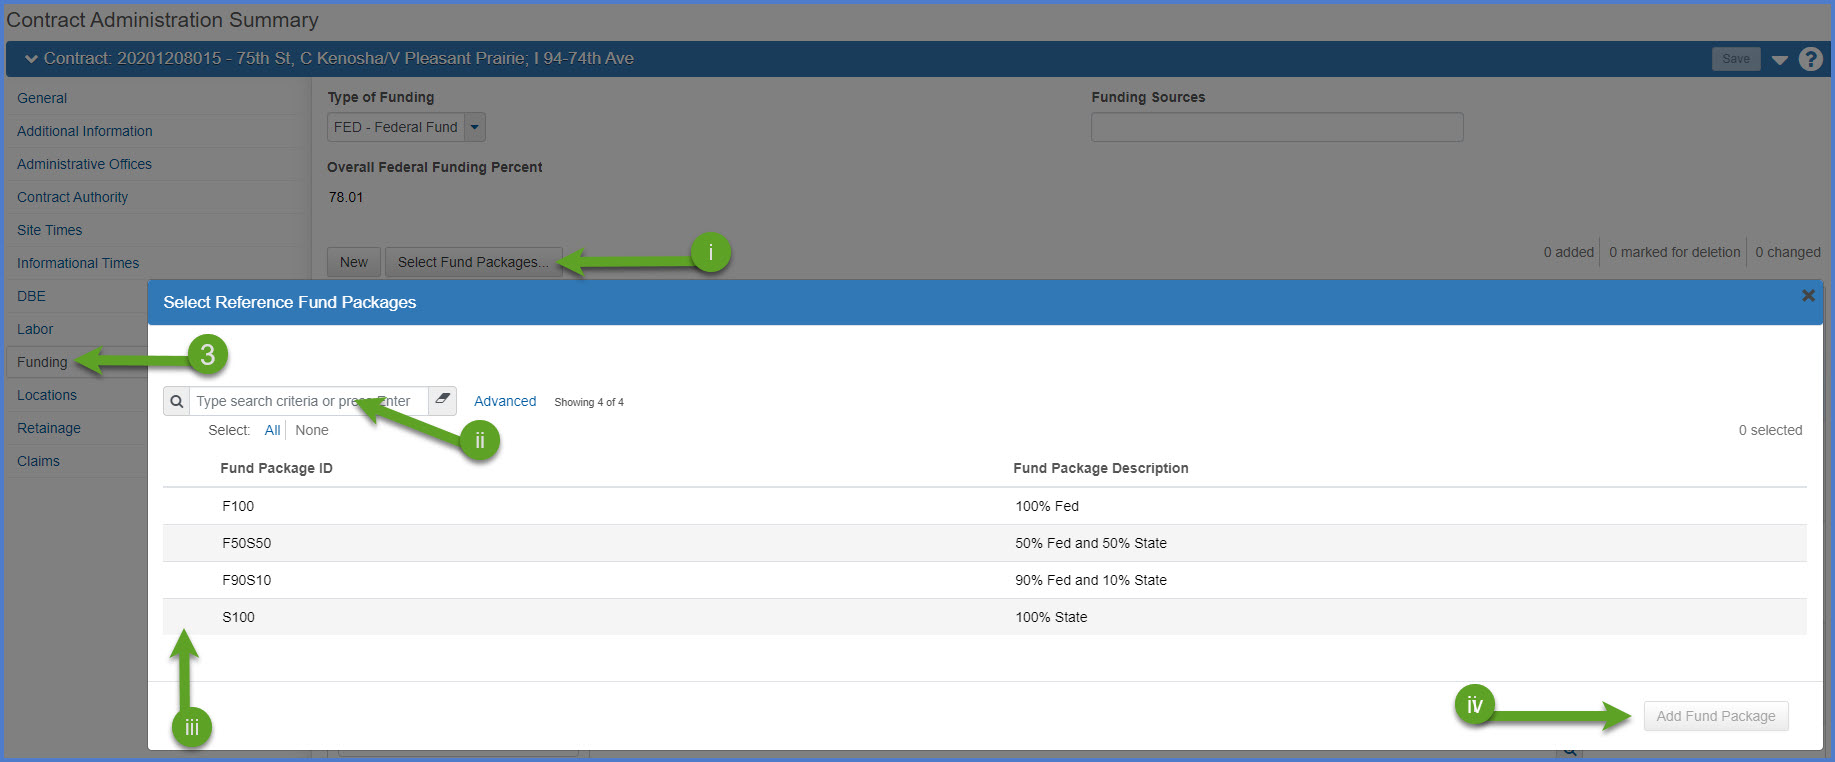
- On the Contract Administration Summary component, select the Funding tab.
- Add funding by manually entering the information (User Defined Fund Packages) or selecting a default Fund Package (WisDOT Pre-defined Fund Packages) as applicable.
- WisDOT Pre-defined Fund Packages are default packages setup in AASHTOWare Project for both Preconstruction and Construction. These default packages include:
- F100 (100% Fed)
- F50S50 (50% Fed and 50% State)
- F90S10 (90% Fed and 10% State)
- S100 (100% State)
- If the default fund packages match FIIPS funding, click <Select Fund Packages>.
- Place cursor in "search box" and click <Enter>.
- Select the appropriate Fund Package ID.
- Click <Add Fund Package>.
- On the Contract Administration Summary component Funding tab, update the Fund Package description by adding the Project ID followed by a "," as the prefix on the field and updating the rest of the description to reflect either a list of the categories with the same funding sources OR the funding sources names. Here are some examples:
- Project ####-##-##, Category 0010 Funding
- Project ####-##-##, 100% State Funding
- If a default Fund Package does not work in this situation, create a User Defined Fund Package.
- Click <New> and a new record will appear at the bottom of the component.
- Fund Package ID - Match the fund package field ID to the fund package description appearing in FIIPS where V=Village, F=Federal, S=State, C=County or City, L=Limit. Here are some examples:
- V100 meaning 100% Village
- F80S10C10 meaning 80% Federal, 10% State, 10% County
- V100LF80S20 meaning 100% Village w/limit then 80% Federal, 20% State
- Fund Package Description - Enter the Project ID followed by a "," followed by either a list of the categories with the same funding sources OR the funding sources names. Make sure to add the complete city or village name if funded by a city or village. Here are some examples:
- Project ####-##-##, Category 0010
- Project ####-##-##, Category 0010, 0020, and 0050
- Project ####-##-##, 100% Village of Pleasant Prairie
- WisDOT Pre-defined Fund Packages are default packages setup in AASHTOWare Project for both Preconstruction and Construction. These default packages include:
- Click <Save>.
- If an User Defined Fund Package was created, there will be no funds assigned to it. From the Contract Administration Summary Funding tab, select the Funding tab.
- Locate the new User Defined Fund Package row. Click on the Funds hyperlink to open the Contract Fund Package Summary component.

- On the Contract Fund Package Summary component, click <Select Funds>.
- On the Select Fund component, search for and select the fund. Add the lowest priority fund package first (Priority order 1, 2, 3, etc.)
- Click <Add to Fund Package>.
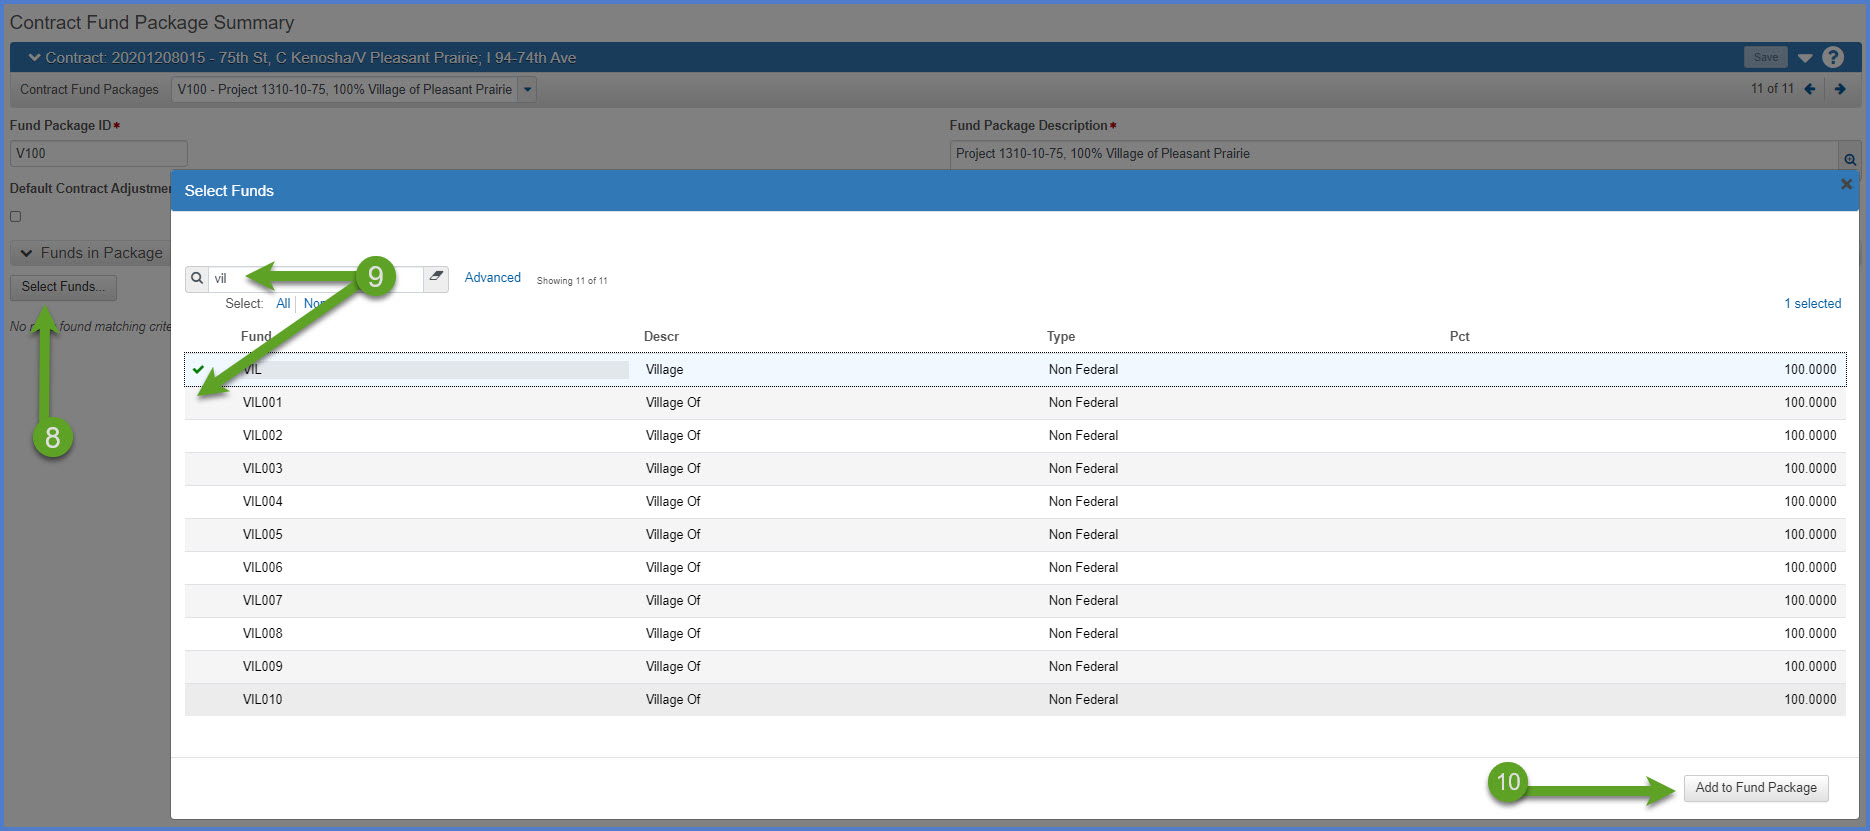
- Enter the details to define the new Fund Package based the information on the FIIPS Project | Funding screen:
- Priority (1, 2, 3, etc.) = FIIPS Priority
- Percentage = FIIPS % w/n priority
- Type = FIIPS Type (Federal or Non Federal)
- Limit = FIIPS Limit (numeric value)
- Click <Save>.
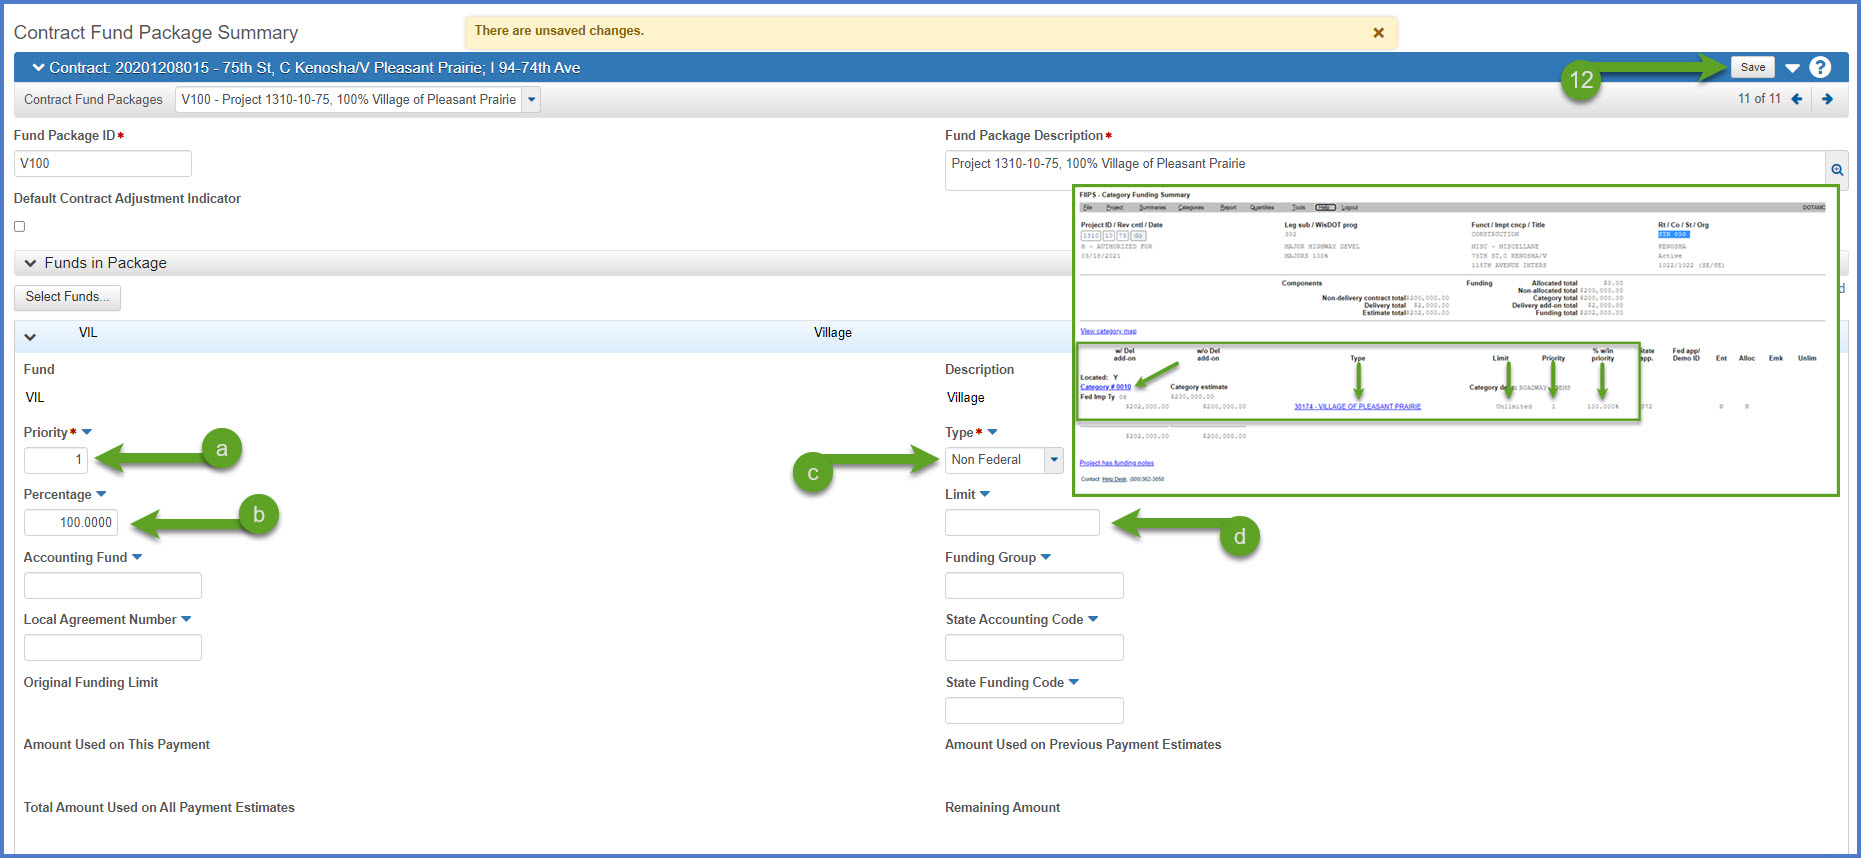
- Repeat steps 10-12 to add additional funds to this fund package.
The Contract Specialist should send an email to the AWP Support mailbox at AWPSupport@dot.wi.gov that includes the Contract ID and the Project ID that was added.
The AWP System Administrators will review the project and send a note to the Contract Specialist and the Project Engineer when their review is complete. At that point, the Project Engineer can create the change order, add and assign funding for all the new items, and then begin the change order approval process.
The Project Engineer can work on the creating the draft change order at any time (after the contract modification justification has been approved). Go to the Change Order page for instructions on how to begin the required data entry for a new change order.
Info: Basic change order information can be added prior to the Contract Specialist adding the project to the contract BUT items cannot be added to the change order until the project creation and review process is complete.
When the project creation and review process is complete, the Project Engineer can add the items to the project.
- From the Contract Change Order Summary component, select the New Items tab.
- Click <Select New Item>.
- On the Select New Item component, search for an item in the Reference Item field by entering the item number or description. Select the new item from the list.
- Select the new project and category to add the item to.
- Click <Add to Change Order>.
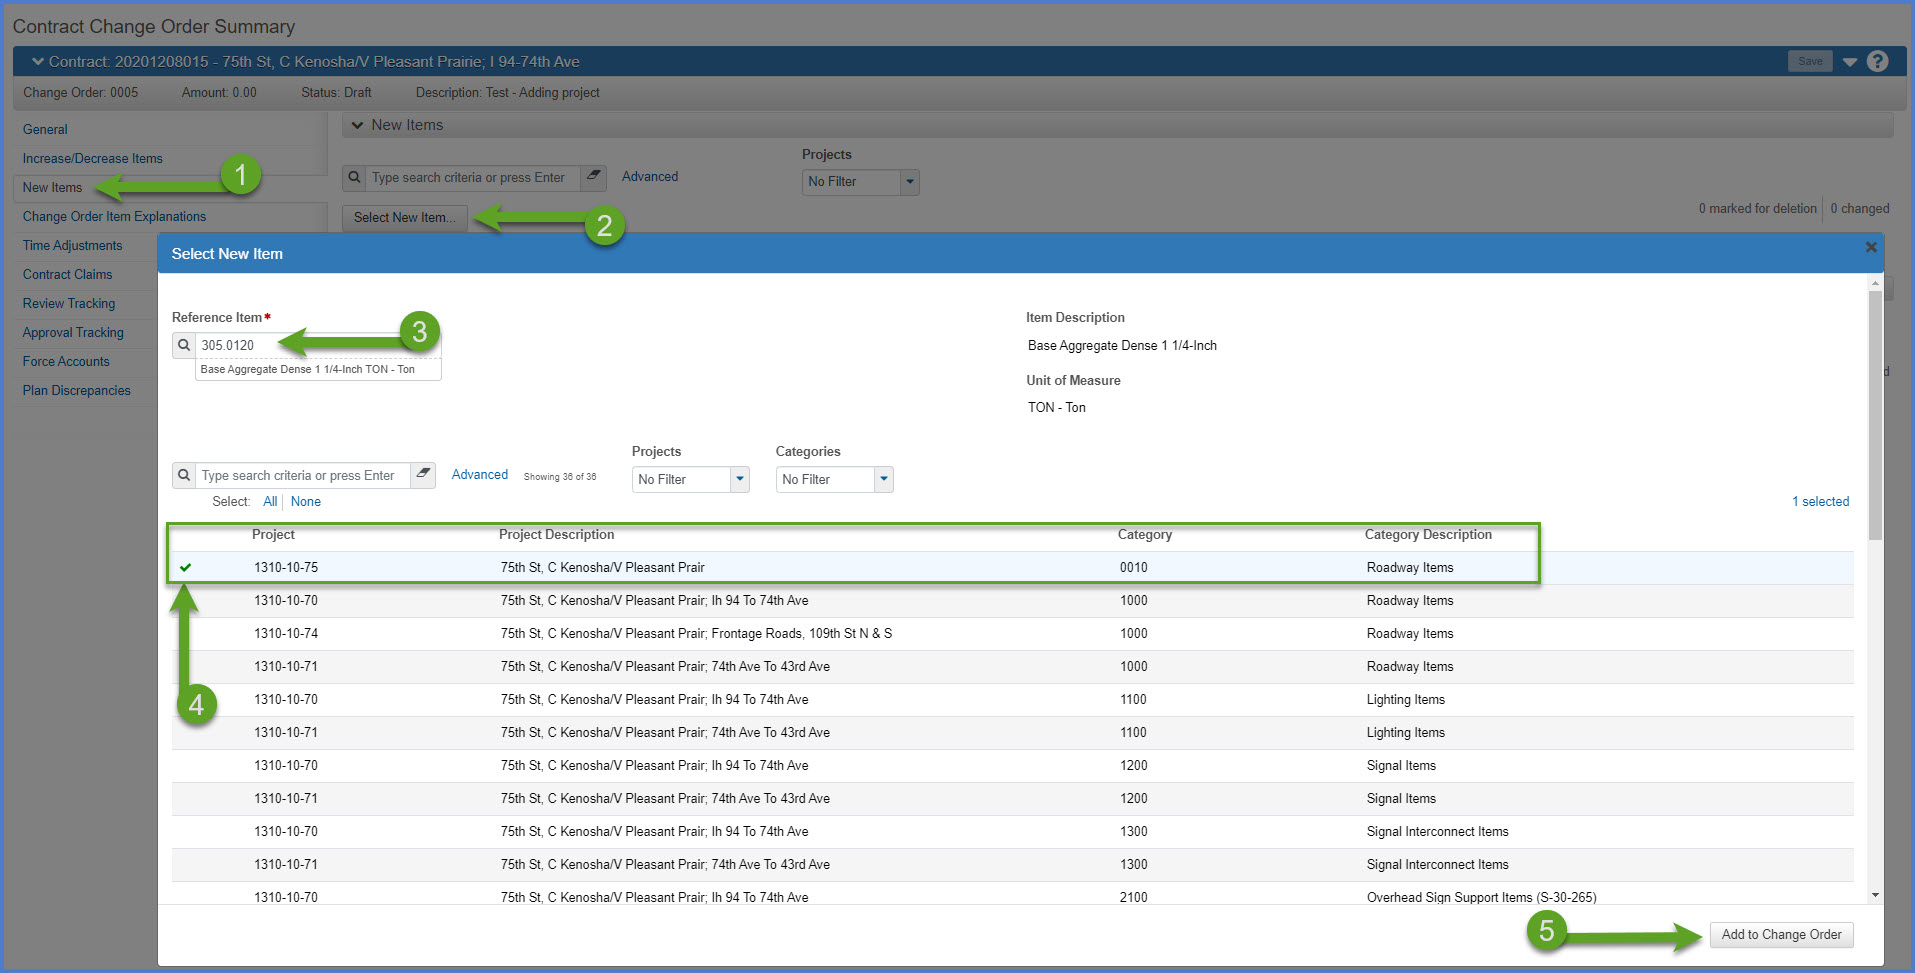
- For each new item, expand the item row and complete the following required fields:
Warning: DO NOT modify the Project Item Line Number or Contract Item Line Number. These are automatically incremented by 2 upon saving the item record.
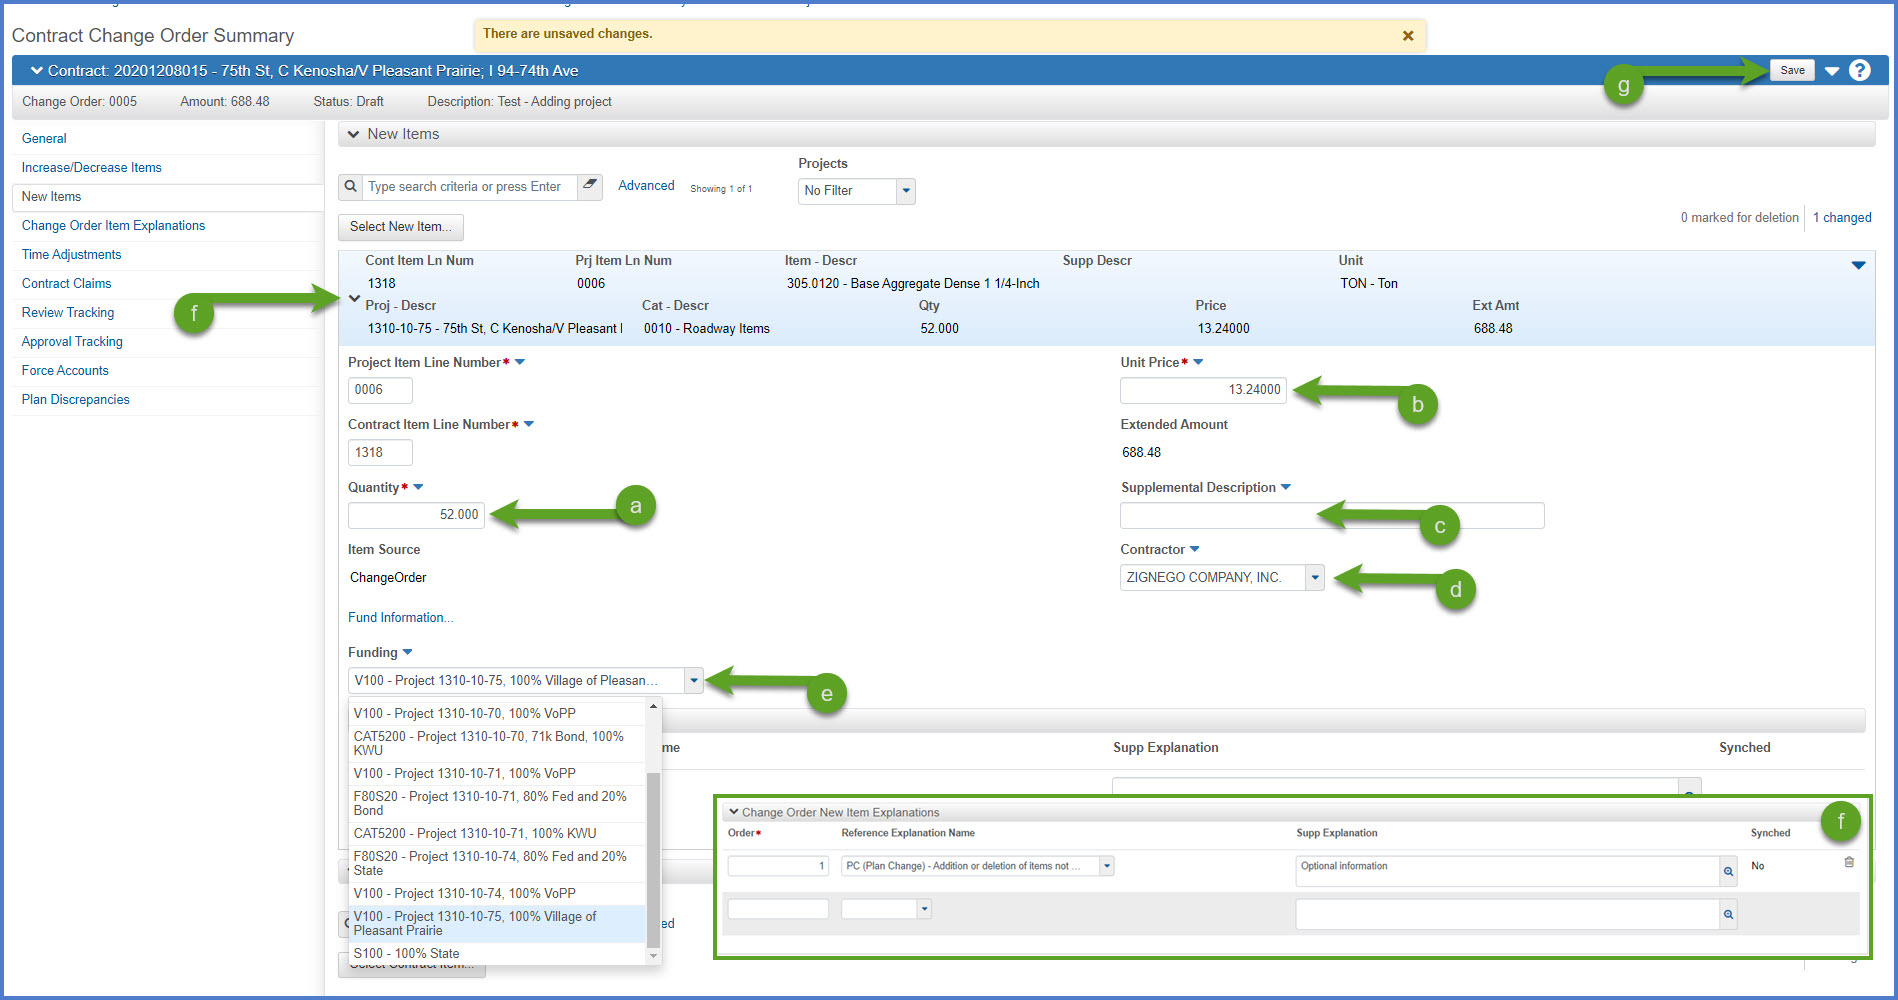
- Quantity - number of units of the item to be added.
- Unit Price - unit price for the item at the contract project level.
- Supplemental Description (if required)
- Contractor - Select the prime or a subcontractor from the drop-down list.
- Funding - Select the correct fund package from the drop-down list. The fund packages are identified by the Project ID and fund package description.
- Change Order New Item Explanations section.
- Order - Enter an Order Number (e.g. 1, 2, 3, etc.)
- Reference Explanation Name - Select a reason codes from the drop down list. The reason code is specific to the items being added. It does not need to match the overall reason code for the change order.
- Supp Explanation - Enter an optional supplemental explanation to describe why the item was added.
- Click <Save>. Repeat steps 2 - 6 for each new item to add to the contract.
- Contact the region Contract Specialist or the AWP System Administrators. Have them confirm on the Fund Package Assignment Summary component, that each category and each new item in the new project is assigned to the correct Fund Package by completing these steps:
- When all the new items have been added and the change order is complete, the Project Engineer will follow the steps found on the Change Order page to add approval groups and begin the approval process.
- Go to "Change Orders | Approval Tracking Tab | Add and if necessary, update the default approval groups for a change order .
- Go to Change Orders | Change Order Approval Process for the Project Engineer.
- Others that are required to review and approve the change order will follow the instructions on the Change Order Approval Process page.
- Once the change order is approved, follow the steps under Assign Items to Subcontractors to add the new items to the subcontractors so the items can be posted to on future DWRs.
- The new item will be assigned a new Contract Item Line Number and a new Item record.
- Use this function to show that an item was added or changed on a change order. The reason the item was added and the change order number will appear on the following reports and components:
- Item History To Date Report (Item Type = Change Order)
- Contract Items XLS report (Item Source = Change Order and the CO Number)
- Contract Project Items XLS report (Item Source = Change Order and the CO Number)
- Contract Items component - new item record with Item Source = ChangeOrder and Change Order Number
- Contract Project Items component - new item record with Item Source = ChangeOrder and Change Order Number
