Payroll spreadsheet creation, conversion, and import process
Last updated: 2025-08-07
Roles:
- Payroll role for the prime and subcontractors = modify access
- All other construction and CRL roles including Contractors = no access
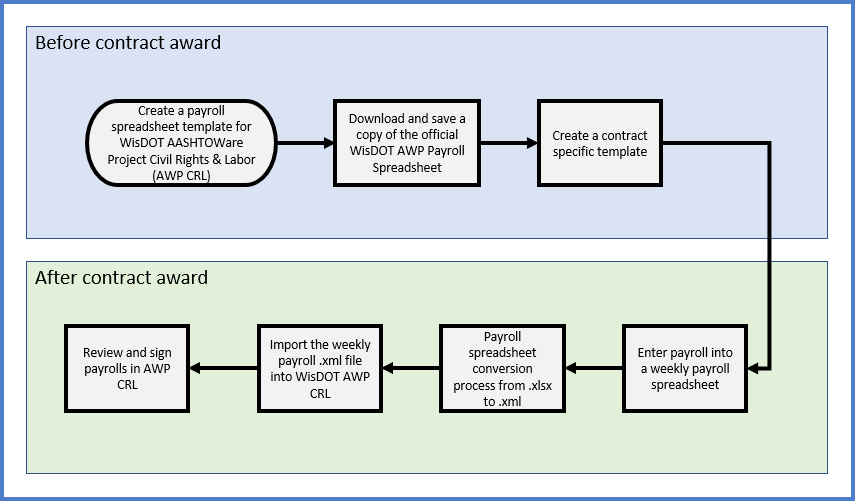
Complete the steps below to use the WisDOT AASHTOWare Project Payroll Spreadsheet to upload payrolls into the AWP CRL Payrolls. The WisDOT AASHTOWare Project Payroll Spreadsheet is customized specifically for WisDOT. The spreadsheet is used to enter up to 50 employee payrolls each week for a specified WisDOT contract and project. Once payroll entry is complete, use the AASHTOWare Project Spreadsheet Conversion Utility to convert the spreadsheet to an XML file and import the .XML file into the AWP CRL Payrolls system.
- This process is the same for both prime contractors and subcontractors.
- Each week, company payroll staff copy the contract specific payroll spreadsheet template to create a weekly payroll spreadsheet for the specified contract for that week for import into AWP CRL.
- The information provided are suggestions to make this process easier for your company. Each company might use the template and weekly payroll spreadsheets differently depending on your company’s needs and the specific details of your employees' information.
- Information entered in the spreadsheet must be typed correctly. Errors in spelling or capitalization may cause the spreadsheet to fail the AASHTOWare Project conversion process, the import process, or the payroll review process by triggering a payroll exception.
- Blue fields are data entry fields. A red asterisk indicates a required field.
- Some fields have associated tool tips that will appear upon clicking the cell.
- The contractors role does not have access to enter payrolls. Contractor and subcontractor staff who enter payrolls must use the Payroll role. Contractor staff with multiple roles will need to switch to the Payroll role to complete these tasks.
Tip: Click on the thumbnail images below to expand and view the content.
Each prime contractor and subcontractor will download a copy of the official WisDOT AASHTOWare Project Payroll Spreadsheet and update it for their company to use to submit weekly payrolls for WisDOT construction work.
- Download a copy of the WisDOT AASHTOWare Project Payroll Spreadsheet Template-v2.xlsx file. (Last updated August 6, 2025)
- Rename the file using the naming convention examples noted below. It is highly suggested that the naming convention includes the company name and the construction contract ID or the controlling project ID. This will aid in troubleshooting when the file is imported into AWP CRL Payrolls.
- Enter the following required fields to setup the contract specific payroll spreadsheet.
- Payroll Form tab (contractor and payroll information) - This section is specific to each contractor and subcontractor and the fields are entered on the upper section of the Payroll Form tab. Click <Save> when data entry is complete.

- Employee Information tab - Enter up to 250 employees on this tab. See the employee information record example for additional field data entry assistance. WisDOT recommends that contractors add all their employees in alphabetical order on this tab of the contract specific payroll spreadsheet if this is the process they chose for entering and submitting their weekly payrolls. Click <Save> when all employees are entered on this tab.
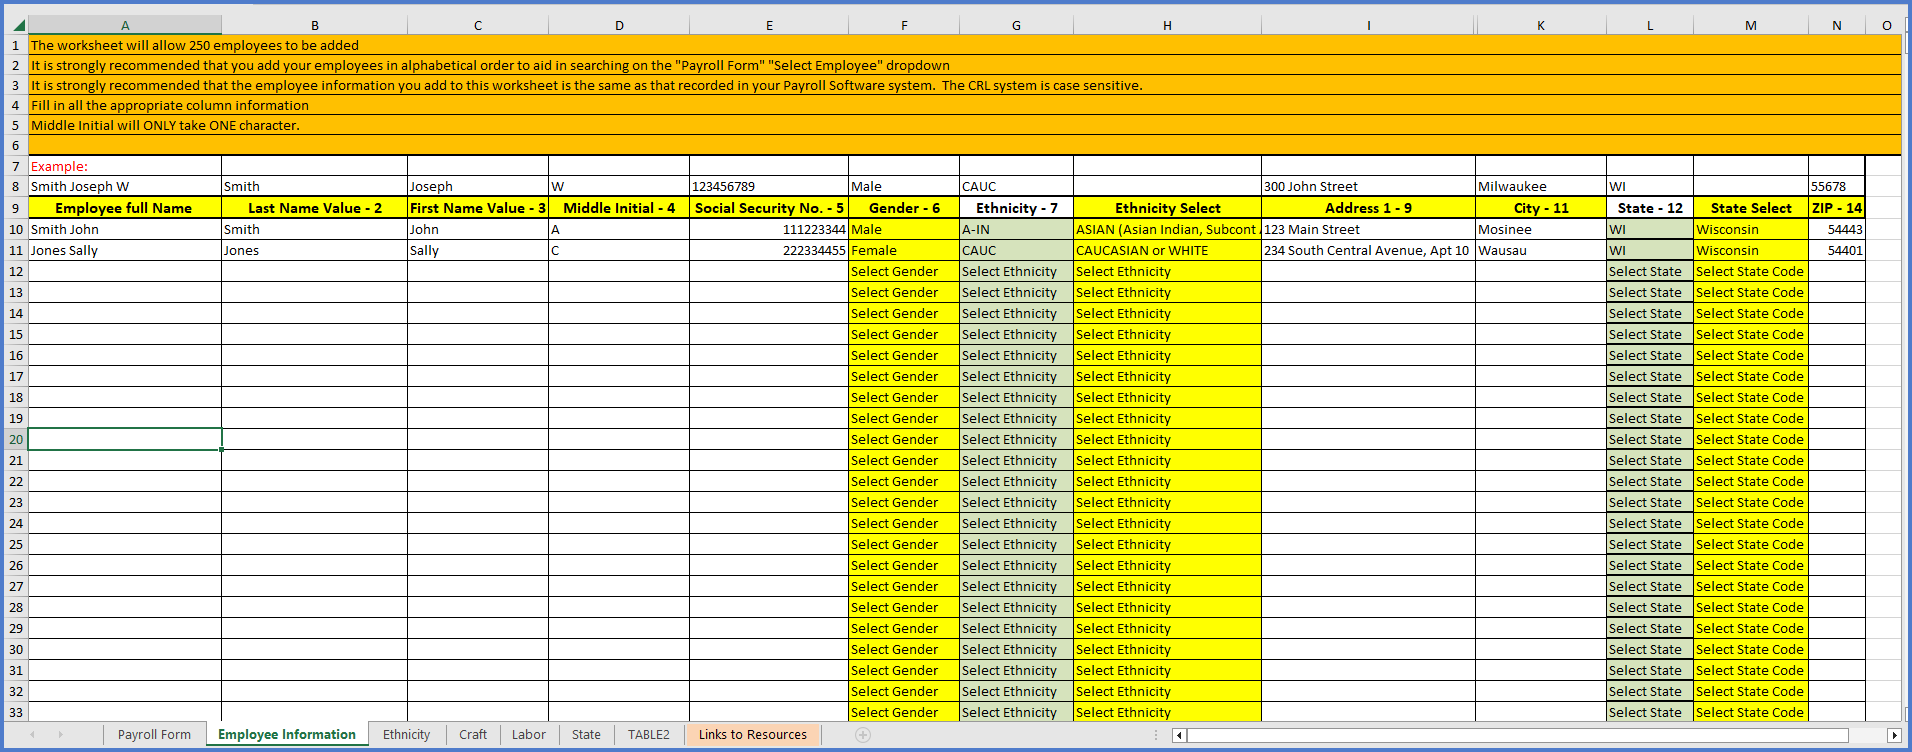
Field Description Vendor Name Name of vendor submitting this payroll record.
This value can be found by logging into WisDOT AASHTOWare Project with your WAMS ID and associated password. Under the Vendor Payrolls section, click "Show first 10".Vendor Number Vendor number assigned to the vendor submitting this payroll report.
This value can be found by logging into WisDOT AASHTOWare Project with your WAMS ID and associated password. Under the Vendor Payrolls section, click "Show first 10".Payroll Number Number assigned to payroll report by vendor. Start with 1 for first week, 2 for second week, etc. Don't skip numbers. Check number prior to uploading payroll report. Pay Period End Date Date weekly pay period ends. Weekly pay period is 7 consecutive 24 hour days the vendor has set as their pay period. System will not allow weeks to overlap. Entering this date will auto populate the work week table to the lower right.
Project ID Enter the lowest project ID (referred to as the controlling project) assigned for the contract noted on the line below. Hyphens are required. Format 9999-99-99. This is not the same as the Contract #. Contract # Contract Number is the year, month, date of the Let and proposal number. No dashes or spaces. Example, 20250114001 is the contract id for proposal number 1 let on January 14, 2025.
This value can be found by logging into WisDOT AASHTOWare Project with your WAMS ID and associated password. Under the Vendor Payrolls section, search for the project ID or a portion of the project description. The contract number will appear if the search is successful.Field Description Employee full name Employee's full name in this format:
Last Name First Name Middle Initial
Separate with spaces (no commas)Last Name Employee's last name First Name Employee's first name Middle Initial Employee's middle initial
Limit of one character.
Leave blank if the employee does not have a middle initial.Social Security No. Employee's Social Security Number
(no spaces or hyphens)Gender Select male or female from the drop down list. Ethnicity Based on the Ethnicity Select field choice. Ethnicity Select Select an ethnicity from the drop down list. Address Employee's home street address. City Employee's city of residence. State Select Select the state of residence from the drop down list. Zip Employee's 5 digit zip code. - Payroll Form tab (contractor and payroll information) - This section is specific to each contractor and subcontractor and the fields are entered on the upper section of the Payroll Form tab. Click <Save> when data entry is complete.
- When the data entry is complete, click <Save>. The weekly payroll spreadsheet is now setup for your company to use to enter weekly payrolls (certified payroll reports).
Payroll spreadsheet template naming convention examples using the contract OR project ID in the naming convention:
NE Asphalt - YYYYMMDD###.xlsx
where YYYYMMDD### is the contract ID
OR
White Buffalo Trucking - ####-##-##.xlsx
where ####-##-## is the project ID
- Open the contract specific payroll spreadsheet.
- Click <Save As>. Enter a name specific to the payroll week by indicating the payroll number or the payroll end date in the file name.
- Enter the following information on the Payroll Form tab. Save the file often so data entered is not lost
- On the Payroll Form tab (contractor and payroll information section), enter the payroll number and pay period end date.
- On the Payroll Form tab (weekly individual employee payroll information section), select each employee who worked this week and enter their payroll information. Up to 50 employee records can be entered on a single spreadsheet. The first employee's payroll record will be entered from line 55-98, the second employees's payroll record will be entered on lines 100-143 and so forth. Refer to the table below for data entry guidance.
Field Employee Type Description Select Employee
All Using the drop down list arrow to the right of this field, select an employee. This list is generated from the Employee Information tab. Has Changed? All
Default value is false. Select true if employee's information has changed since last payroll (e.g., first or last name, middle initial, address, gender, etc.) Salaried (y/n) Salary If the employee selected is a salaried worker, select Yes. Report total daily hours physically worked on project on Salaried Hours (S.H.) line only. Complete all other applicable cells. Labor Class All Using the drop down list arrow to the right of this field, select the Labor Classification that identifies the type of work being performed by the selected employee.
The selected Labor Classification will auto-populate the Craft Code for the employee. The Craft Code is assigned to each craft in the Wage Decision Craft List.
To obtain the list of Wisconsin craft codes or labor classes, download the payroll spreadsheet template and navigate to the corresponding tab for this information.
Total Pay Period Salaried Hours Salary Total number of hours the salaried employee worked this week. Include both the hours physically worked on this project plus other salary hours. Normal Salary Salary The established salary for the salaried employee for this payroll period. O.T. (Overtime) Hourly Report overtime hours worked on specific day(s), in the appropriate cell. If no OT hours were worked, the cell must contain 0.00.
O.T. Rate of Pay Hourly The overtime (OT) hourly rate the employee is paid for working overtime. This OT rate must be entered even if no OT hours were worked. S.T. (Straight Time) Hourly Report straight time hours worked on specific day(s), in the appropriate cell. If no ST hours were worked, the cell must contain 0.00. S.T. Rate of Pay Hourly The straight time (ST) hourly rate the employee is paid for working straight time. This ST rate must be entered even if no ST hours were worked. S.H. (Salaried hours) Salary Only report hours in this row if a salaried employee did physical work on the project. All hours worked on the day should be reported in this row. Do not separate OT hours out. Total Project Classification Hours All The total number of hours worked by the employee for this craft and classification. The values are automatically calculated as O.T., S.T., or S.H hours based on the hours entered each day for the employee. Apprentice/OJT ID All If the employee is an apprentice, enter the apprentice ID, or if apprentice ID is unknown, enter APP. If the employee is an OJT graduate, enter OJT. Apprentice/OJT Wage %
All The percentage of the full wage rate to be paid to this apprentice. The Apprentice percentage is based on the apprentice contract. The OJT percentage is always 100%. Pay Period Gross Pay All The gross amount earned by the employee for all work (both public and private work) performed during this pay period including extra pay items, if appropriate. (e.g. Per diems or any additional pay received, etc.) FICA All The amount of FICA tax deduction for this pay period. Federal Withholding All Amount of federal income tax deduction for this pay period. State Withholding All Amount of state income tax deduction this payroll period. Medicare All The amount of Medicare to be deducted from the employee's gross amount for this payroll period. Additional Deduction(s) Calculated This is a calculated field. Enter additonal deductions in the Additional Deductions located to the lower right of this field. The total additonal deductions amount will calculate here. Total Deductions Calculated This is a calculated field. The sum of FICA, federal and state withholding, plus additional deductions. Net Paid Calculated This is a calculated field. The gross pay amount minus total deductions for all work performed (state and non-state) by this employee during this pay period. Health/Welfare All Hourly rate of employer contribution towards a Health and Welfare plan. Hourly Rate = Annual Employer Cost/Total Hours (public and private) worked in a year. Vacation/Holiday All Hourly rate of employer contribution towards a Vacation or Holiday pay plan. Hourly Rate = Annual Employer Cost/Total Hours (public and private) worked in a year. Skill Impr/Training/Education All Hourly rate of employer contribution towards Skill Impr/Training/Education. Hourly Rate = Annual Employer Cost/Total Hours (public and private) worked in a year. Do not include Transportation Education Fund (TEF). Pension/Retirement/Annuity All Hourly rate of employer contribution towards Pension/Retirement/Annuity. Hourly Rate = Annual Employer Cost/Total Hours (public and private) worked in a year. Cash Payment All Hourly cash rate paid this week toward the prevailing wage fringe benefit amount if no fringes or partial fringes are paid by the employer. Additional Fringe(s) All Hourly rate of employer contribution towards a bona fide fringe benefit not listed under Fringe Benefits. Hourly Rate = Annual Employer Cost/Total Hours (public and private) worked in a year. Identify this fringe in the Employee Comments area. Employee Comments (Check Number or ACH is required)
All The check number or ACH are required comments. If applicable, enter per diem paid, other payments, other project hours, mileage, additional fringe benefits, etc. 4(c) Exception All (Infrequently used) In addition to the basic hourly wage rates paid, payments of fringe benefits as listed in the contract have been or will be made to appropriate programs for the benefit of such employees, except as noted in Section 4(c). Additional Deduction(s) All Report additional deductions for employee. Enter a description in the Deduction Description cell and enter dollar amount in the Amount cell. IMPORTANT: leave this area blank If no additional deductions or an import error will occur.
- When the data entry is complete, continue to the next step Payroll spreadsheet conversion process (from an .xlsx to an .xml file.
Weekly payroll spreadsheet naming convention examples using the contract OR project ID in the naming convention:
Arbor Green - YYYYMMDD### - Payroll 3.xlsx
where YYYYMMDD### is the contract ID and the payroll number is indicated
Mega Rentals - ####-##-## - End 05102025.xlsx
where ####-##-## is the project ID and the payroll end date is indicated
The next step is to convert the weekly payroll spreadsheet and create the weekly payroll XML file to be imported into AWP CRL.
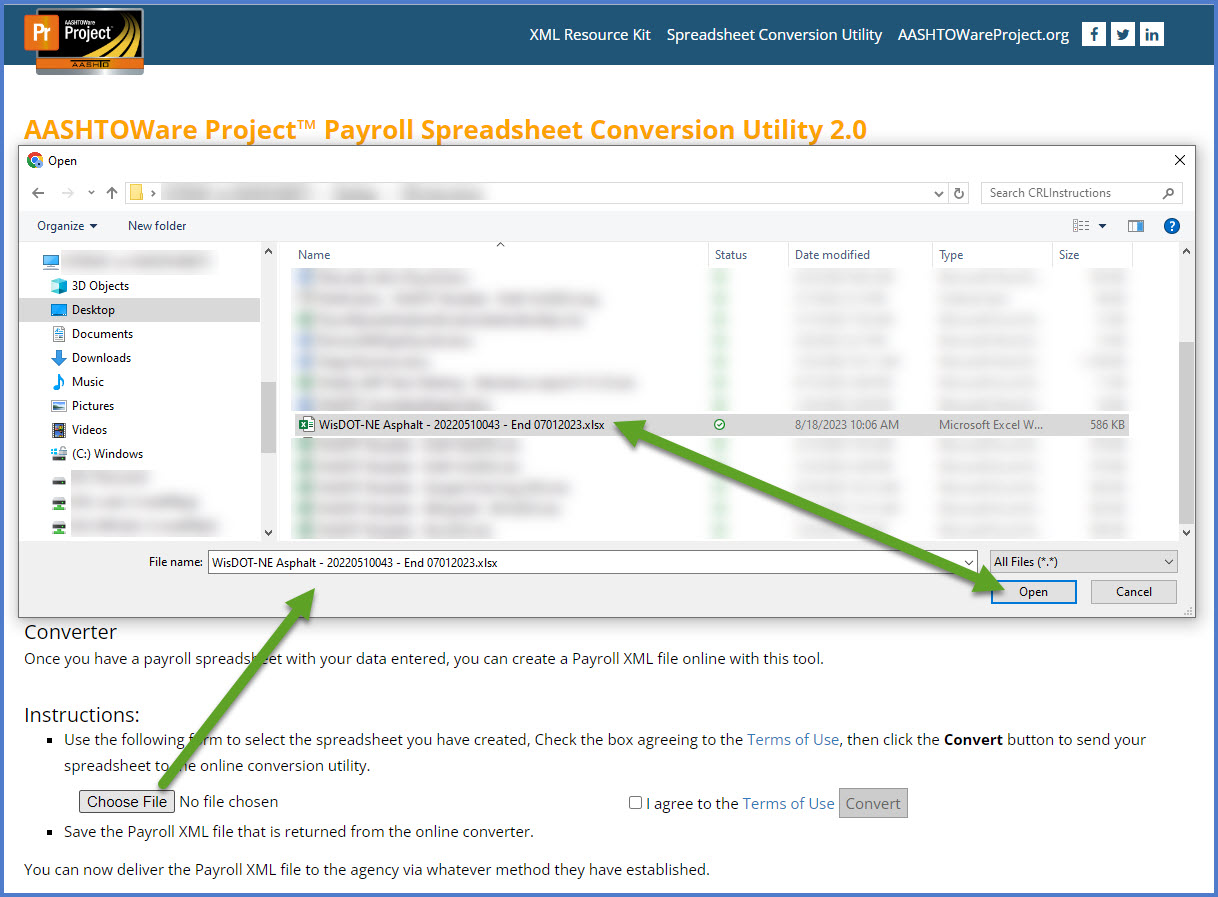
- Go to AASHTOWare Project™ Payroll Spreadsheet Conversion Utility 2.0.
- Skip the sections with "Agency Instructions" and "Contractor Instructions". These steps were completed previously.
- Go to the "Converter Instructions" section.
- Click <Choose File>.
- Review and click the check box for "I agree to the Terms of Use".
- Click <Convert>.

- Carefully review any error messages received during the conversion process. Update and save a new copy of the weekly payroll spreadsheet. Repeat steps 4-6 above.
- If the conversion completes with no errors, an XML file with the same name and the .xml extension will be saved to the downloads folder. It is recommended that this file be copied or moved from the /Downloads folder to another location for long term storage.
-
Expand the first browser pop up window stating there is an "Unverified download blocked" by click the expand arrow on the right.
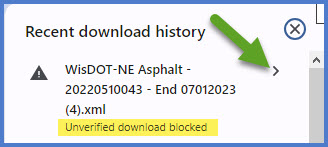
-
Click <Download unverified file> to complete the creation of the contract specific payroll spreadsheet XML file for import. The file may be moved from the /Downloads folder to another location for long term storage.
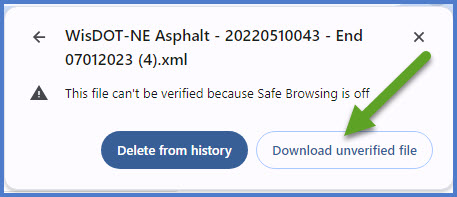
Sometimes company browser settings will impact downloading an unverified file. Here is an example:
For the next step, contractors will import the weekly payroll spreadsheet XML file into AWP CRL.
- Log onto WisDOT AASHTOWare Project (AWP) with your WAMS ID and associated password.
- Make sure "PROJECT WisDOT Payroll" is the active role.
- Click Open Global Actions Menu | Import File from the dashboard.
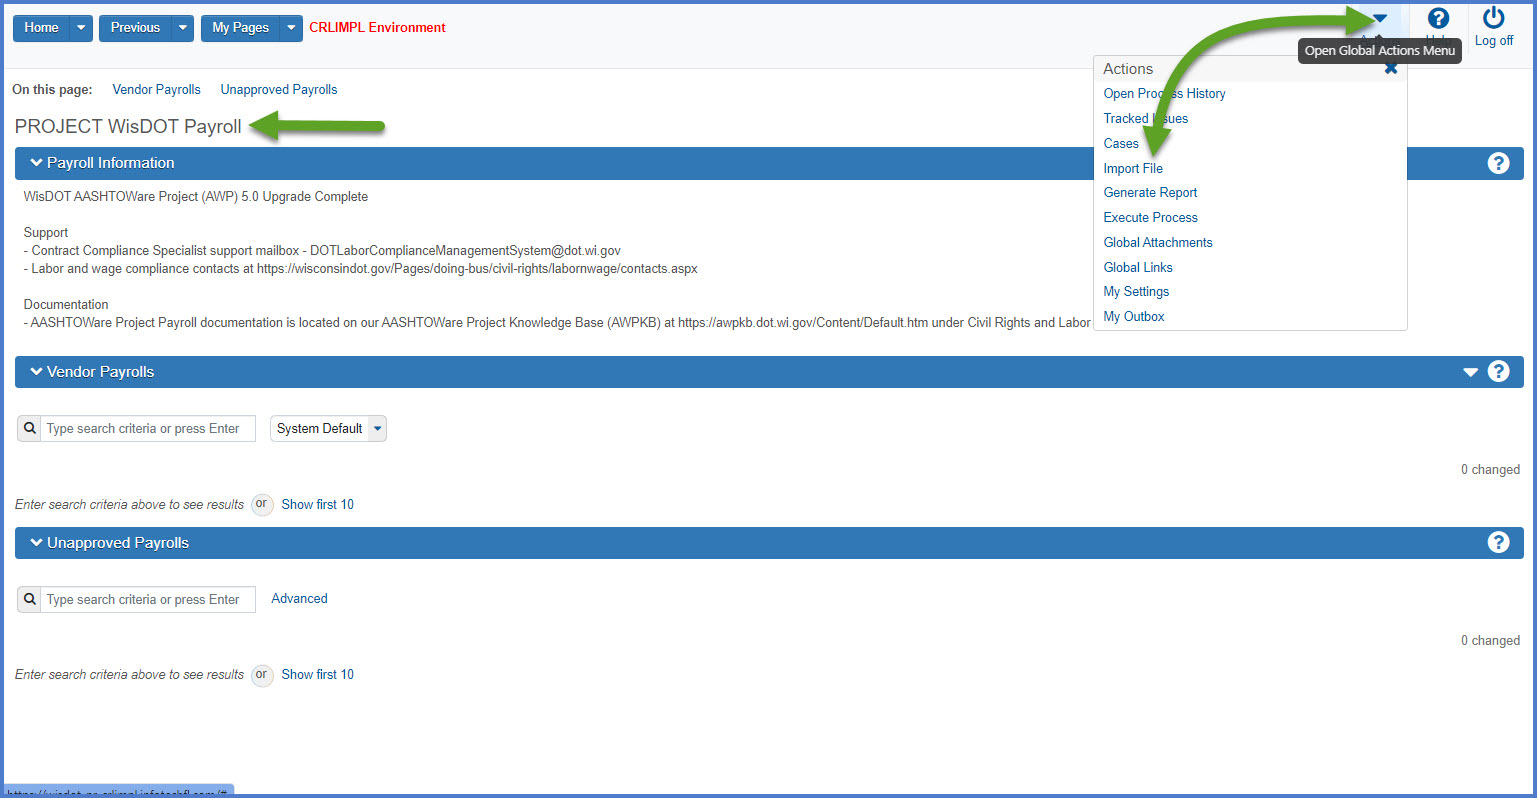
- On the Import component, click <Select File>.
- Browse to and select the weekly payroll spreadsheet XML file. Click <Open>.
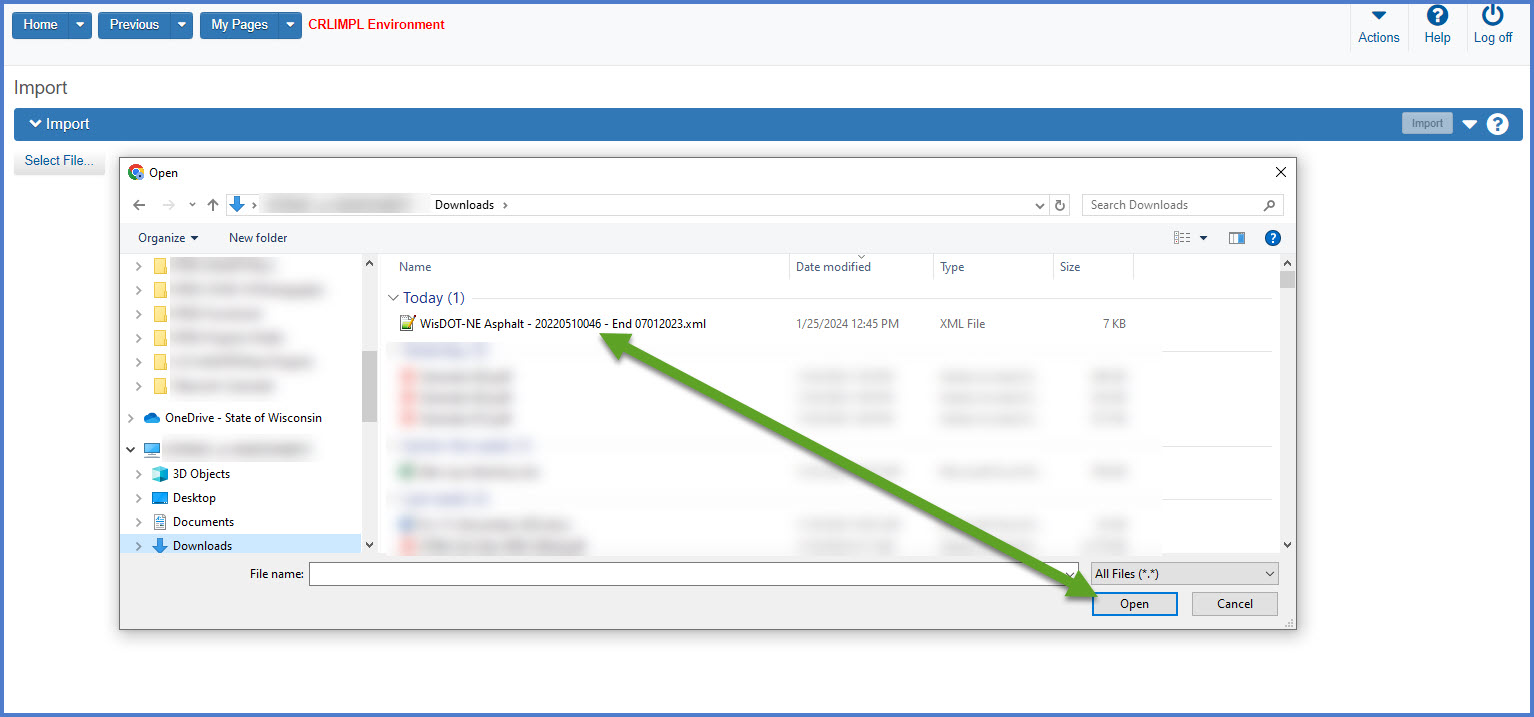
- Confirm the correct file was selected for import. Click <Import> to start the import process.

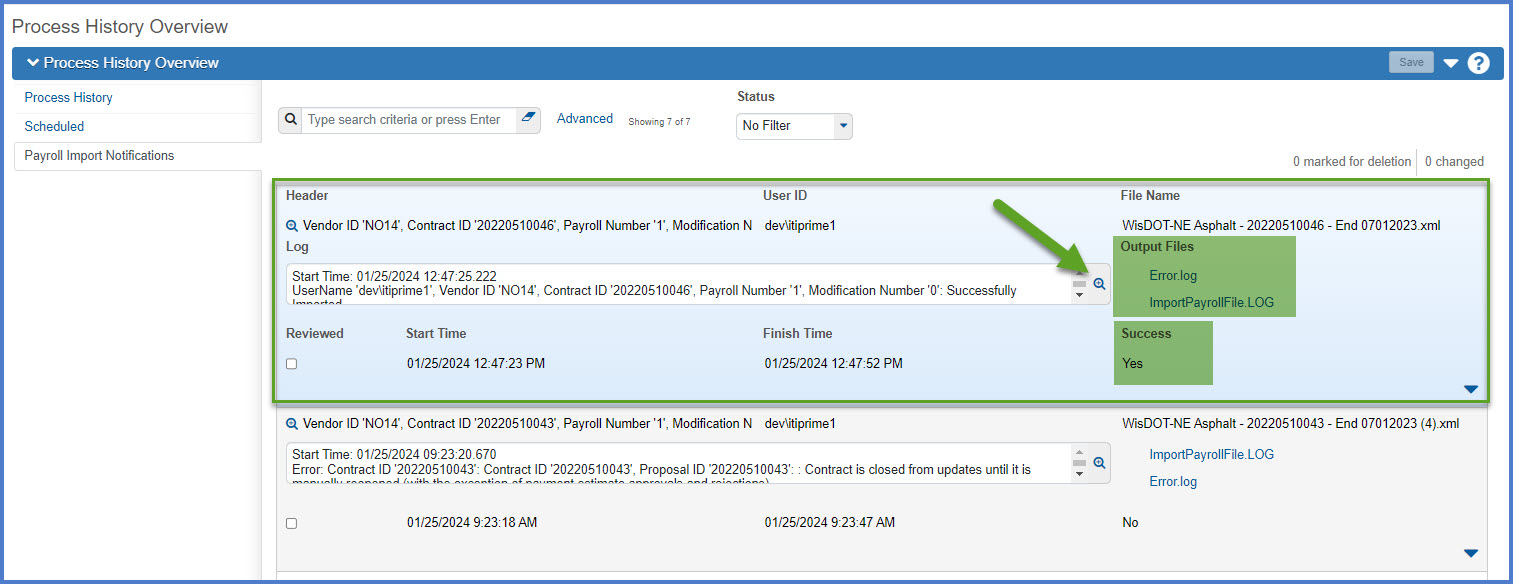
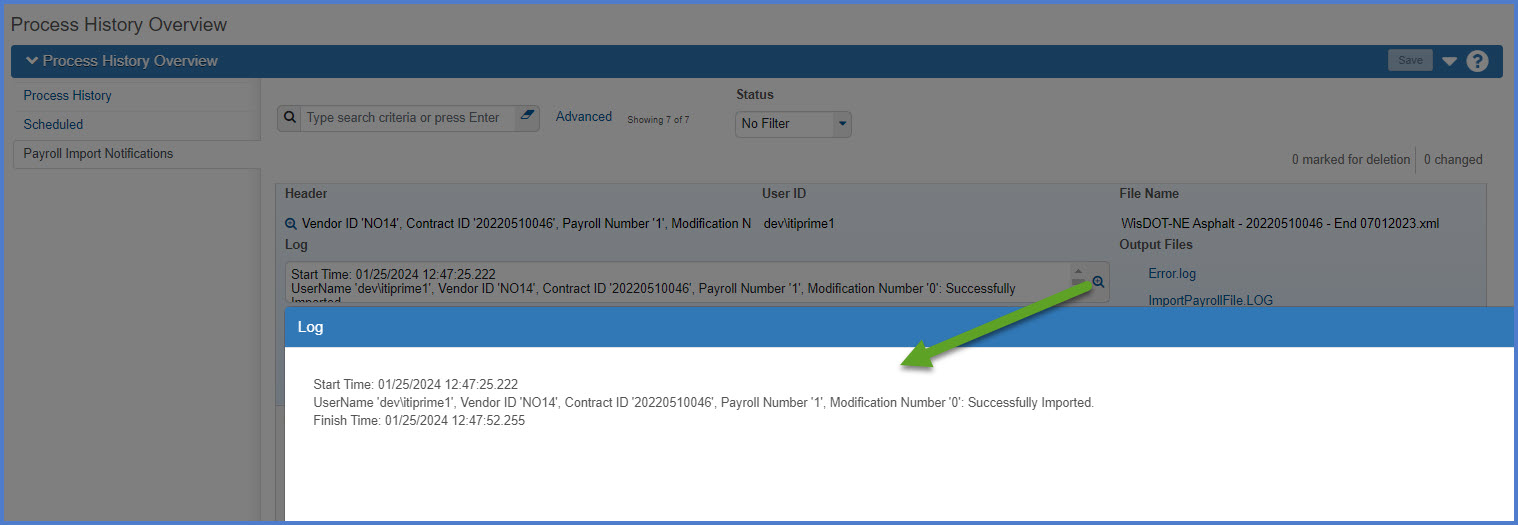
- Wait for the "Payroll Import Submitted - See Notifications" message to be returned. Click the "Go to Process History Payroll Import Notifications" and review the results of the payroll import process.

- If the import was not successful, correct the errors on the weekly payroll spreadsheet. Refer to the Civil Rights & Labor FAQs for common import errors and how to resolve them. After updating the weekly payroll spreadsheet, repeat the Payroll spreadsheet conversion process (from an .xlsx to an .xml file) process AND the Payroll spreadsheet import process again.
Upon successful import of the payroll spreadsheet, go to Review and sign a Certified Payroll Report (CPR).
