Manual payroll data entry
Last updated: 2025-06-05
Roles:
- Payroll role for the prime and subcontractors = modify access
- All other construction and CRL roles including the Contractor role = no access
Certified payrolls may be entered or imported into AWP CRL Payrolls in four different ways.
Prime contractors and subcontractors can manually enter weekly certified payrolls directly into AWP CRL Payrolls. Staff may copy an existing payroll for a project to create a new one which saves some data entry steps by copying several employee specfic fields to the new payroll record.
- This process is the same for both prime contractors and subcontractors.
- Fields noted below with a * are required data entry on a certified payroll record.
- Payroll numbers should be sequential. The begin date should be one day later than the end date of the previous payroll.
- The contractors role does not have access to enter payrolls. Contractor and subcontractor staff who enter payrolls must use the Payroll role. Contractor staff with multiple roles will need to switch to the Payroll role to complete these tasks.
Tip: Click on the thumbnail images below to expand and view the content.
- Log onto WisDOT AASHTOWare Project with your WAMS ID and associated password.
- Make sure "PROJECT WisDOT Payroll" is the active role.
- From the dashboard search for and select the contract on the Vendor Payrolls Overview component by searching for the Contract ID, controlling project ID, project description, vendor (contractor) ID or contractor in the search box.Tips:
If the contract is not found, contact WisDOT Labor Compliance at DOTLaborCompliance@dot.wi.gov and include “AWP CRL” in the subject line. The subcontractor payroll contact may not have vendor authority access or the subcontractor has not been added to the contract. - Click on the payroll hyperlink for the contract that your company is entering payrolls for.
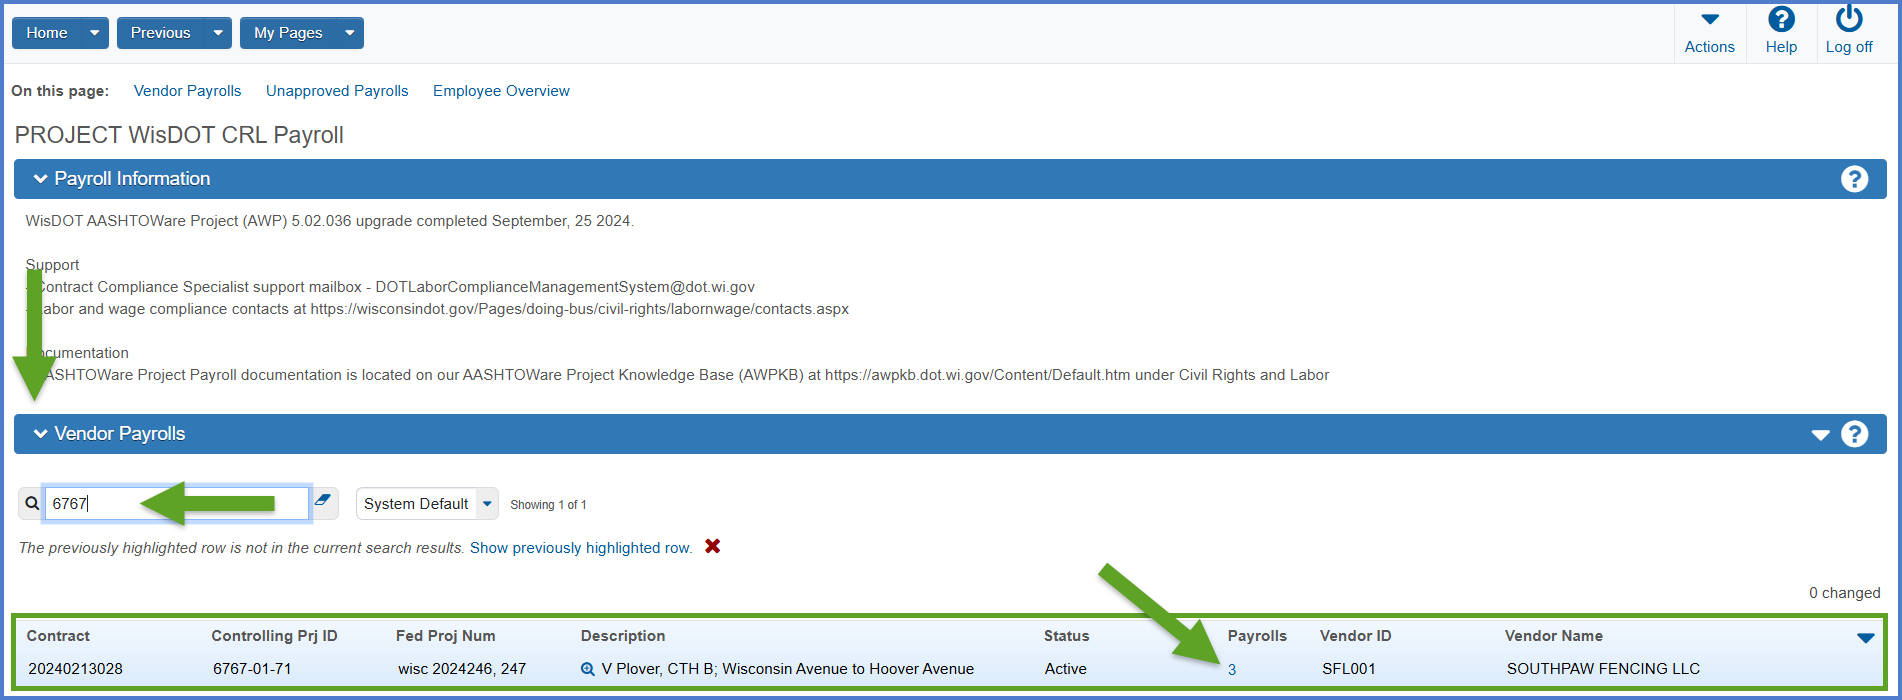
- Note the number of the last payroll entered. Select Open Component Actions Menu | Add New Payroll.

- On the External Add Certified Payroll component, enter the following fields. Click <Save> when data entry is complete.

- Upon saving the certified payroll record, determine if either of these fields require attention., Click <Save> when data entry is complete. Click the Employees quick link and go to this link to begin Adding employees to the certified payroll record.

| Field | Required | Description |
|---|---|---|
| Payroll Number | Yes | Number assigned to payroll report by vendor. Start with 1 for first week, 2 for second week, etc. Don't skip numbers. Check number prior to submitting new payroll report. If the number has been used there will be an error message. |
| Begin Date | Yes | Date the weekly payroll period begins. A payroll period is 7 consecutive 24 hour days which the contractor has predetermined. The system will not allow payroll periods to overlap. |
| End Date | Yes | For payroll report: date weekly payroll period ends. Weekly payroll period is 7 consecutive 24 hour days the vendor has set as their payroll period. System will not allow weeks to overlap. |
| Comments | No | Additional information about this certified payroll report. |
| Field | Required | Description |
|---|---|---|
| Non-Performance Payroll | No | Check this box if not performing work on this project from the Begin Date to the End Date. |
| Final Payroll | No | Check this box if this is the final payroll report for this project. |
There are two ways to add employees to a new certified payroll record.
- On the External Certified Payroll component, click the Employee quick link located under the menu bar.

- Select Open Component Actions Menu | Add Ref Employee to select an existing reference employee. Prime and subcontractors can only see their own employees in the Ref Employee list..
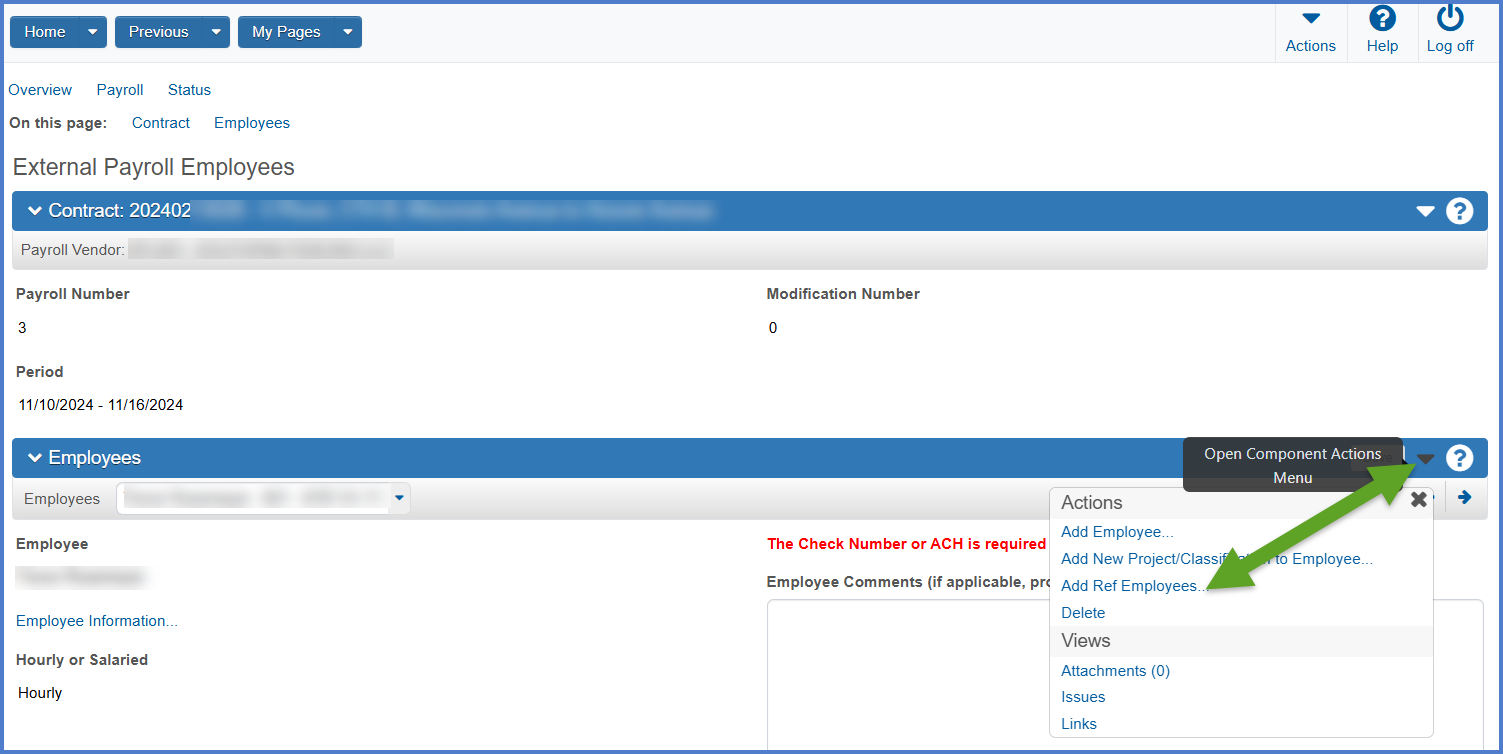
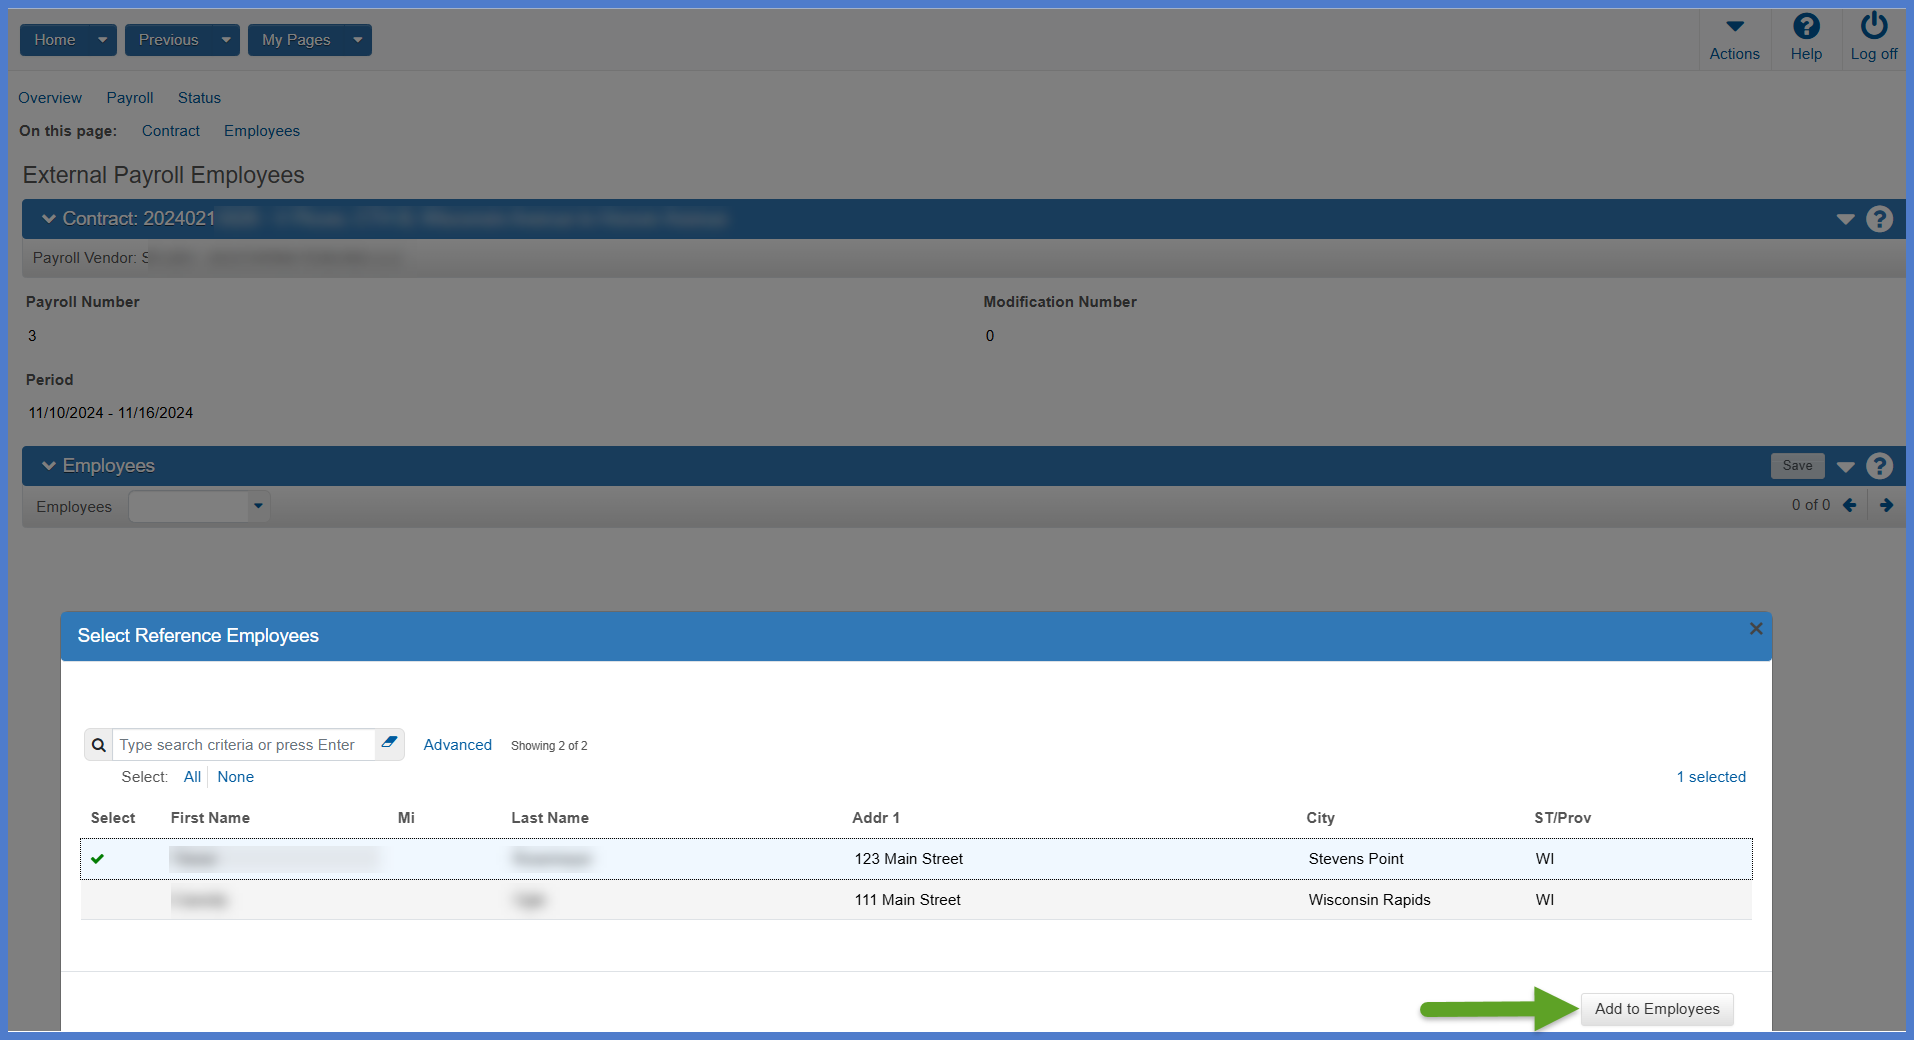
- Search for and select the reference employee records under the Select Reference Employees component by searching for the employee first or last name, a portion of the address or city in the search box.
- An Advanced Filter may also be used. See Searching, sorting, and filtering lists for details.
- One or more employees can be selected on the Select Reference Employees component. The number of employees selected is tracked on the right side of the component.
- Once one or more employees is selected, click <Add to Employees>.
- Go to Entering employee payroll information for detailed instructions on how to record the hourly or salary payroll details for the selected reference employee(s).
- On the External Payroll Employees component, click the Employee quick link.

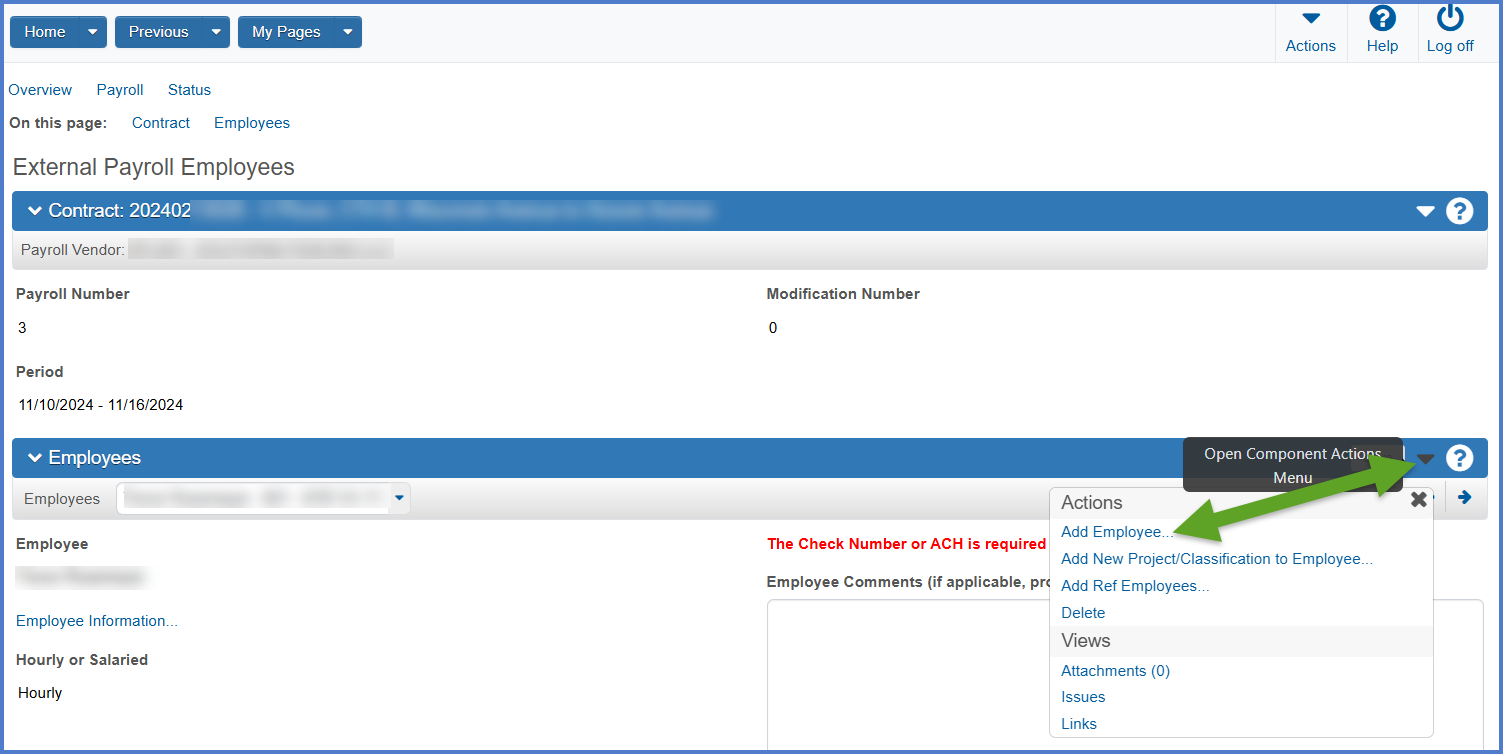
- On the External Payroll Employees component, select Open Component Actions Menu | Add Employee to add a brand new employee to the system.
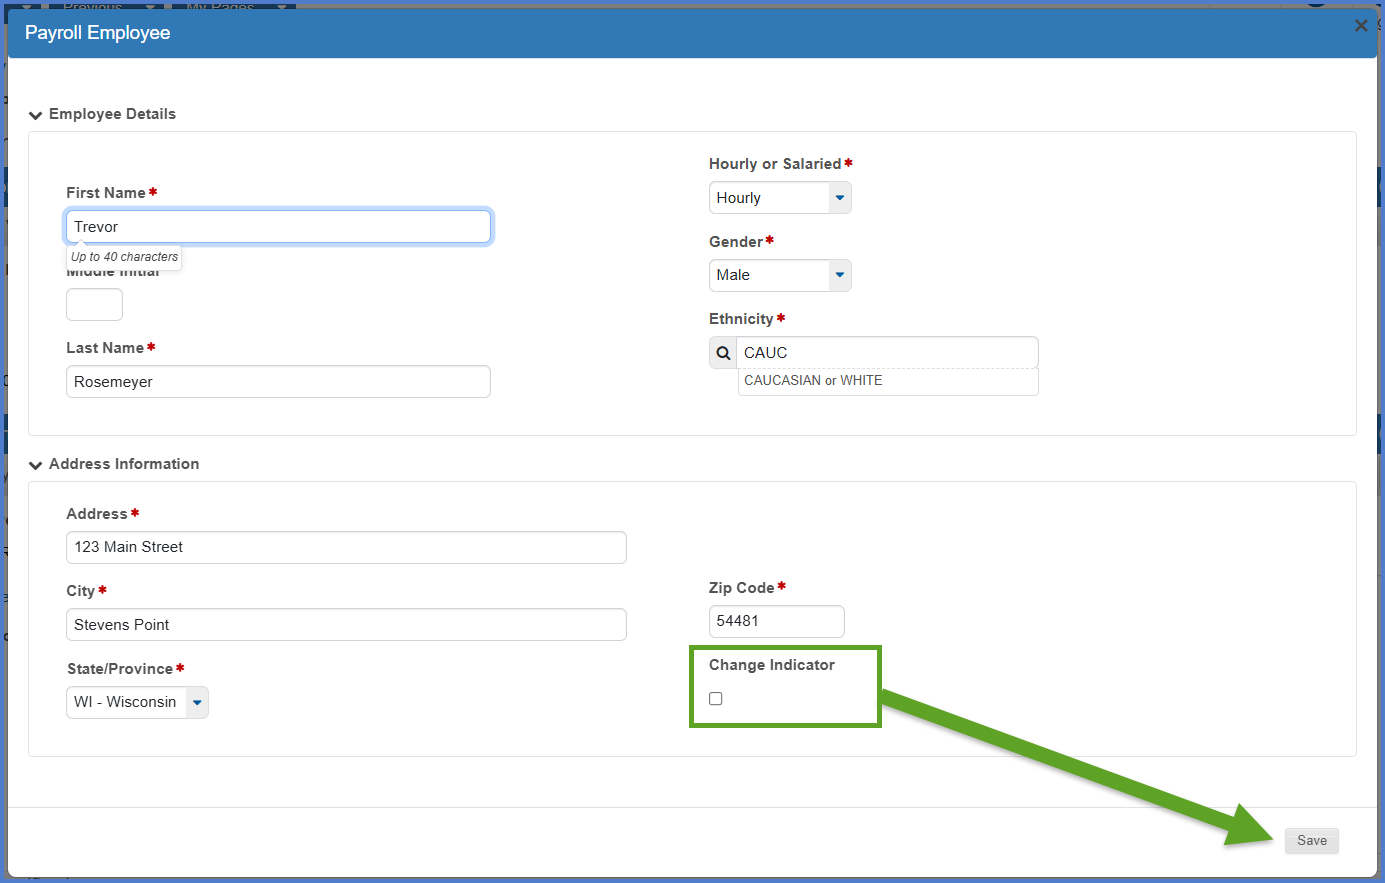
- On the Payroll Employee component, enter all the required fields. Additional guidance for some fields appears in the table below. Click <Save> when data entry is complete. Repeat steps 2-3 to add additional new employees for this certified payroll record.
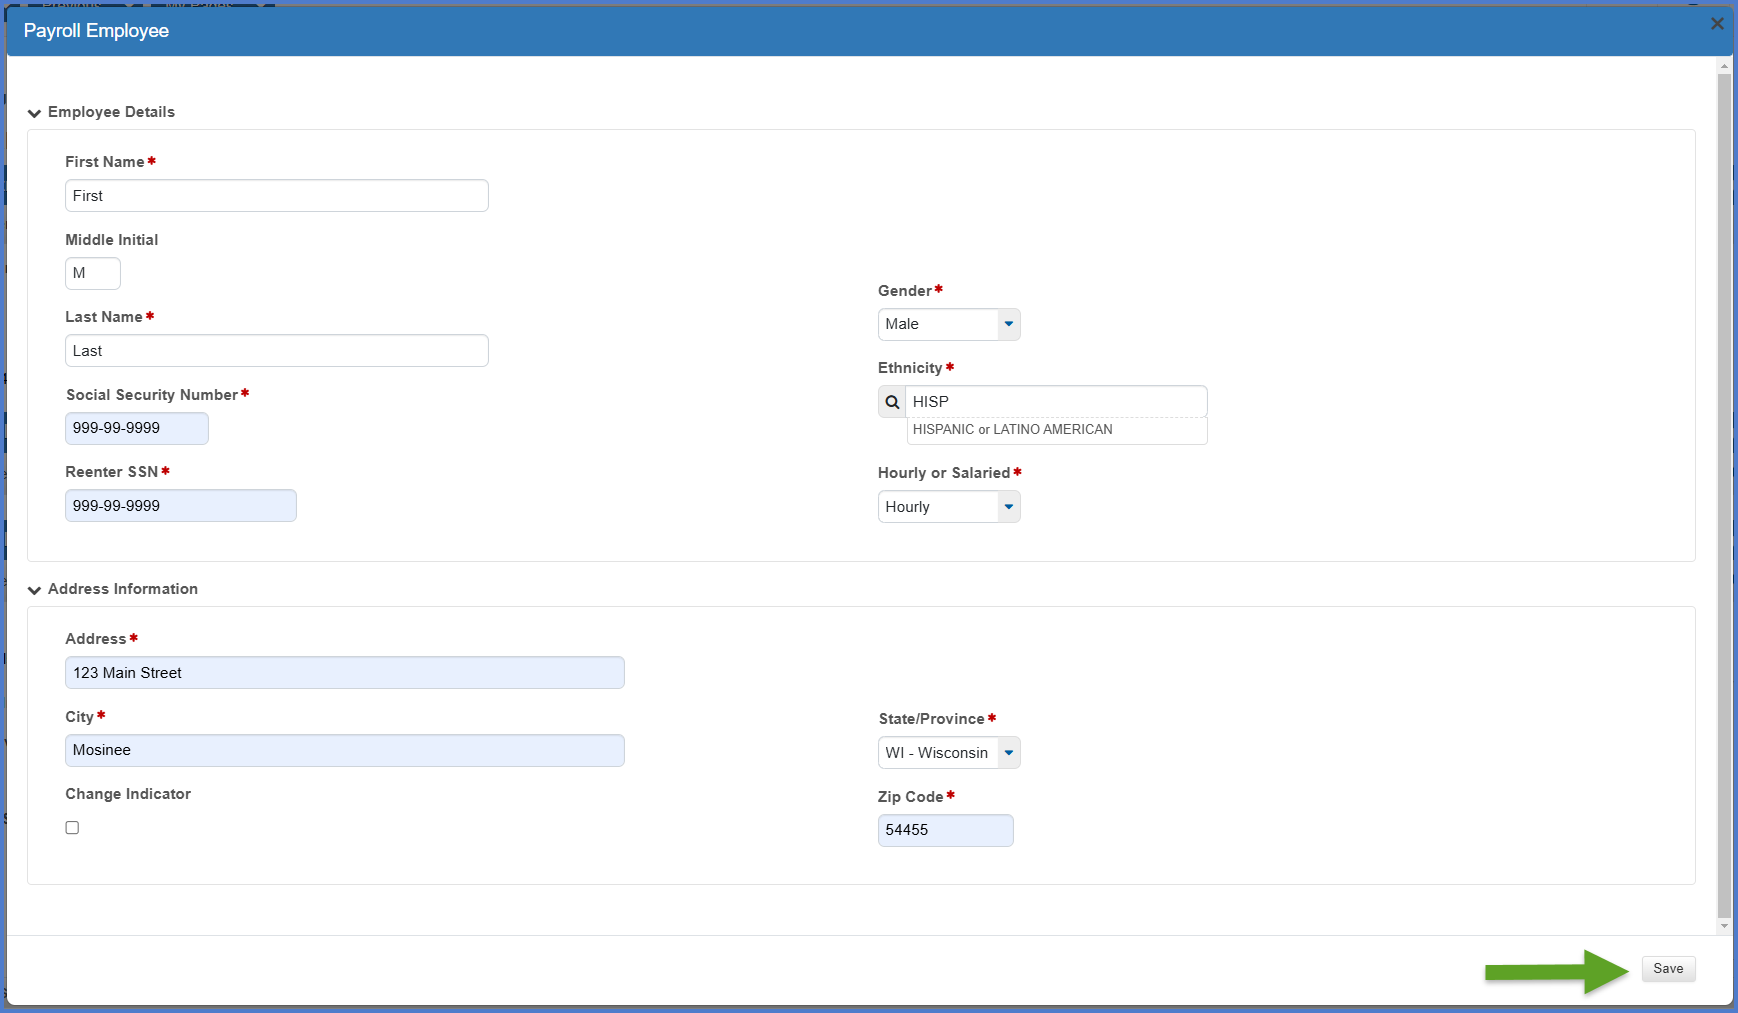
Field Required Description First Name, Middle Initial, Last Name Yes Enter the employee's full name including middle initial, if one exists. Social Security Number Yes Entry format is 999-99-9999.
This value MUST be entered correctly. Only a limited number of staff can view or update this field after it is entered and saved as part of the certified payroll. The reference employee record is created after the certified payroll is signed by the subcontractor and prime contractor and moves to the "Under Agency Review" phase.Reenter SSN Yes Entry format is 999-99-9999.
This value MUST be entered correctly. Only a limited number of staff can view or update this field after it is entered and saved as part of the certified payroll. The reference employee record is created after the certified payroll is signed by the subcontractor and prime contractor and moves to the "Under Agency Review" phase.Gender Yes Select the appropriate option from the down list. Ethnicity Yes Begin to type an ethnicity or click <Enter> to select one from the auto complete list. Hourly or Salaried Yes If the employee selected is paid hourly, select Hourly. If the employee selected is salaried, select Salaried. Address, City, State/Province, Zip Code Yes Enter the employee's home address including city, state and zip code. Change Indicator No Select box if employee's information has changed since last payroll (e.g., first or last name, middle initial, address, gender, etc.)
There are two types of employee payrolls: hourly and salaried. Follow the guidance below to enter payrolls for each employee that worked for this certified payroll pay period.
- After all employees have been added to this payroll, click the Employees quick link to return to the External Payroll Employees component.
- In the Employees section, select an employee from the drop down list.

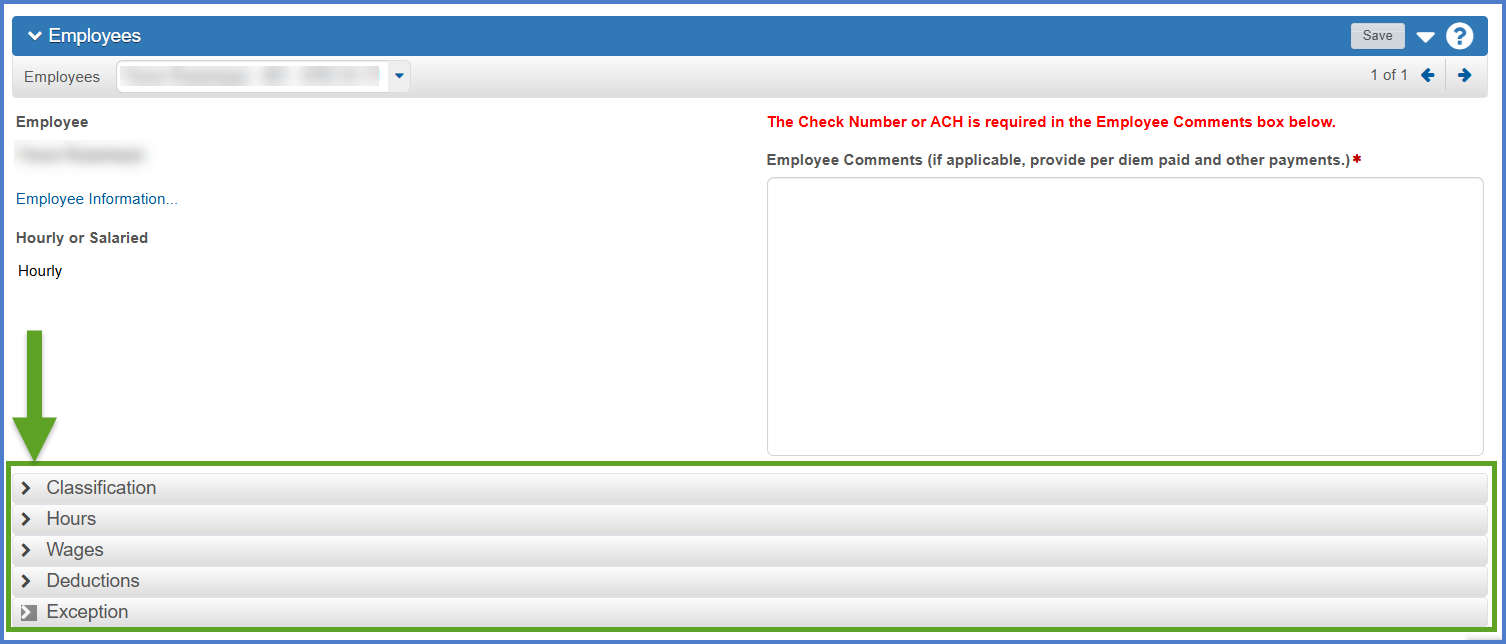
- Data entry is broken down into five sections whether the employee is an hourly or salary employee. Expand each section to complete the required fields using the table below for data entry guidance. Click <Save> after entering data in each section. Upon saving the record, fields to be calculated by the system will be updated. Repeat steps 2-3 for each employee.
- Be sure to enter each fringe rate for those employees if applicable as well as the Total Fringe Benefits Paid.
- Ensure the Total Deductions add up to the sum of all the individual deductions. Total Deductions = FICA Withholding Amount + Federal Withholding Amount + State Withholding Amount + Additional Deductions you add in the Deductions section.
- Net Pay = Total Gross Pay – Total Deductions
| Section | Field | Required | Calculated | Salary or Hourly | Description |
|---|---|---|---|---|---|
| Employee | Employee section example 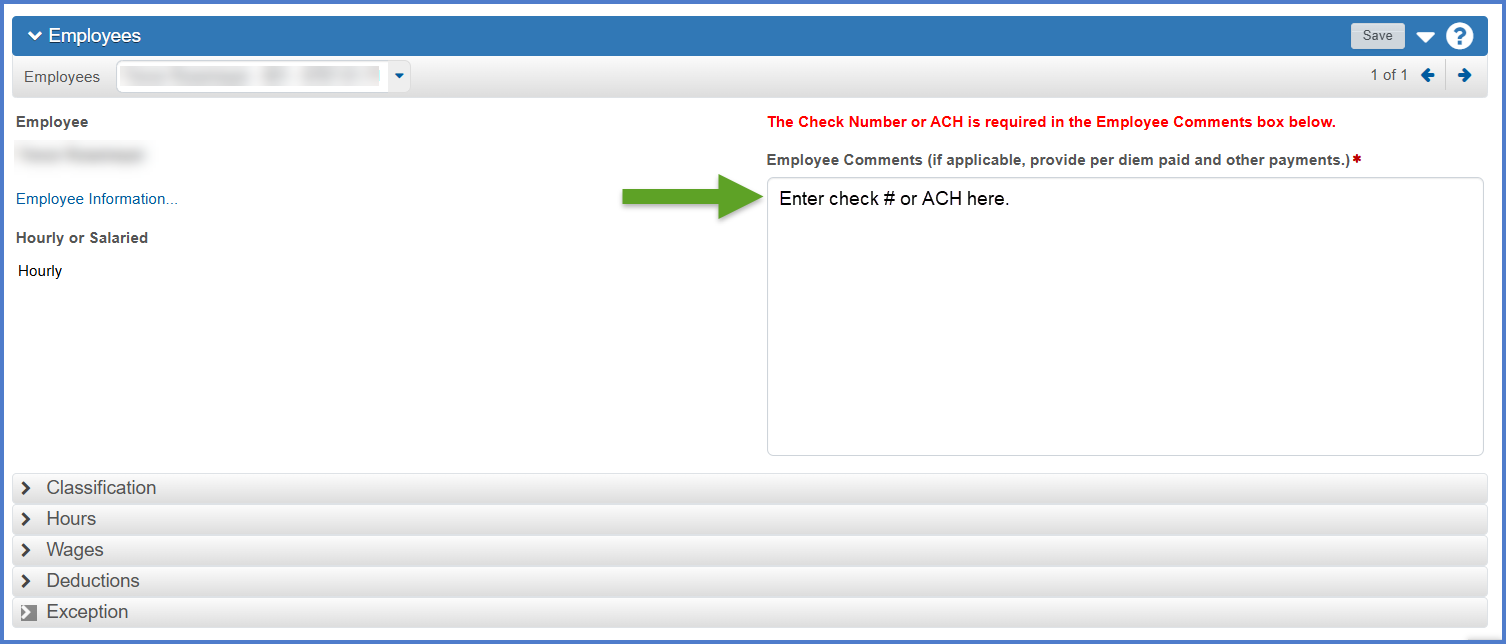 |
||||
| Employee Comments | Yes | No | Both |
Entry of the Check Number or ACH is required for each employee on this certified payroll record. Employee comments may also include per diem paid and other payments. For Owner / Operators, enter "Owner / Operator" or "OO". |
|
| Classification | Salaried Classification section example  |
||||
| Project ID | Yes | No | Both | Click on the drop down arrow to the right. Always select the lowest numbered project ID (referred to as the controlling project ID). | |
| Craft Code | Yes | No |
Both |
Select the Craft Code from the drop down list. The Craft Code is related to the Labor Class. Refer to Craft Codes and Labor Codes based on Federal US DOL Wisconsin Wage Determinations for more details. | |
| Labor Classification | Yes | No | Both |
Enter the appropriate Labor Classification Code identifying a sub-set of the craft code for the type of work the selected employee has performed on this project. The Labor Classification selected is from the applicable wage decision assigned to this project and identifies the required wage amount. |
|
| Straight Hourly Rate | Yes | No | Hourly | The straight hourly rate the employee is paid for working straight time on this project. | |
| Overtime Hourly Rate | Yes | No | Hourly | The overtime hourly rate the employee is paid for working overtime on this project. | |
| OJT Trainee or Apprentice | No | No | Both | This checkbox indicates that this employee is either an On The Job Trainee (OJT) or an apprentice. | |
| OTJ Trainee or Apprentice ID | No | No | Both | If employee is an apprentice, enter apprentice id, or if apprentice id is unknown, enter APP. If the employee is an OJT graduate, enter OJT. | |
| OJT Trainee or Apprentice Percentage | NO | No | Both |
APP: enter the percentage of the base skilled wage rate this apprentice is earning. OJT: always 100%. |
|
| Hours | Salary Hours section example Hourly Hours section example 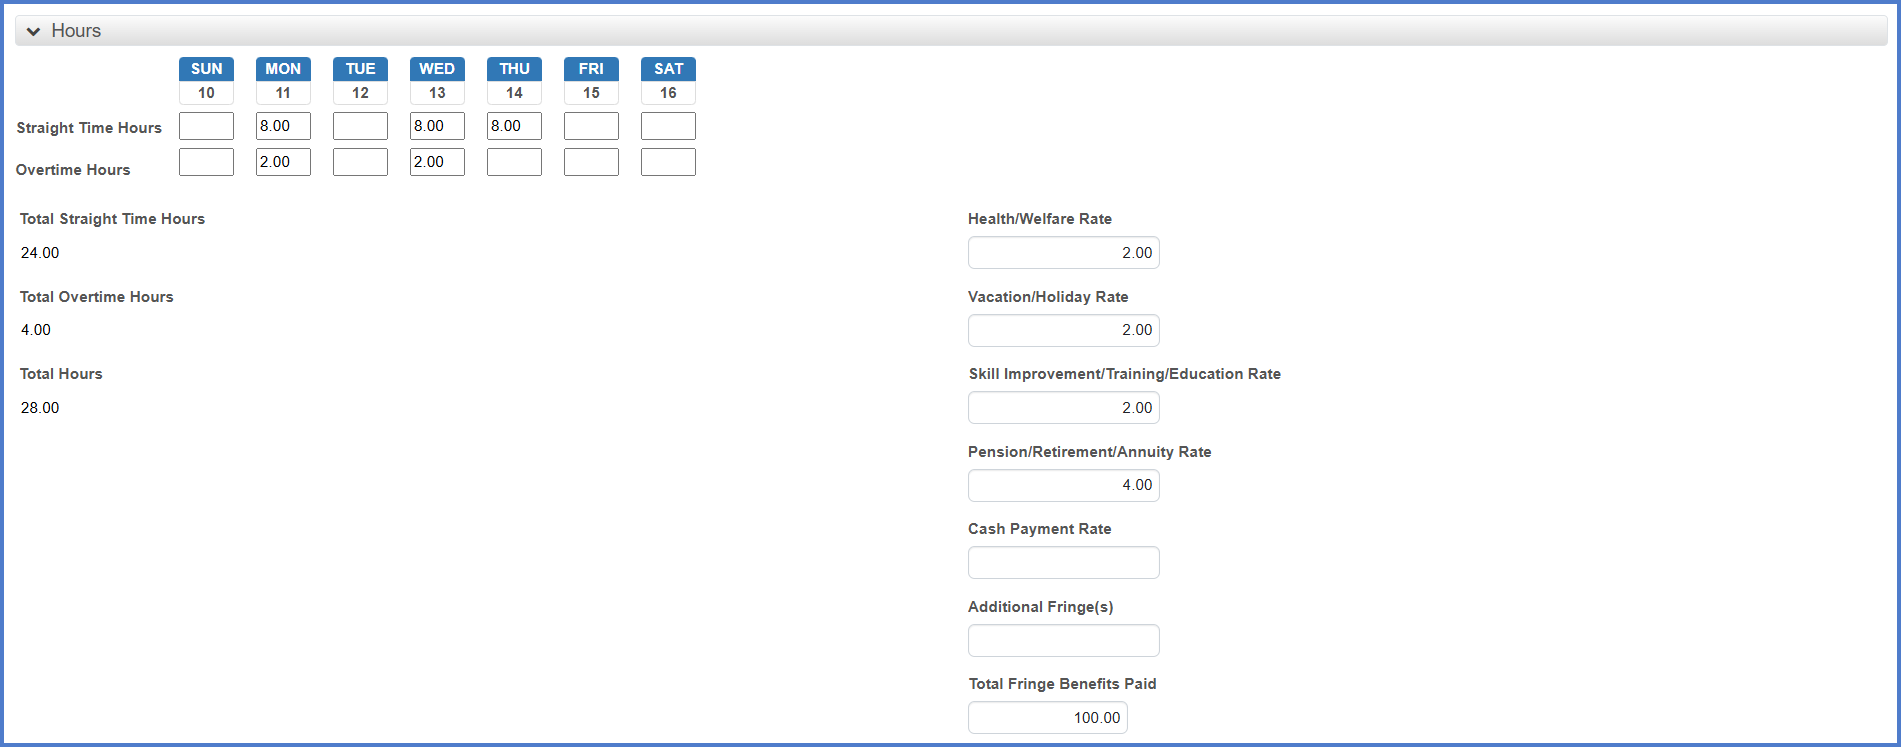 |
||||
| Straight Time Hours | Yes | No | Hourly | Report straight time hours worked on specific day(s) in the appropriate fields. | |
| Overtime Hours | Yes | No | Hourly | Report overtime hours worked on specific day(s), in the appropriate fields. | |
| Total Straight Time Hours | N/A | Yes |
Hourly |
Calculated by the system. The total number of hours of straight time the employee worked this week on this project. | |
| Total Overtime Hours | N/A | Yes |
Hourly |
Calculated by the system. The total number of hours of overtime the employee worked this week on this project. | |
| Total Hours | N/A | Yes |
Hourly |
Calculated by the system. The sum of the Total Straight Time Hours plus the Total Overtime Hours. | |
| Salaried Employee Hours | Yes | No | Salary | Only report hours in this row if a salaried employee did physical work on the project. All hours worked on the day should be reported in this row. Do not separate OT hours out. | |
| Calc Total Project Classification Salaried Hours | N/A | Yes | Salary | Calculated by the system. The sum of the daily hours entered on the payroll. | |
| Total Pay Period Salaried Hours | Yes | No | Salary | Total number of hours the salaried employee worked during this payroll period. Include both public and private hours. Calculated by the system. | |
| Health / Welfare Rate | Yes, if fringe benefit is paid. | No |
Both |
Hourly rate of employer contribution towards a Health and Welfare plan. Hourly Rate = Annual Employer Cost/Total Hours (public and private) worked in a year. | |
| Vacation / Holiday Rate | Yes, if fringe benefit is paid. | No |
Both |
Hourly rate of employer contribution towards a Vacation or Holiday pay plan. Hourly Rate = Annual Employer Cost/Total Hours (public and private) worked in a year. | |
| Skill Improvement / Training / Education Rate | Yes, if fringe benefit is paid. | No |
Both |
Hourly rate of employer contribution towards Skill Impr/Training/Education. Hourly Rate = Annual Employer Cost/Total Hours (public and private) worked in a year. Do not include Transportation Education Fund (TEF). | |
| Pension / Retirement / Annuity Rate | Yes, if fringe benefit is paid. | No |
Both |
Hourly rate of employer contribution towards Pension/Retirement/Annuity. Hourly Rate = Annual Employer Cost/Total Hours (public and private) worked in a year. | |
| Cash Payment Rate | Yes, if fringe benefit is paid. | No |
Both |
Hourly cash payment paid this week toward the prevailing wage fringe benefit amount if no fringes or partial fringes are paid by the employer. | |
| Additional Fringe(s) | Yes, if fringe benefit is paid. | No |
Both |
Hourly rate of employer contribution towards a bona fide fringe benefit not listed under Fringe Benefits. To get the hourly rate, divide the annual employer contribution divided by total hours (public and private) worked in a year. Identify this fringe in the Employee Comments area | |
| Total Fringe Benefits Paid | Yes | No |
Both |
Total fringe benefit amount (add hourly amounts for fringes multiplied by Total Hours worked on this project). | |
| Wages | Salary Hours section example Hourly Hours section example  |
||||
| FICA Withholding Amount | Yes |
No |
Both | The amount of FICA tax to be deducted from the employee's gross amount for this payroll period. | |
| Federal Withholding Amount | Yes | No | Both | The amount of federal income tax deduction for this payroll period. | |
| State Withholding Amount | Yes | No | Both | The amount of state income tax deduction this payroll period. | |
| Total Deductions | Yes | By the user | Both | The sum of FICA, federal and state withholding, plus additional deductions. | |
| Normal Salary | Yes | By the user | Salary | Weekly Salary | |
| Project Wages | N/A | Yes | Both | Calculated by the system. The gross amount earned by the employee for hours worked this week in this classification on this project. | |
| Total Gross Pay | Yes | By the user | Both | The gross amount earned by the employee for all work (both public and private work) performed during this payroll period including extra pay items, if appropriate. (e.g. Per diems or any additional pay received, etc.) | |
| Net Pay | Yes | By the user | Both | The gross pay amount minus total deductions for all work performed (state and non-state) by this employee during this pay period. | |
| Deductions | Deduction section example |
Click <New> to add deductions and enter values in the fields noted below. | |||
| Description |
No |
No | Both | Enter payroll deductions that are not withholdings. Examples: Child support, Levy, garnishments, union dues, vacation, 401 employee contributions |
|
| Amount | No | No | Both | The amount of each additional payroll deduction. | |
| Exception | Exceptions section example |
Click <New> to add exceptions and enter values in the fields noted below. | |||
| Exception Explanation | No | No | Both | (Infrequently used) In addition to the basic hourly wage rates paid, payments of fringe benefits as listed in the contract have been or will be made to appropriate programs for the benefit of such employees except noted in Section 4(c). Example: No benefits - seasonal employee |
There are four types of wage determinations that could apply to a WisDOT project.
- Highway WI 10 applies to all highway work and these wages are included in every contract.
- Heavy WI 15 included in contract if there is a bridge or structure over a navigable waterway as defined by USDOL and the US Coast Guard (applies to all work on the bridge/structure from bank to bank).
- Heavy WI 08 included in contract if sanitary sewer and water main work is more than 20% of the contract and will cost more than 1 million dollars.
- Building rates included in any contract with a building.
WI 10 is assigned to every contract. WI 15, WI 08, and Bldg may also be included depending on the type of work.
Go to Craft and Classifications.xlsx for assistance selecting the craft code and labor classification code based on the WisDOT project type. Refer to the Contract Proposal for more details.
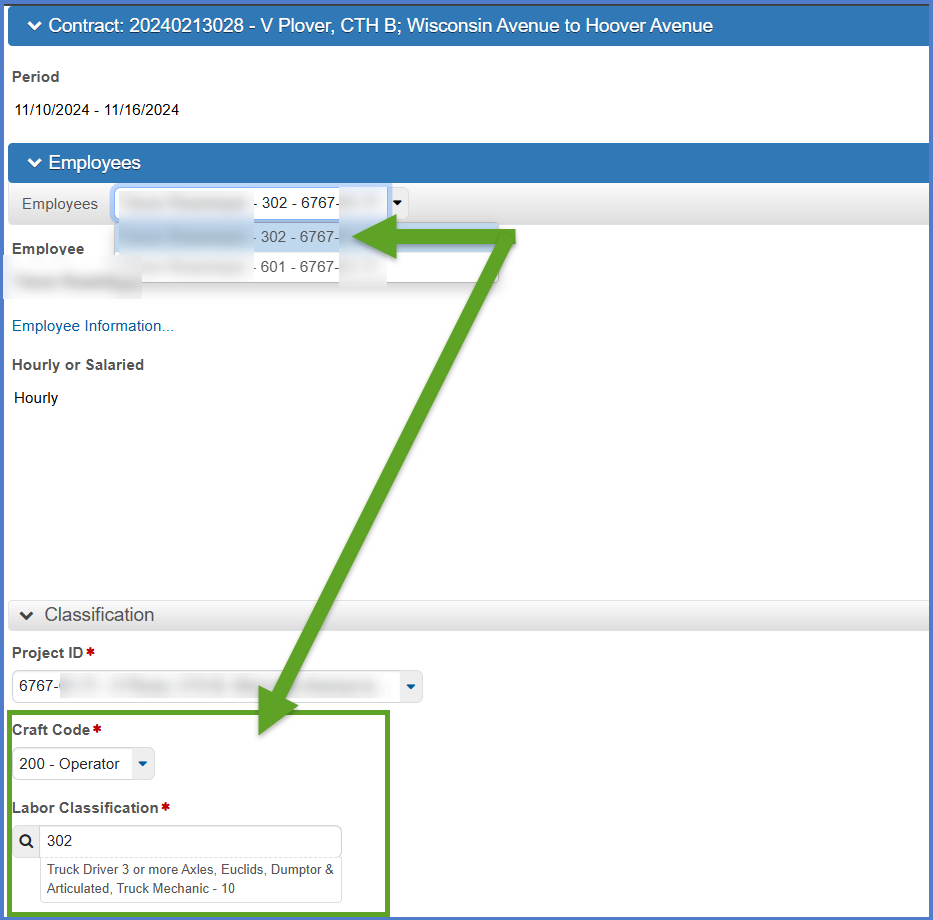
Complete these steps to create a second entry for an employee on this payroll if the employee has multiple classifications or tasks, if there are multiple projects the employee worked on, if the OT fringe benefits are different under certain circumstances, or the employee earns a different OT rate under certain circumstances.
-
On the External Payroll Employees component Employees section, click the Open Components Action Menu | Add New Project / Classification to Employee.

-
On the Add New Project / Classification to Employee component enter the following fields. Select the employee from the list by clicking under the Select column to add the green checkmark. Click <Add Classification/Project to Employee> when data entry is complete.
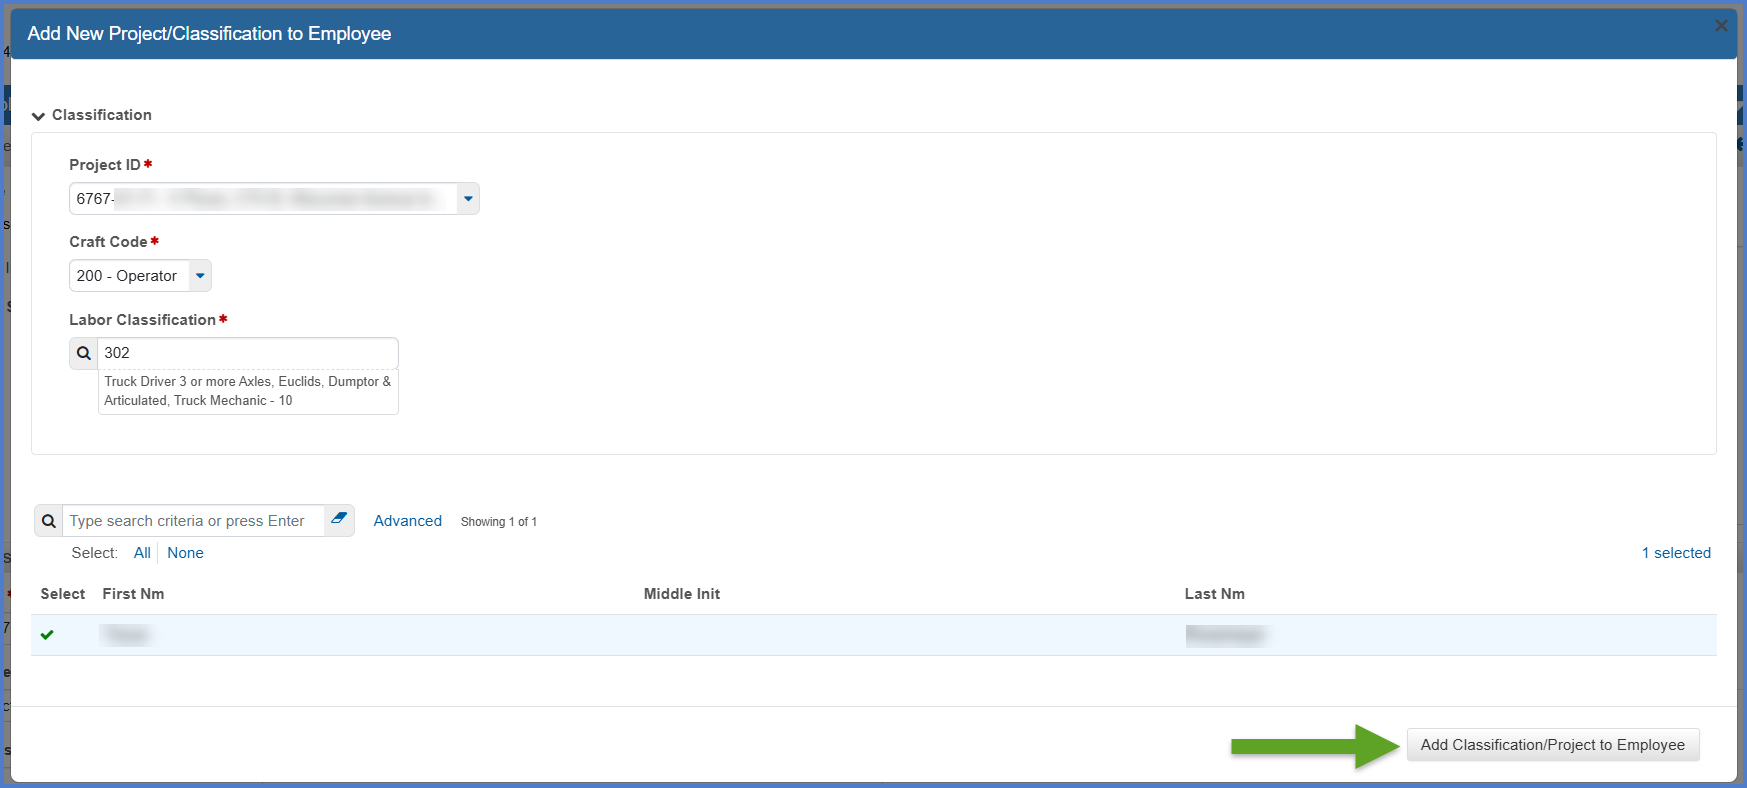
Field Required Description Project ID Yes Click on the drop down arrow to the right. Always select the lowest numbered project ID (referred to as the controlling project ID). Craft Code Yes Select the Craft Code from the drop down list. The Craft Code is related to the Labor Class. Refer to Craft Codes and Labor Codes based on Federal US DOL Wisconsin Wage Determinations for more details. Labor Classification Code Yes Enter the appropriate Labor Classification Code identifying a sub-set of the craft code for the type of work the selected employee has performed on this project. The Labor Classification selected is from the applicable wage decision assigned to this project and identifies the required wage amount. -
Upon saving the additional record for the employee, control will be returned to the External Payroll Employees component.
-
From the Employees component section, select the new employee classification entry from the list.
-
Go to Entering payrolls for each employee to enter payroll information for the employee under this classification.
There are scenarios where the employee has more than two hourly wage rates in a pay period. For example, when they work regular time, standard overtime, and double overtime.
To handle this, enter the employee twice on the spreadsheet. Fill in all the information for both entries of the employee including fringes, deductions, gross pay, and labor class.
The difference between the two entries is in how you fill in the daily hours and the pay rates as shown in the example on the screen.
The same technique can be used when manually entering payroll directly into AWP CRL Payroll.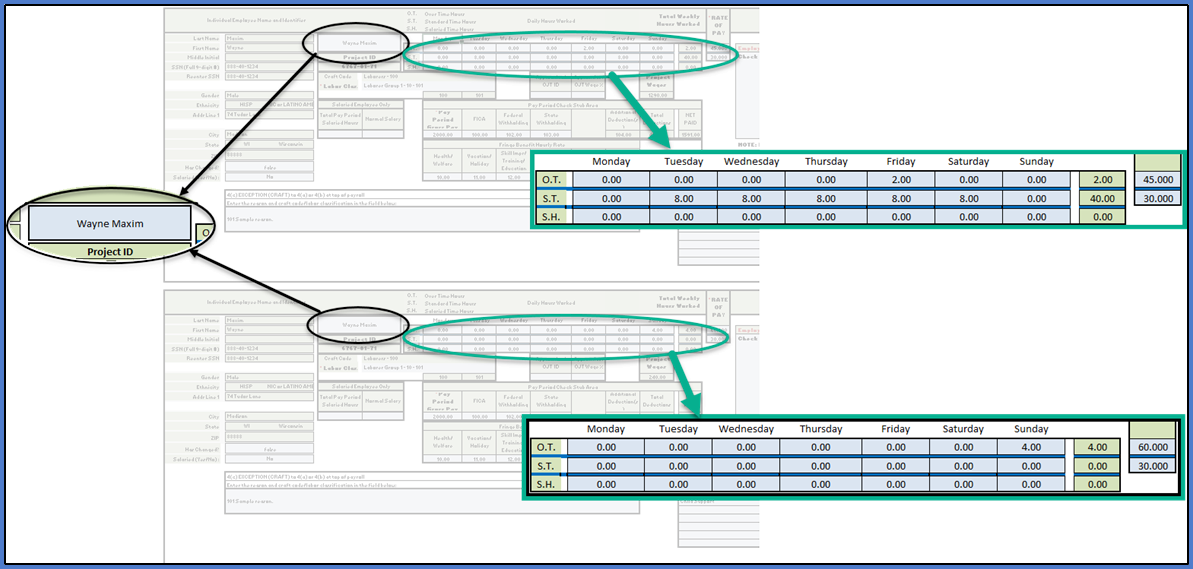
There are scenarios where an employee works multiple labor classifications on a project in a pay period.
To handle this, enter the employee twice (or more) on the spreadsheet. Fill in all the information for both entries of the employee including fringes, deductions, and gross pay.
The difference between the two entries is in how you fill in the labor class, daily hours, and pay rates as shown in the example on the screen.
The same technique can be used when manually entering payroll directly into AWP CRL Payroll.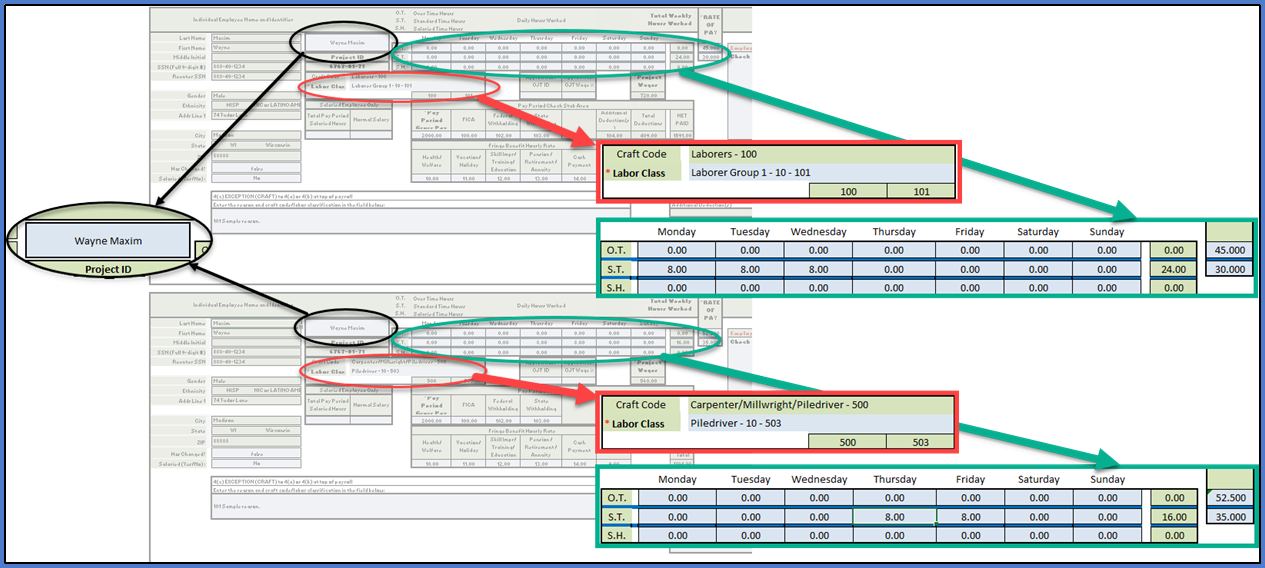
This process copies all the information from the selected source payroll to the new payroll. This includes all the employee records with all the employee hours and wages are set to 0.
- Log onto WisDOT AASHTOWare Project with your WAMS ID and associated password.
- Make sure "PROJECT WisDOT Payroll" is the active role.
- From the dashboard search for and select the contract on the Vendor Payrolls Overview component by searching for the Contract ID, controlling project ID, project description, vendor (contractor) ID or vendor name in the search box.Tips:
If the contract is not found, contact WisDOT Labor Compliance at DOTLaborCompliance@dot.wi.gov and include “AWP CRL” in the subject line. The subcontractor payroll contact may not have vendor authority access or the subcontractor has not been added to the contract.. - Click on the payroll hyperlink for the contract that your company is entering payrolls for.

- Note the number of the last payroll entered. Select the payroll row to copy. It is recommended that staff select an approved payroll as it will not have any exceptions. Select Open Row Actions Menu | Copy.
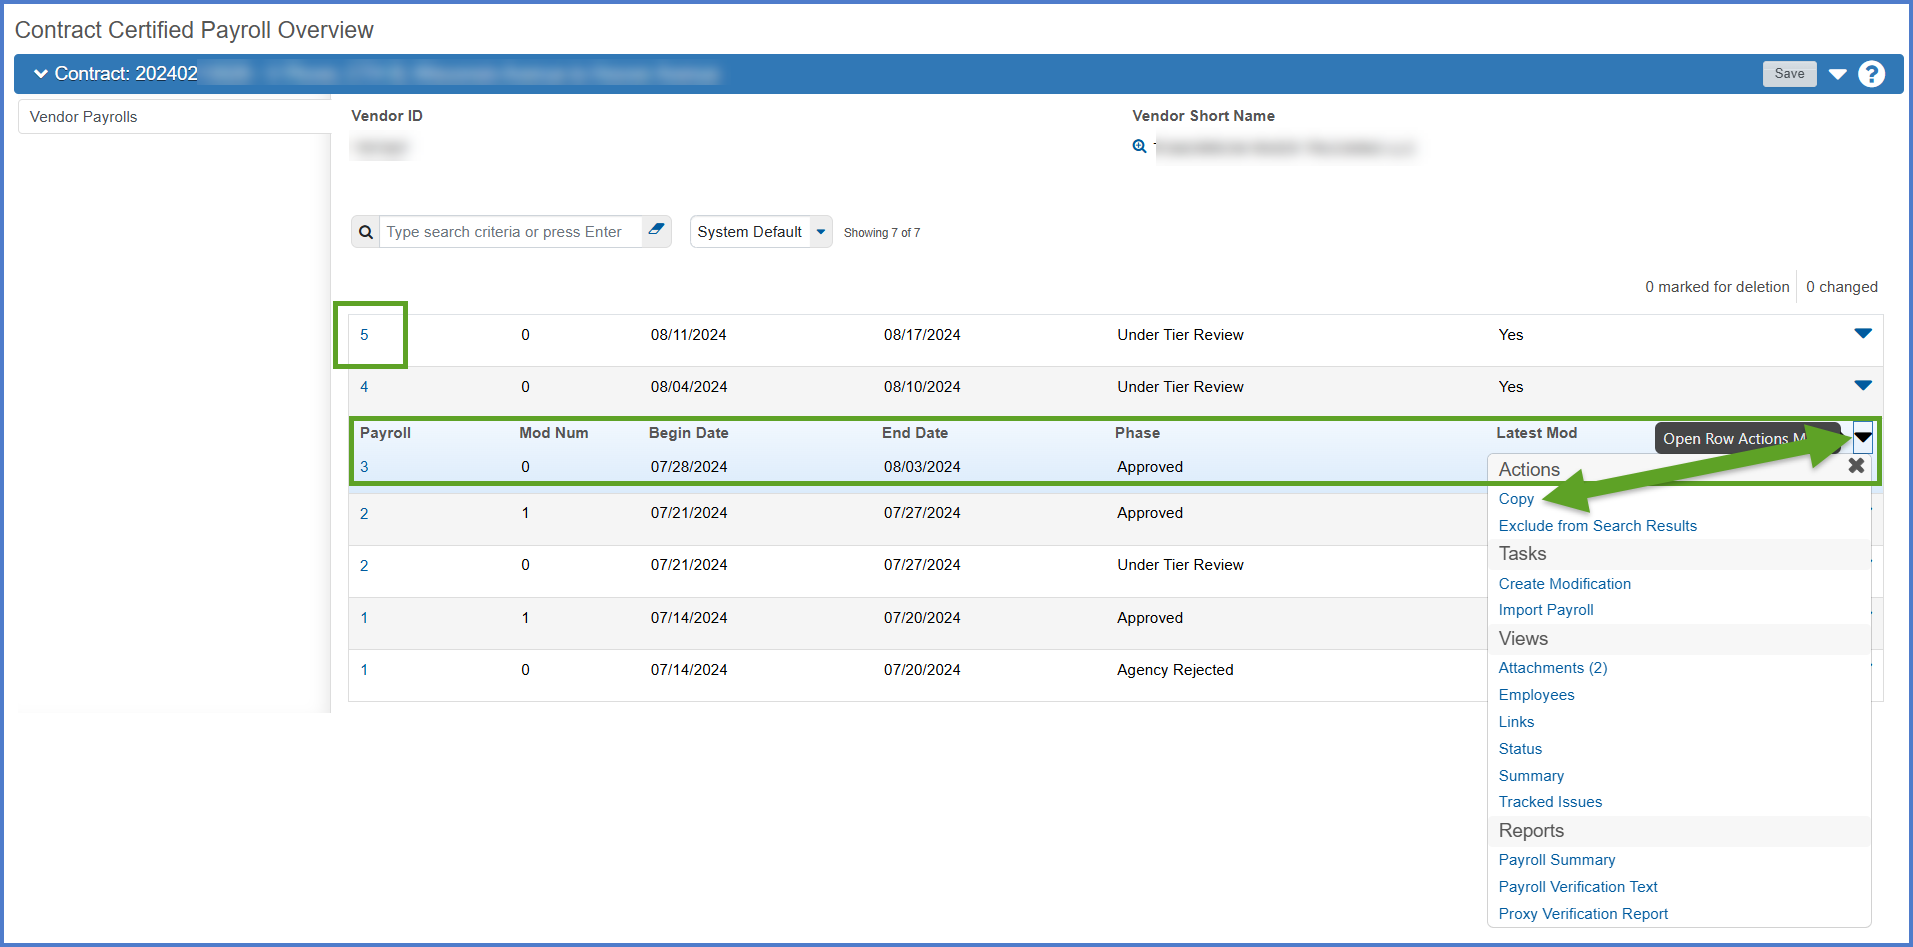
- On the External Copy Certified Payroll component, enter the following fields:
- Enter the next payroll number in the sequence (based on the number noted for the last payroll entered on the previous component plus 1).
- Begin Date - The date the payroll period began (based on a 7-day work week, normally a Sunday).
- End Date - The date the payroll period ended (based on a 7-day work week, normally a Saturday).
- Click <Copy Payroll>.

- On the External Copy Certified Payroll component, enter the optional comments field if needed. If a comment is added, click <Save>.

- Go to Entering employee payrolls the next step in the copy an existing payroll to a new payroll process.
Complete these steps to delete an employee record from a payroll.
-
On the External Payroll Employees component Employees section, select the employee from the drop down list.
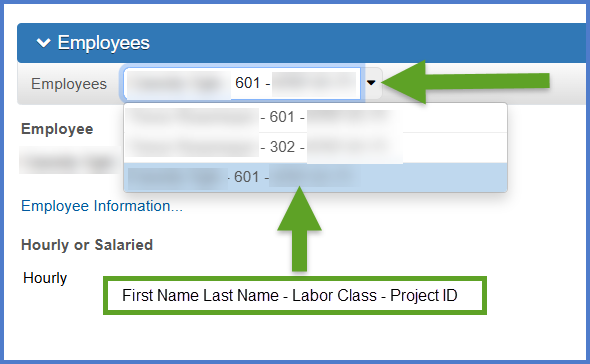
-
Select Open Component Actions Menu | Delete. The employee record, including multiple classification records will be deleted from this payroll. The employee record will not be deleted from AWP CRL Payrolls.
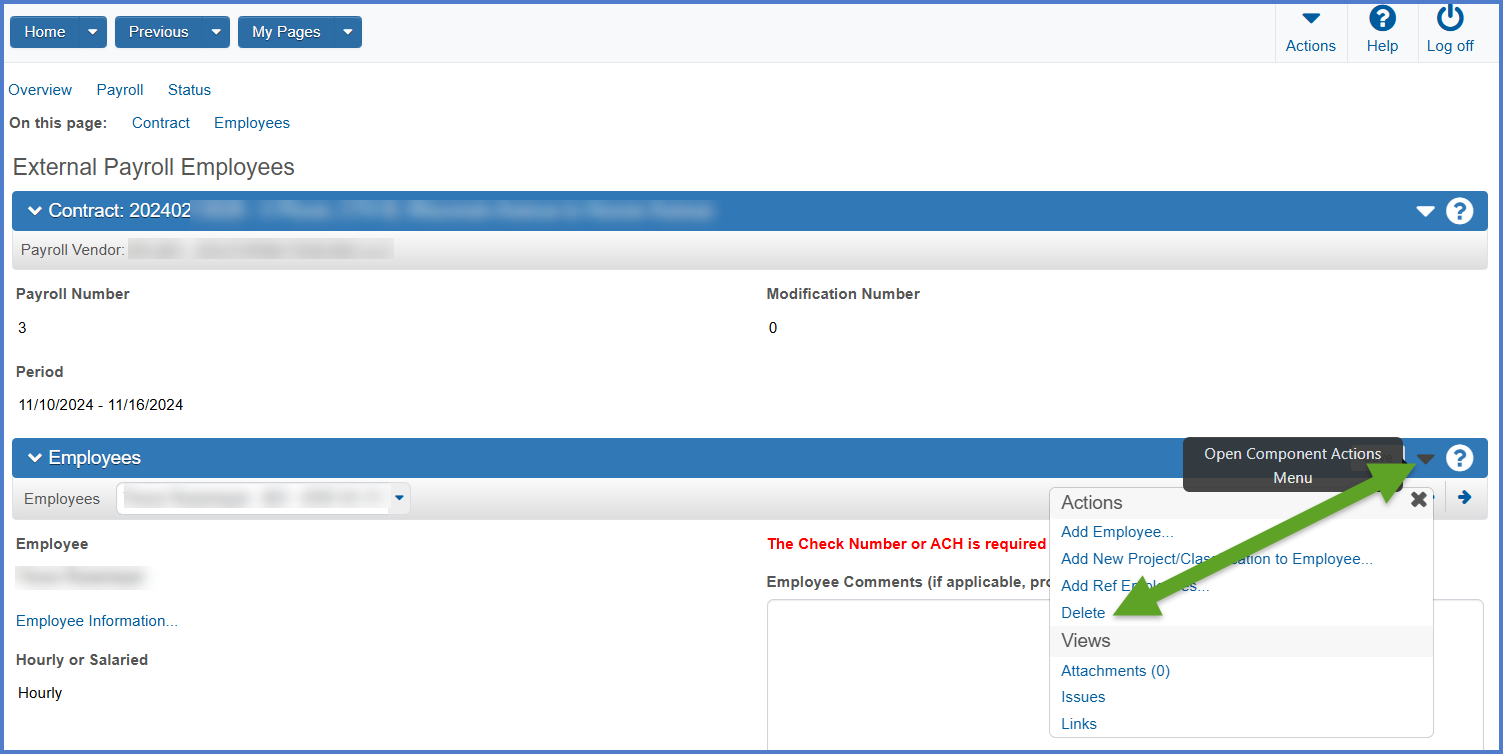
To update the employee's name, personal address, etc. complete the steps below:
When entry of the manual Certified Payroll Report (CPR) is complete, go to Review and sign a Certified Payroll Report (CPR).
