Redistribution of liquidated damages to active projects
Last updated: 2023-02-24
Roles:
- Contract Specialist, Project Engineer = modify access
- Contractors, Project Manager, Supervisor, Chief, Inspector, FHWA, ReadonlyConstr = read only access
AASHTOWare Project Construction handles liquidated damages differently than the legacy systems when a contract has multiple projects. When liquidated damages are calculated, the system will distribute them between ALL projects, even projects that have not started work yet. In many cases, this results in negative project vouchers. The Bureau of Financial Management does not want negative project vouchers submitted. To correct this, the following procedure should be used to assign the liquidated damages to the project(s) where work is occurring.
- On the Contract Administration Summary | Site Times tab, select the site ID hyperlink for the site that liquidated damages are being charged against.
- On the General tab, Status = Inactive.
- Click <Save>.
- Click on the Contract Progress quick link.
- On the Contract Progress Summary | Payment Estimates tab, click <Add Payment Estimate>.
- Select an Estimate Type from the drop-down list (Intermediate, Final, Post Final, or Semi Final).
- Edit the Period End Date for the payment estimate to coincide with the dates of the DWRs to be included on the payment estimate.
- Click <Add Payment Estimate>. Wait for the "Add Payment Estimate Process started at MM/DD/YYYY HH:MM:SS AM/PM" message to appear.
- Click the Contract Progress Payment Estimate quick link located at the top of the screen. Wait for the estimate to be created. Click the browser refresh button if necessary. Sometimes it takes a while for the system to create a payment estimate. The Project Engineer can check the status of a payment estimate by selecting the Process History Overview. Wait for the process to complete (Finish Time). Review the Output Files for errors.
- Use the <Previous> button to return to the Add Contract Payment Estimate component and ensure the estimate has been created.
- Select the Contract Administration quick link.
- On the Contract Administration Summary | Site Times tab, select the site ID hyperlink for the site that liquidated damages are being charged against again (to allow the entry of user generated adjustments).
- On the General tab, Status = Active.
- Click <Save>.
- Click on the Contract Progress quick link.
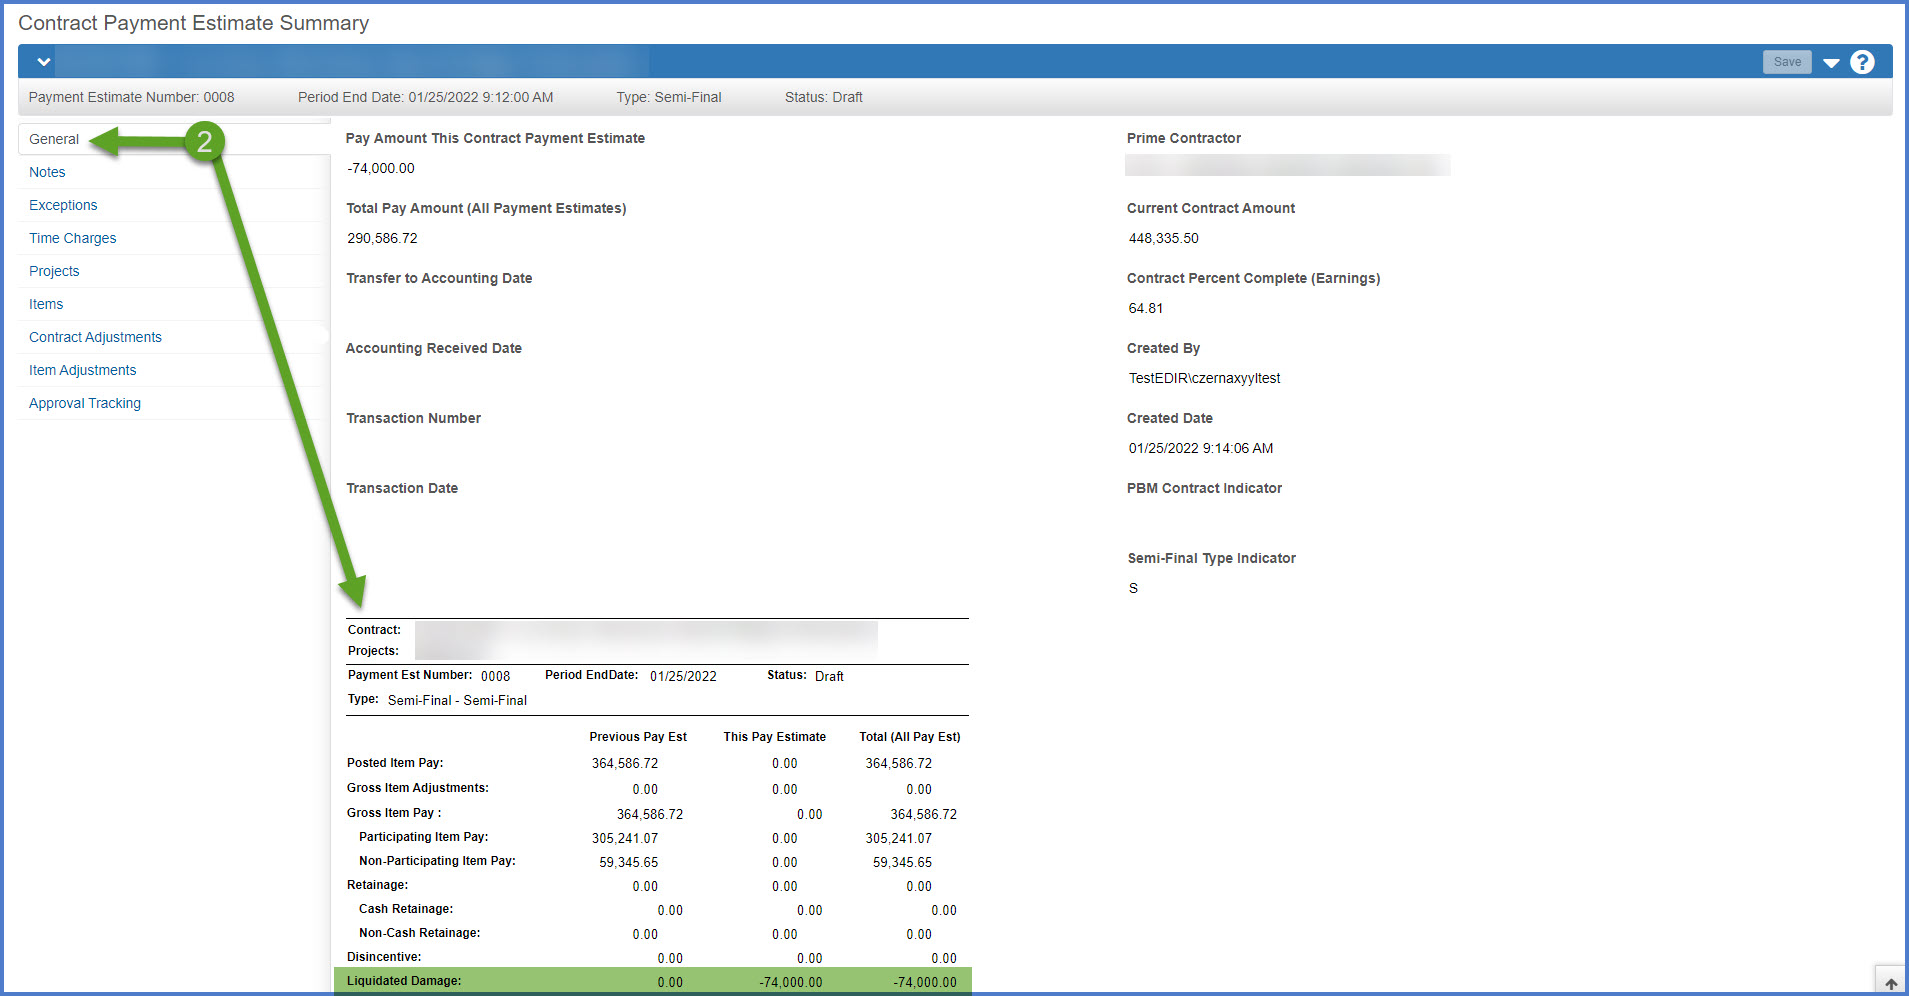
- On the Contract Progress Summary | Payment Estimates tab, click on the Est Num hyperlink for the new draft payment estimate. Note the amount withheld for liquidated damages on the General tab.

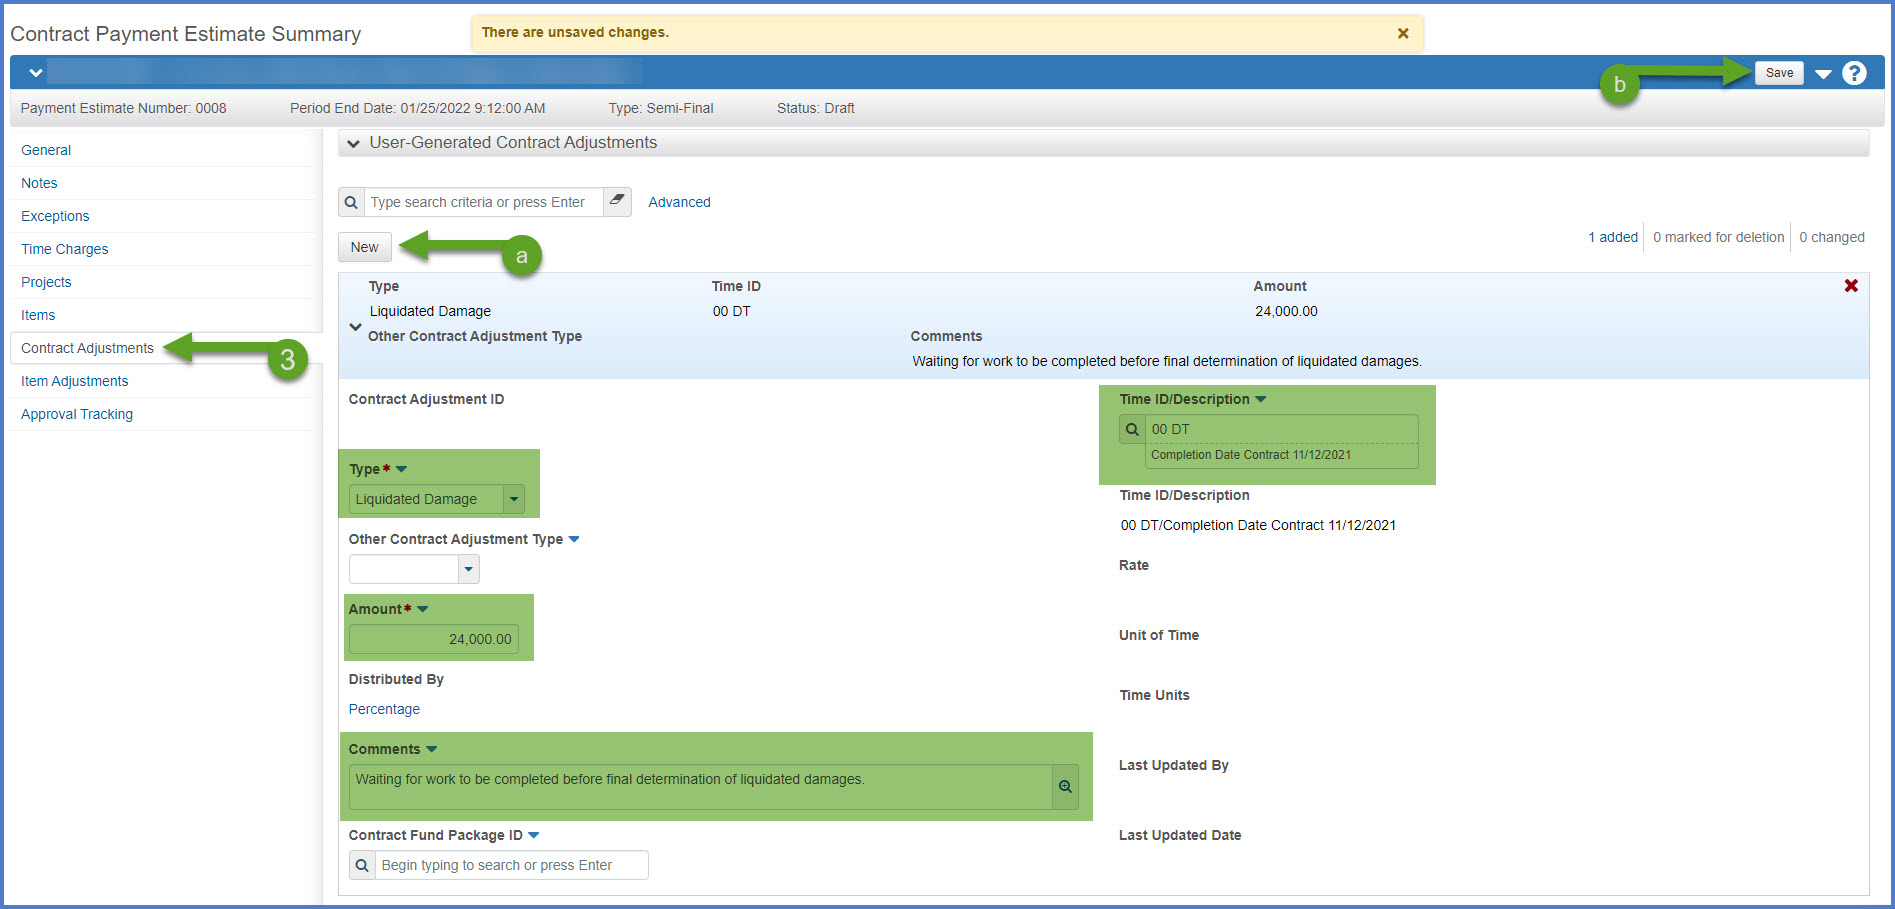
- Select the Contract Adjustments tab to enter the User-Generated Contract Adjustment.
- Expand the User-Generated Contract Adjustments section. Click <New>.
- Enter the required fields (see table below). Click <Save> when complete.

- Enter a negative value to increase the total amount of liquidated damages.
OR - Enter a positive value to decrease the total amount of liquidated damages.
Field Description Type Select Liquidated Damages to offset on the main or interim sites. Amount Calculate the liquidated damages based on the number of days and liquidated damages rate for the site.
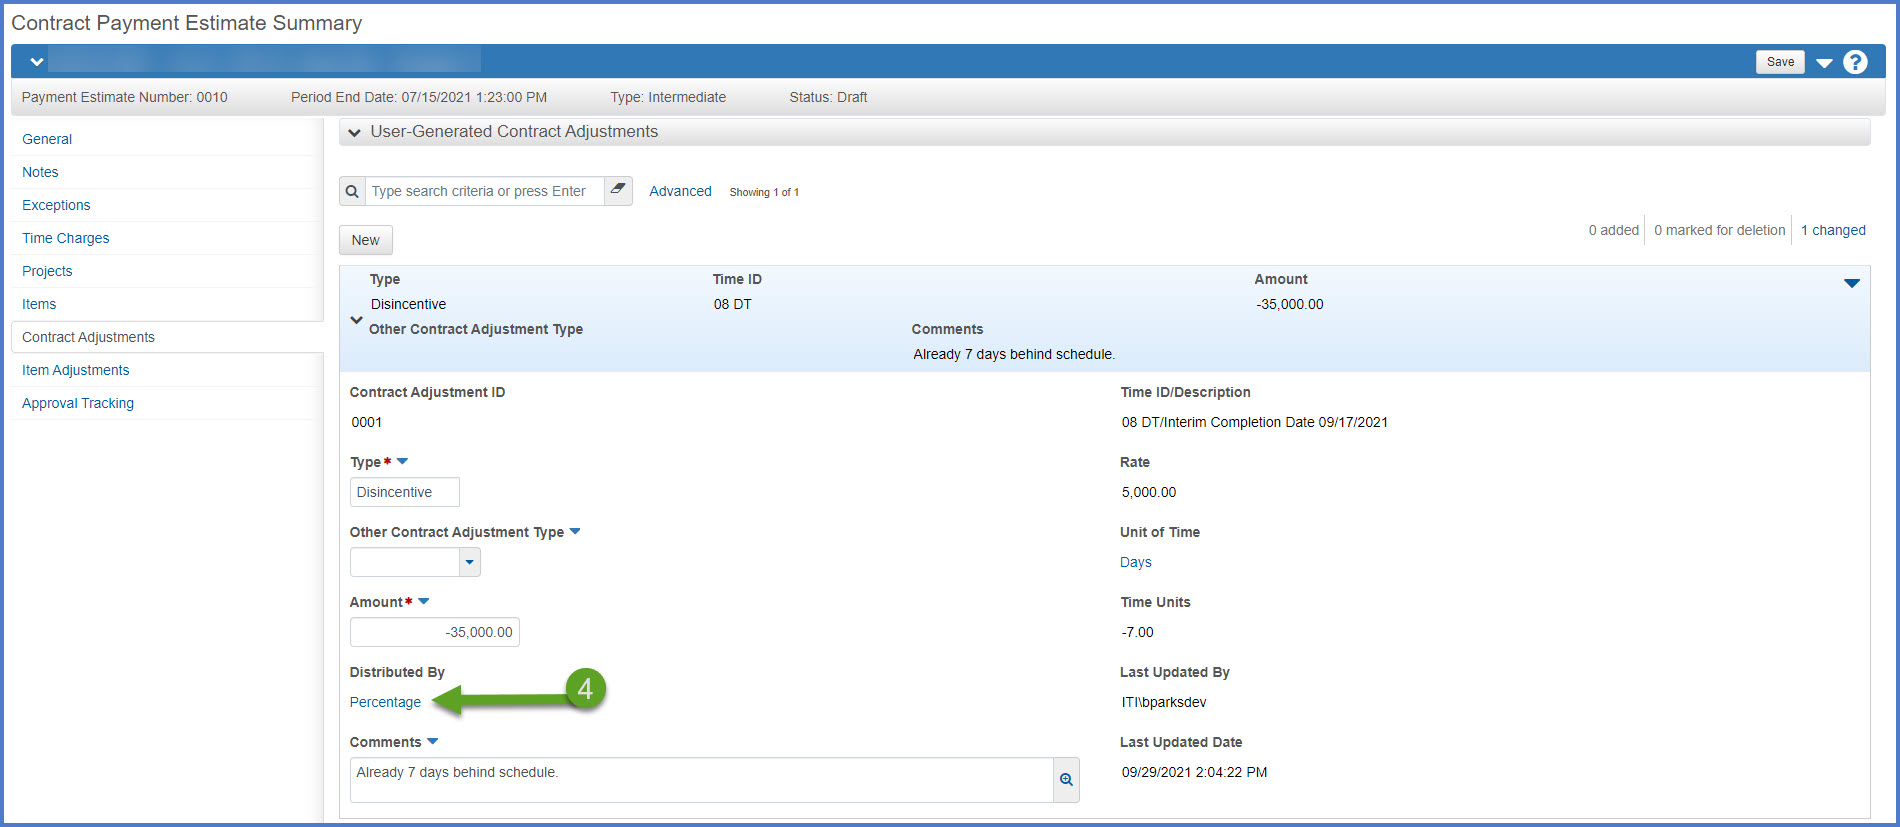
Comments Comments explaining the reason an user generated contract adjustment was created are required for this payment estimate. Time ID / Description Select the Time ID for the site that liquidated damages are being charged against. - On the new User-Generated Contract Adjustments record, select the Percentage hyperlink under "Distributed by".

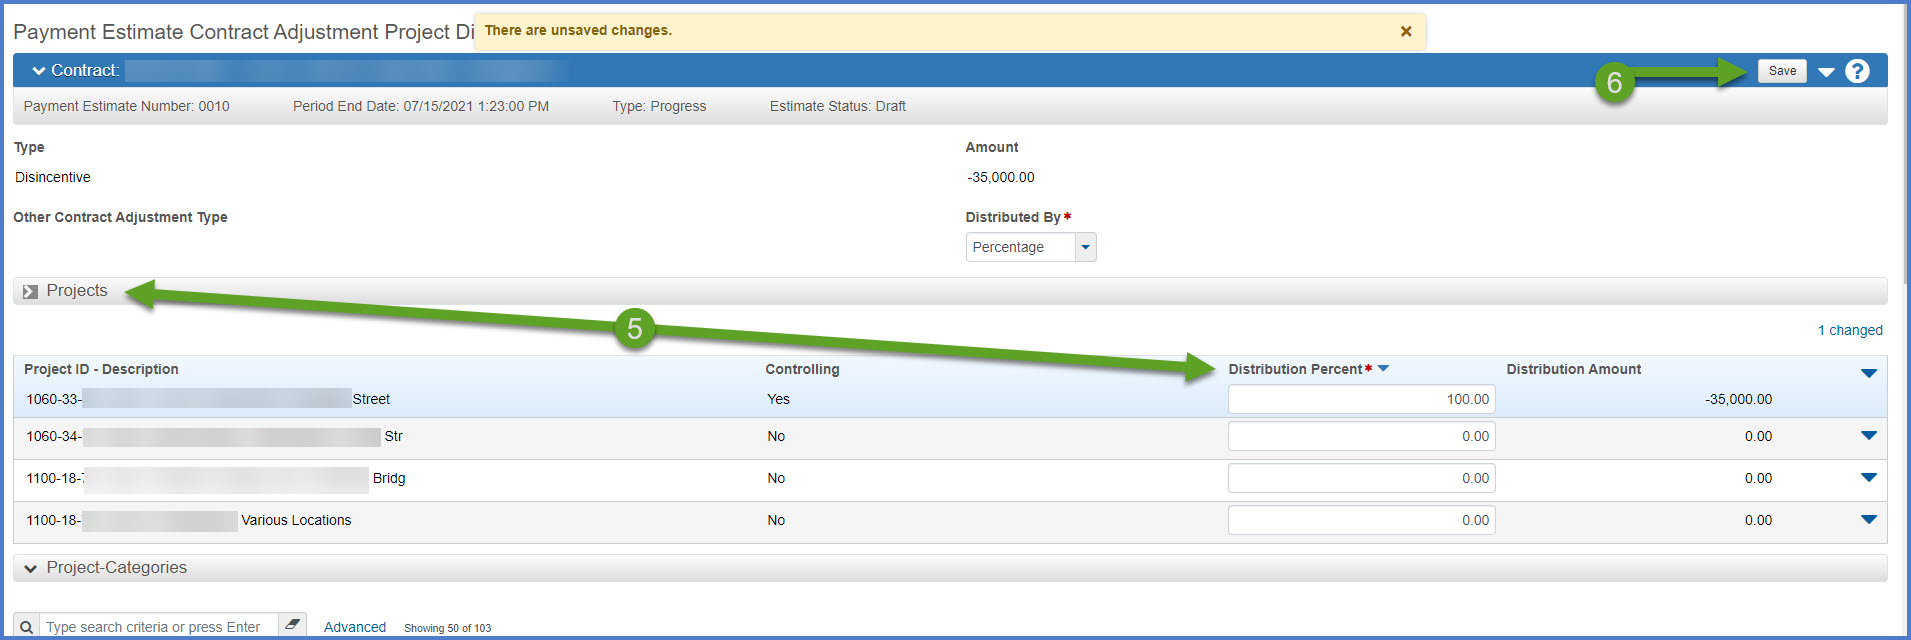
- On the Payment Estimate Contract Adjustment Project Distribution Summary component, under the Projects section, redistribute the liquidated damages to the correct project(s) that work has been completed on by entering the Distribution Percent for each project.
- Click <Save>.

- Click the Previous button to return to the Contract Payment Estimate Summary component and complete the steps below for the payment estimate.
- General tab - confirm the payment estimate amounts are correct including the total amount for liquidated damages.
- Notes tab - enter the required payment estimate notes.
- Enter the date range of work completed is this a requirement of the Bureau of Financial Management.
- In addition, the project engineer's name, contact number and any additional comments may be entered.
- Click <Save>.
- Exceptions tab - review for any payment estimate exceptions requiring action.
- Time Charges tab - ensure the correct number of days were charged for Working Day sites.
- Projects tab - Confirm the voucher pay amounts are correct.
- Items tab - Review item postings that are part of this payment estimate.
- Submit the payment estimate for approval by following the Payment Estimate Approval Process (steps for the Project Engineer).
Requirement: Continue to follow these steps if liquidated damages are accessed on future estimates by entering the incremental liquidated damages amount on future payment estimates.